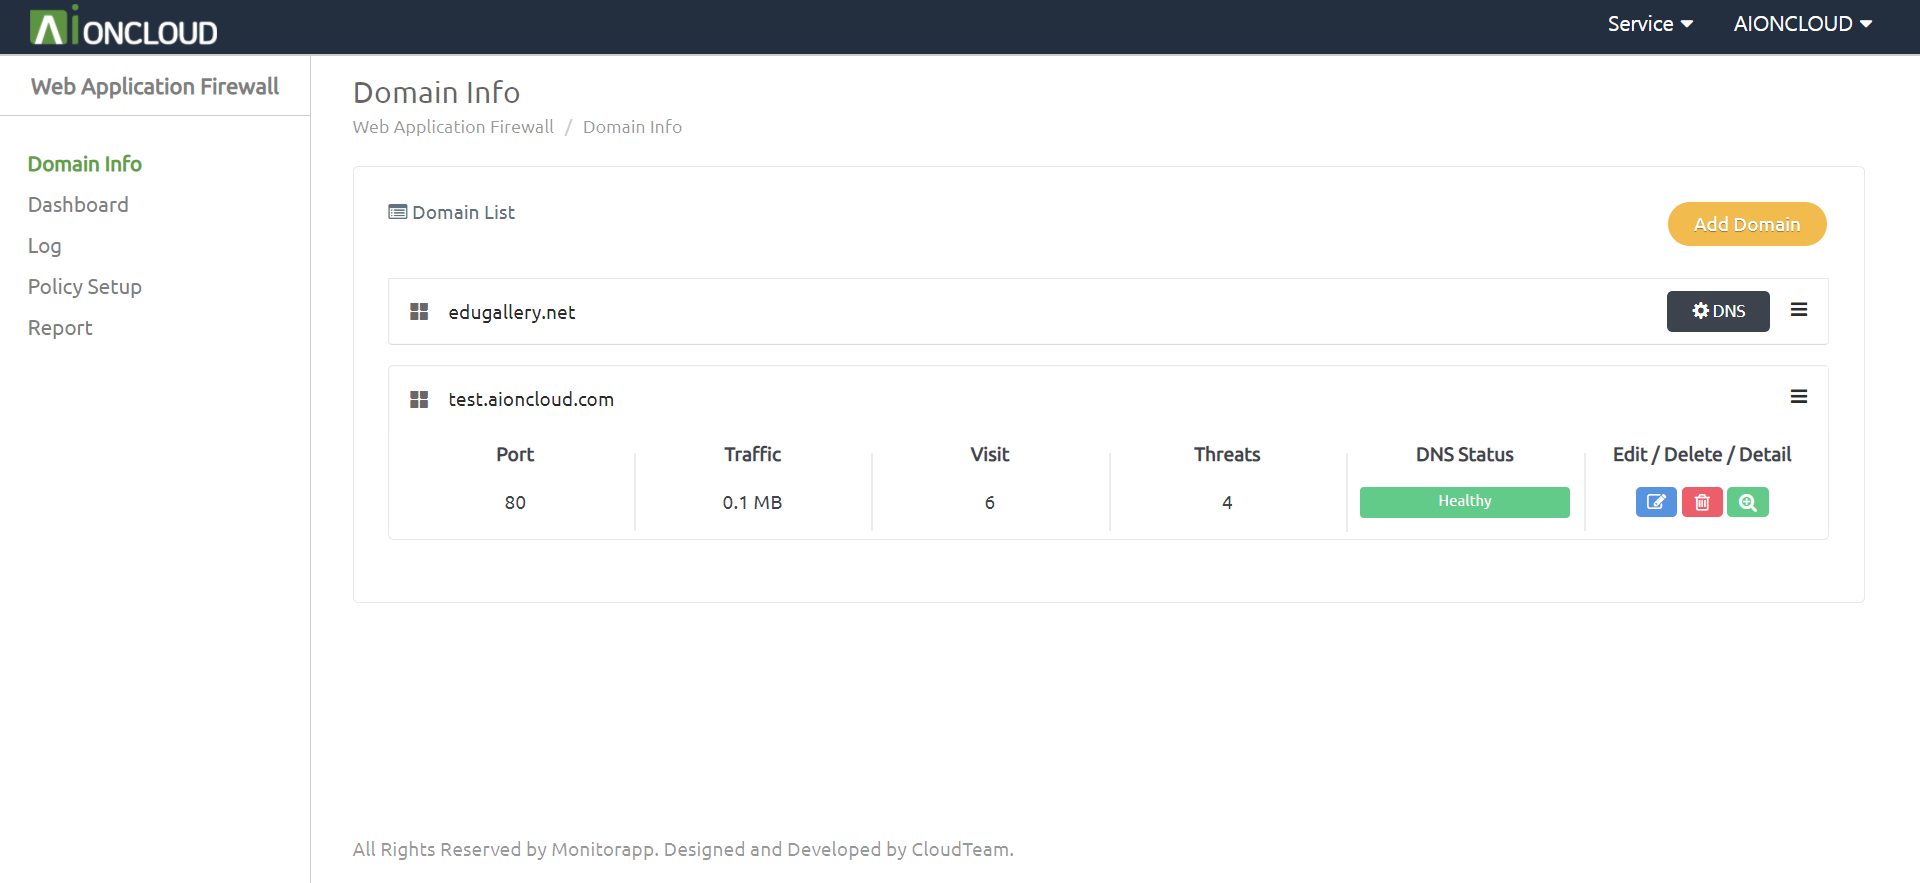
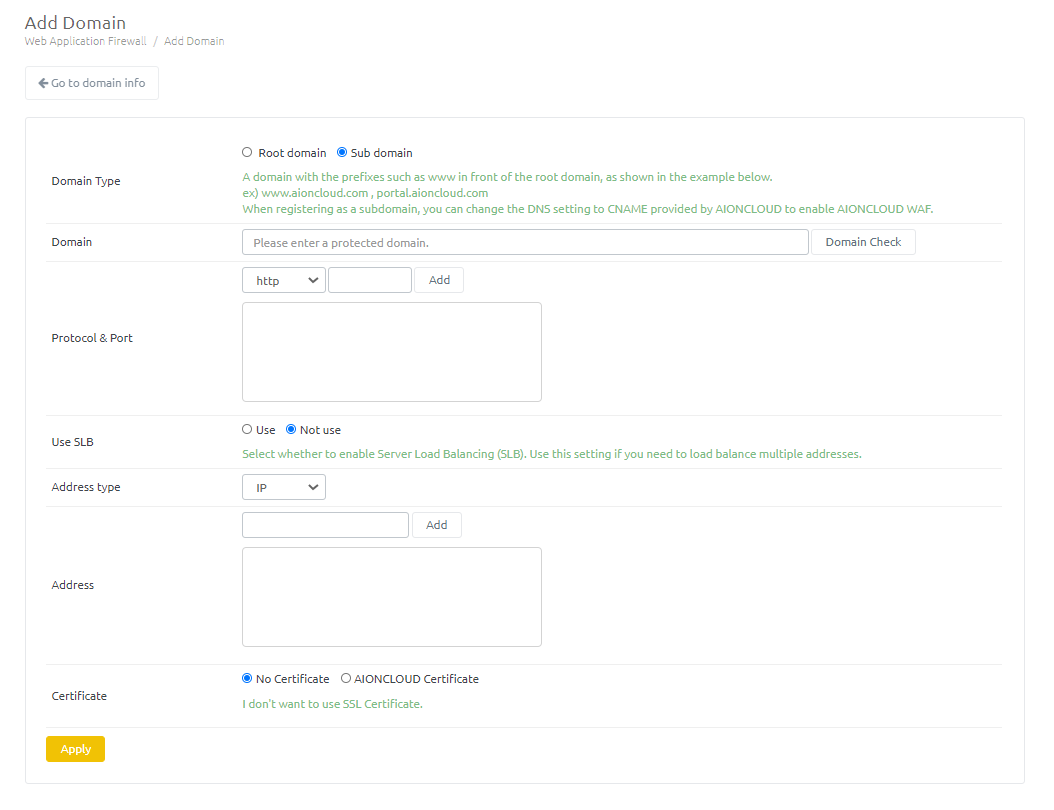
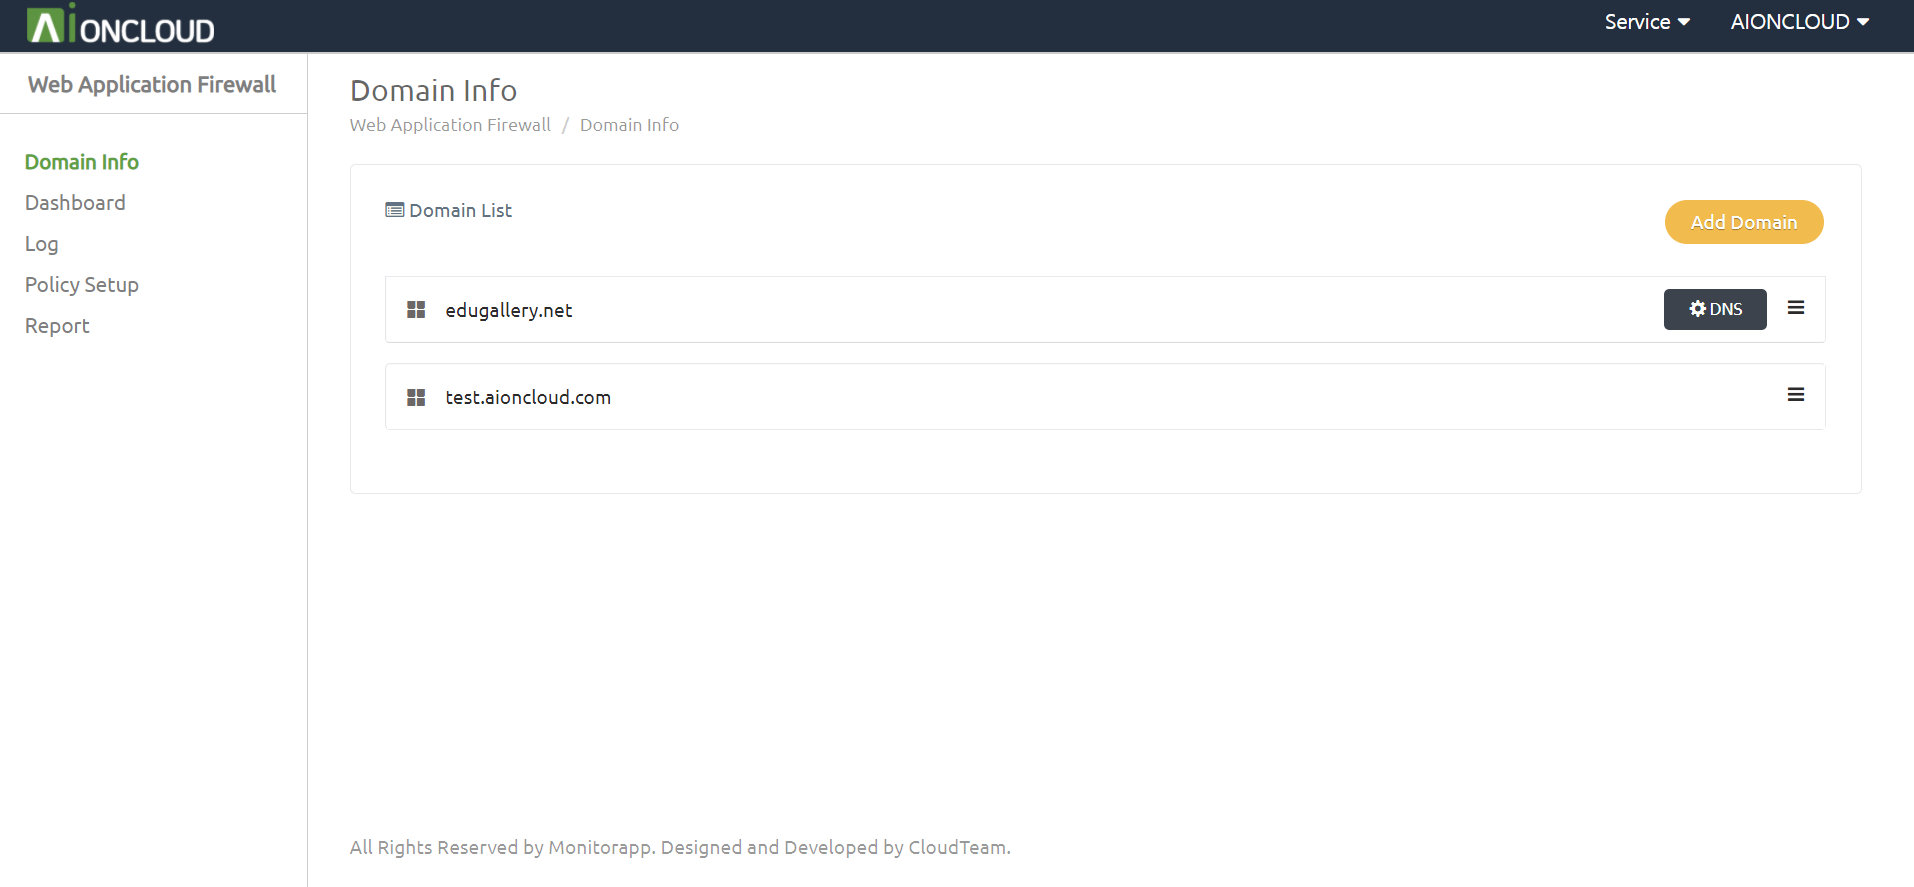
Click “Add Domain” in the Domain info menu to register the target domain.
Enter the domain information and click the Apply button. - Domain type : Select whether the domain is the root domain or a subdomain. - Domain : Enter the domain and click the 'Domain Check' button to perform the domain check. - Protocol & Port : Adds the protocol and port information in use on the server. - Use SLB : Select whether to enable the Server-side load balancing (SLB) feature. - Address type : Select Origin address information of protected server is IP type or CNAME type is recognized. - Address : Add origin server address. - Certificate : If you use HTTPS, upload the certificate file you are using. When selecting AIONCLOUD certificates, you will use certificates issued by Let's Encrypt.
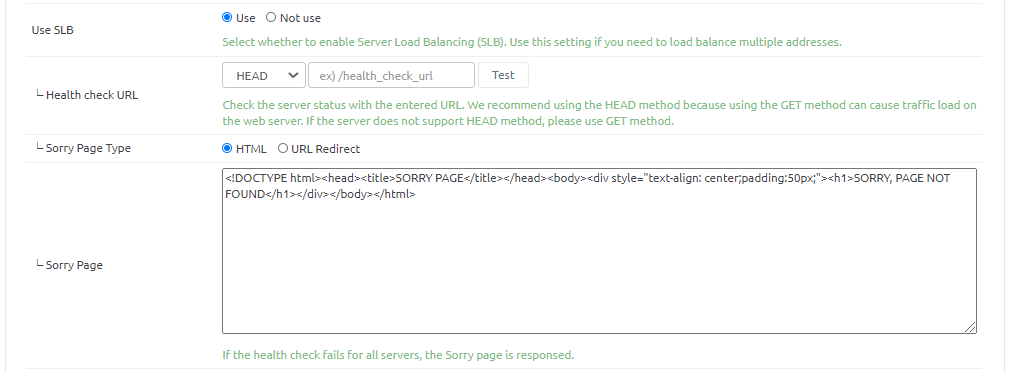
Use SLB - Health check URL : Enter the URL information to use when checking the health of the server. You must click the Test button to verify that it is checked properly. - Sorry Page Type : Select the type of Sorry page that will be responded to the client in the event of a failed health check on all servers. You can type the page directly into HTML or redirect it to another URL. - Sorry page : Enter HTML when selecting HTML, or URL to redirect when selecting URL.
When a client accesses the www.aaa.com domain through a browser, the DNS server queries for the domain's access path.
If the host DNS setting is set to A record, the DNS server checks the public IP address of the matching web server and connects to the corresponding path.
Host DNS setting of AIONCLOUD service uses Cname method. The host's Cname is managed by the AIONCLOUD, and the IP that matches the Cname is the WAF IP.
DNS failover is automatically applied when there is a problem in the WAF. The IP that matches the Cname is changed to the webserver public IP of the domain so the client can use the web service without any trouble.
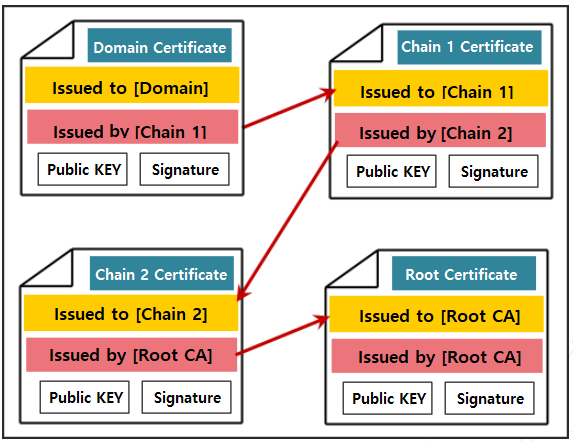
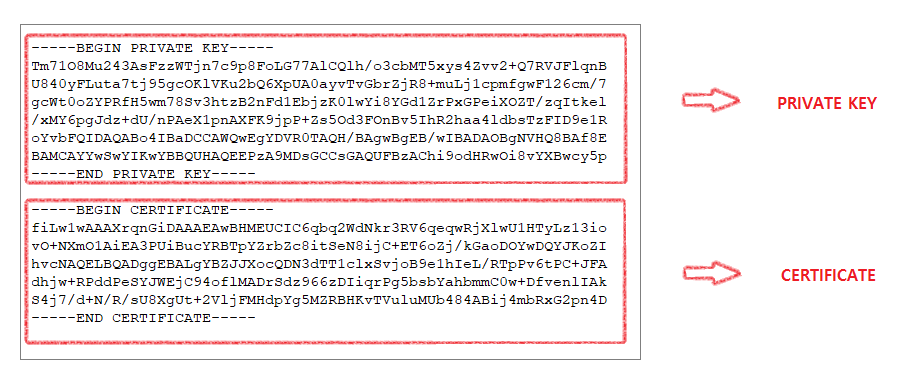
Certificate Form
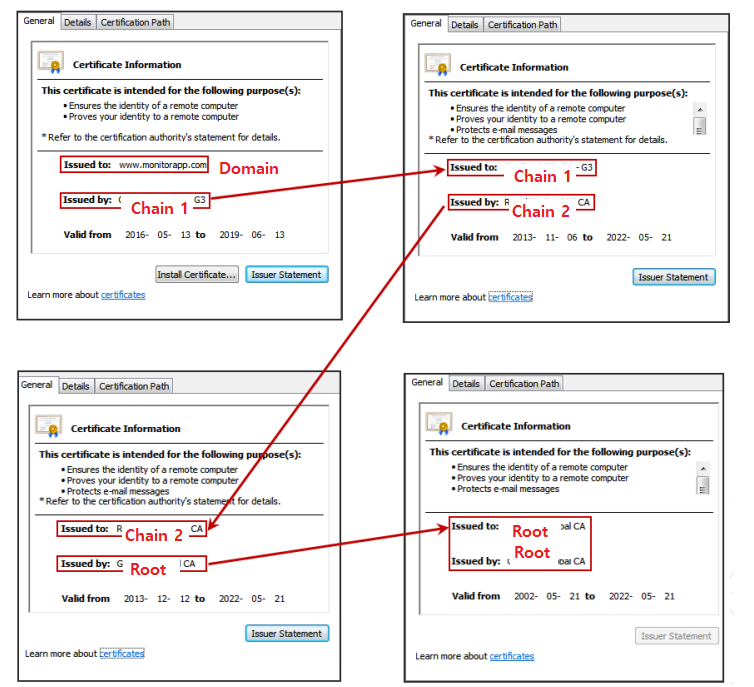
- The domain certificate receives signature verification from the upper chain certification authority, the chain certificate receives signature verification from the root authority, and the top level root certificate performs signature verification by itself. Chain certificates may not exist for each domain or may be plural.
- If there is no chain certification authority, the root can directly verify the signature on the domain certificate, or in the case of a private domain certificate, the domain certificate can verify itself.
Certificate Signing Example
Convert to PEM format(Use Openssl Command).
※In order to register the certificate of the web server to the web firewall during conversion, the form of the certificate must be converted.
If the private key is encrypted, the password must be verified and an additional process for decryption occurs.
| extension | command (UNIX/LINUX standard) |
|---|---|
| pfx | openssl pkcs12 -in filename.pfx -out filename.pem –nodes |
| p7b | openssl pkcs7 –inform der –in filename.p7b –print_certs –text –out filename.pem |
| p7b(Verisign certificate) | openssl pkcs7 -print_certs -in filename.p7b -out filename.pem |
Open the PEM file and extract the <CERIFICATE> part.
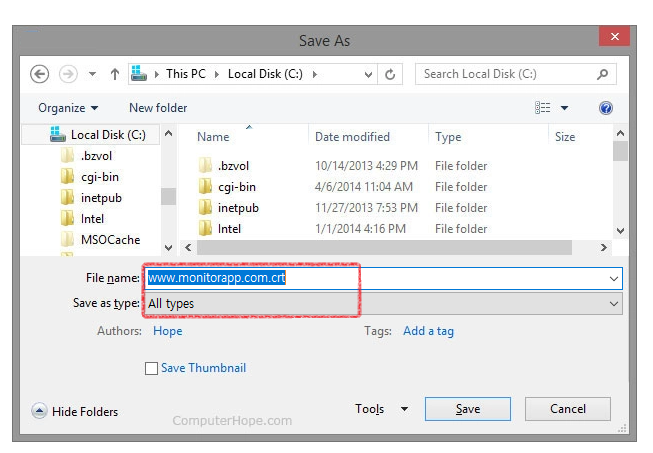
Open the text file, sort in order, and save
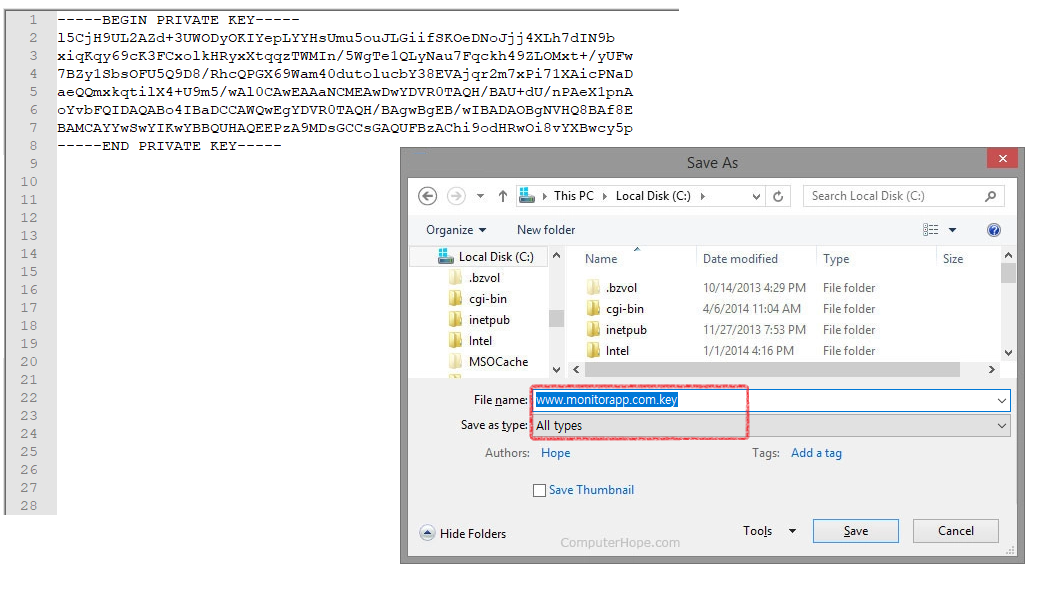
Create private key file
※ If you don't have the private key in the PEM file, get a private key from the server.
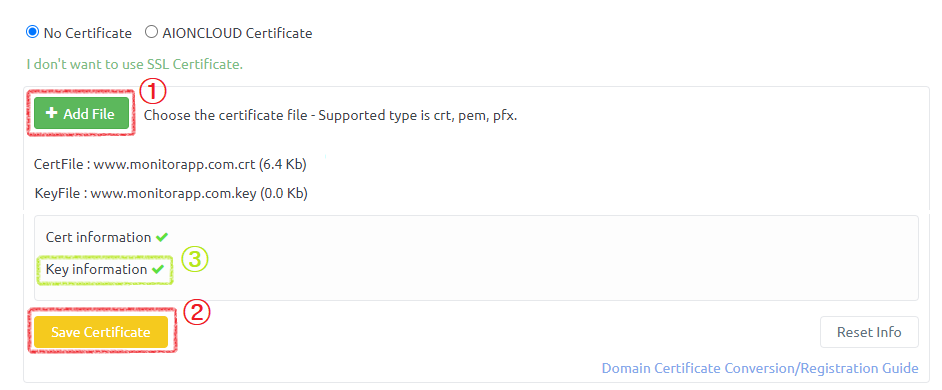
CertificateRegistration
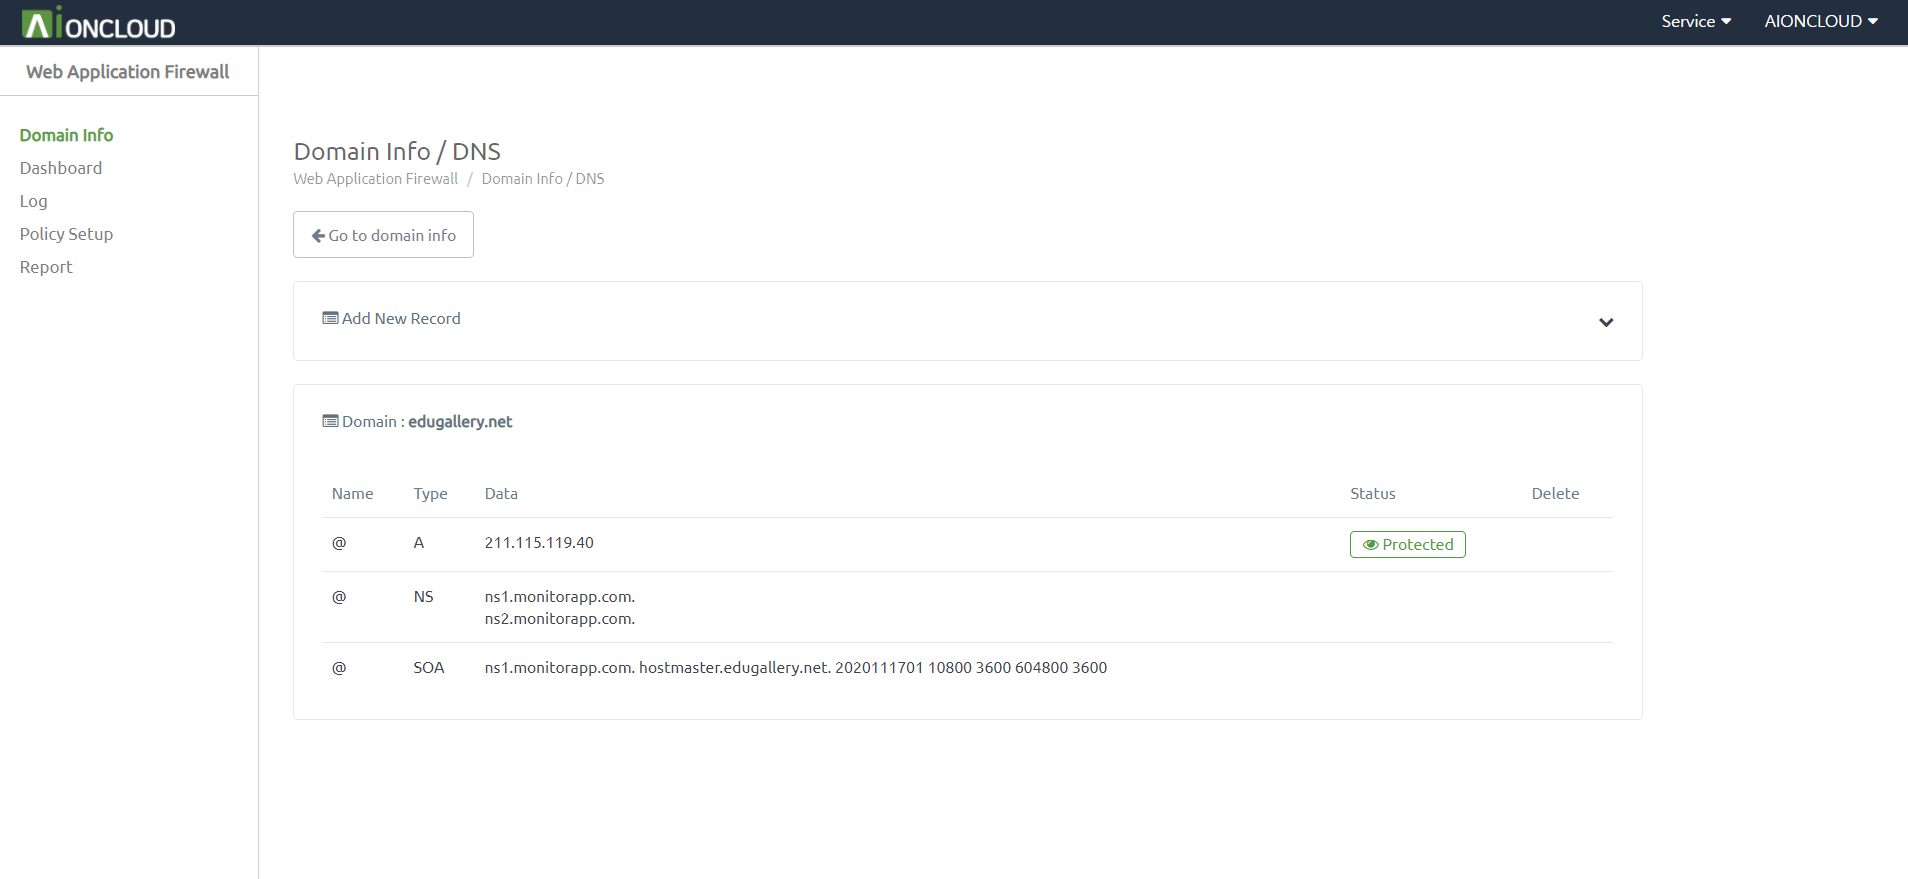
Check for the presented NameServer Record in the DNS menu.
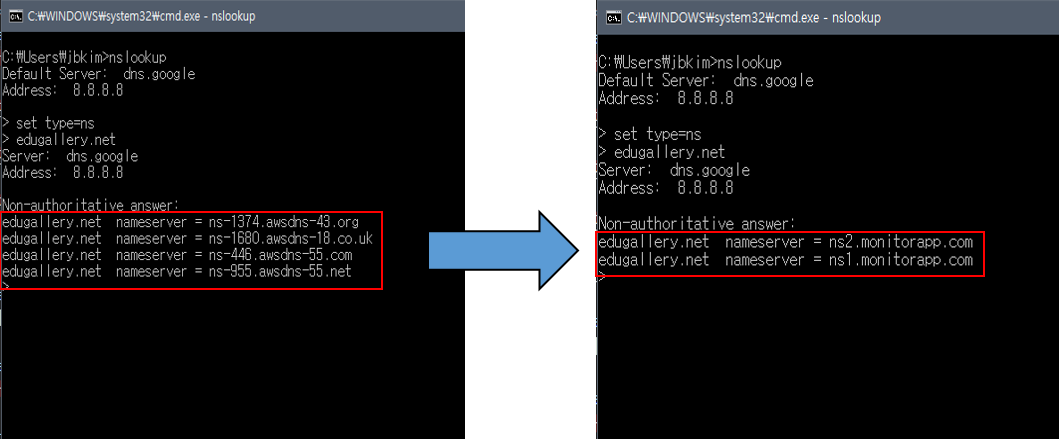
NameServer changing differs on the hosting service. Refer to the DNS Record-setting guide from each hosting service. GoDaddy: https://www.godaddy.com/help/change-an-a-record-19239 HostGator: https://www.hostgator.com/help/article/how-do-i-change-my-dns-or-name-servers Wix: https://support.wix.com/en/article/adding-dns-records-in-your-wix-account
Check if the NameServer has altered correctly by inquiring Lookup.
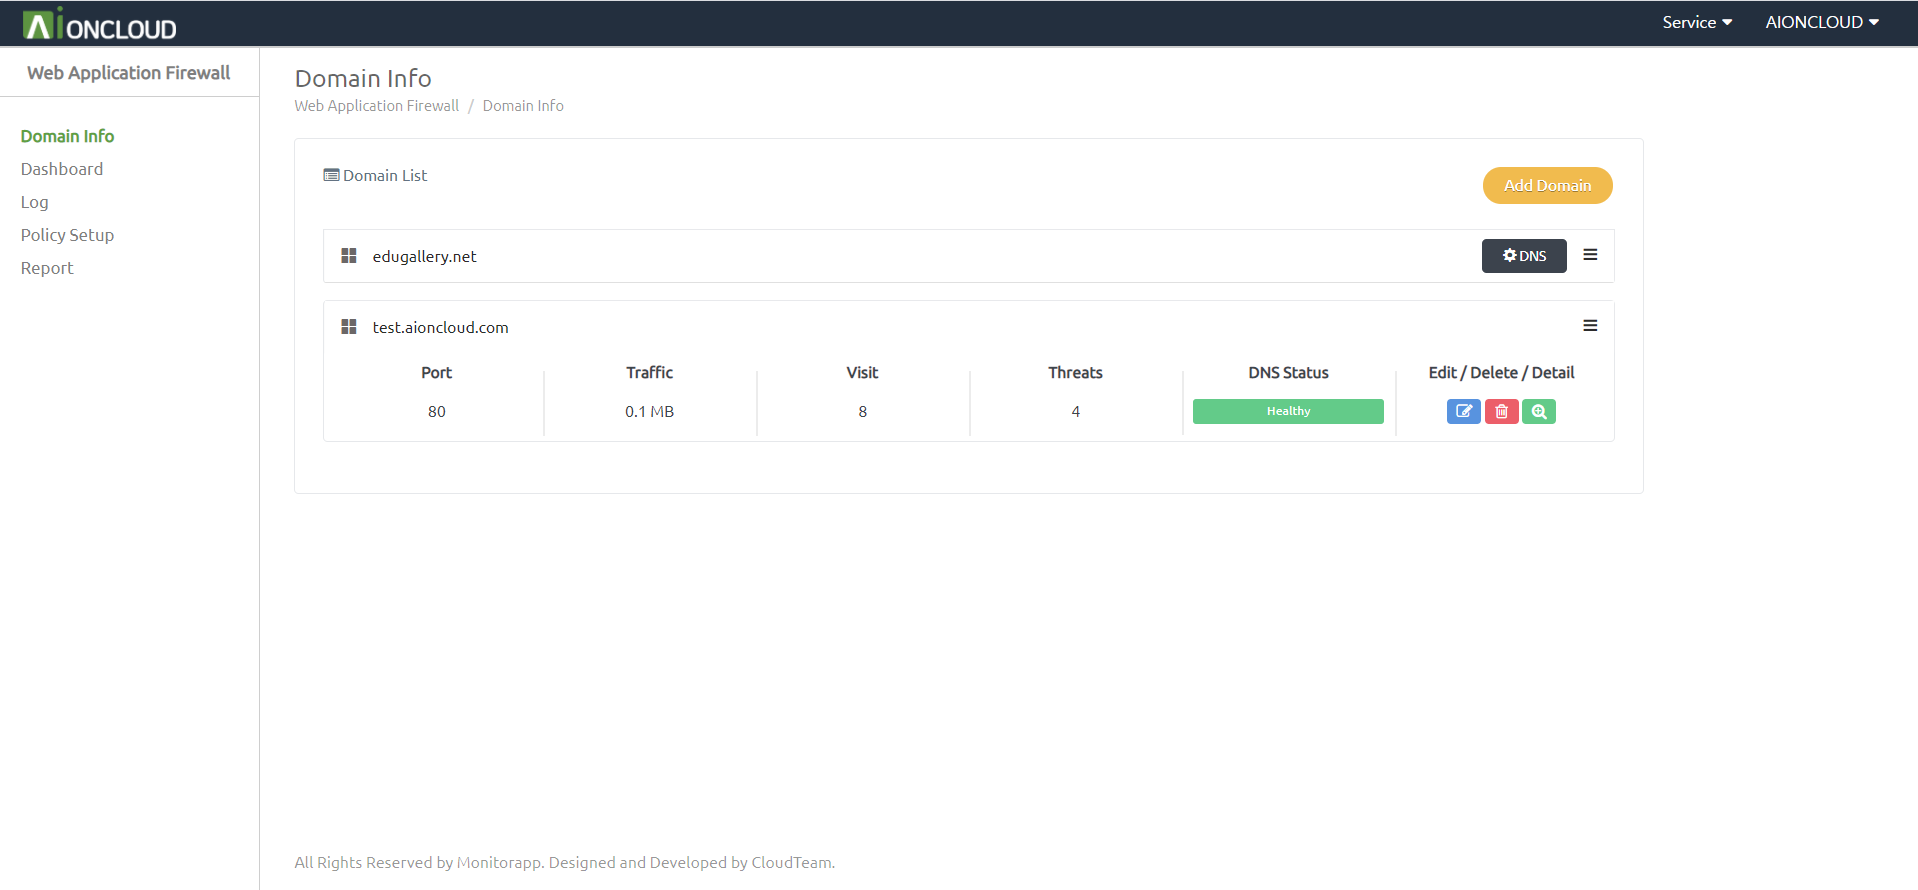
Refresh in the domain list after checking the alteration.
Check for the presented DNS(Cname) Record in the “Detail” of the Domain list.
Access public cloud GSLB interface.
Change the existing DNS record-setting in the webserver to AIONCLOUD Cname.
Below example is AWS Route 53 GSLB interface. Interface can differ on GSLB service.
Check if the DNS has altered correctly by inquiring Lookup Changing. The DNS will be applied differently on the TTL setting.
Refresh in the domain list after checking the alteration.
Check for the presented DNS(Cname) Record in the “Detail” of the Domain list.
DNS Record-setting differs on the hosting service. Refer to the DNS Record-setting guide from each hosting service. - Gabia DNS Record-setting https://customer.gabia.com/manuals/detail_pop.php?seq_no=2711 - Whois DNS Record-setting http://cs.whois.co.kr/manual/?p=view&page=1&number=434 - Cafe24 DNS Record-setting https://help.cafe24.com/cs/cs_faq_view.php?idx=438&page=1
Check if the DNS has altered correctly by inquiring Lookup.
Refresh in the domain list after checking the alteration.
Check for the presented DNS(Cname) Record in “Detail” of Domain list.
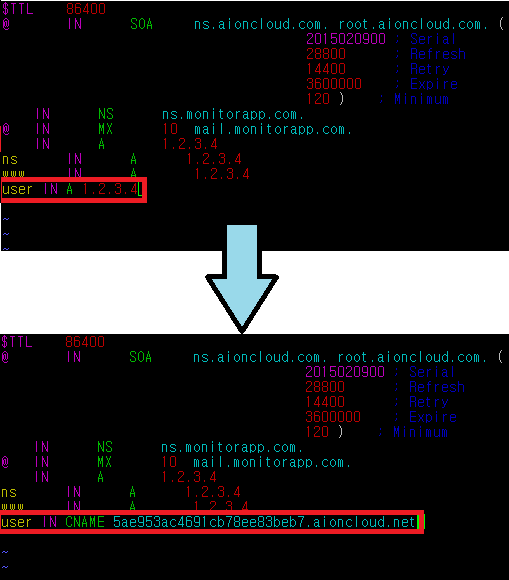
Alter the Zone file in the Name Server Daemon using Vi tool.
Change the existing DNS record setting in the webserver to AIONCLOUD Cname. - ※ Below example is BIND(Berkeley Internet Name Domain) daemon. DNS Record setting differs on the Name Server Daemon.
Check if the DNS has altered correctly by inquiring Lookup.
Refresh in the domain list after checking the alteration.
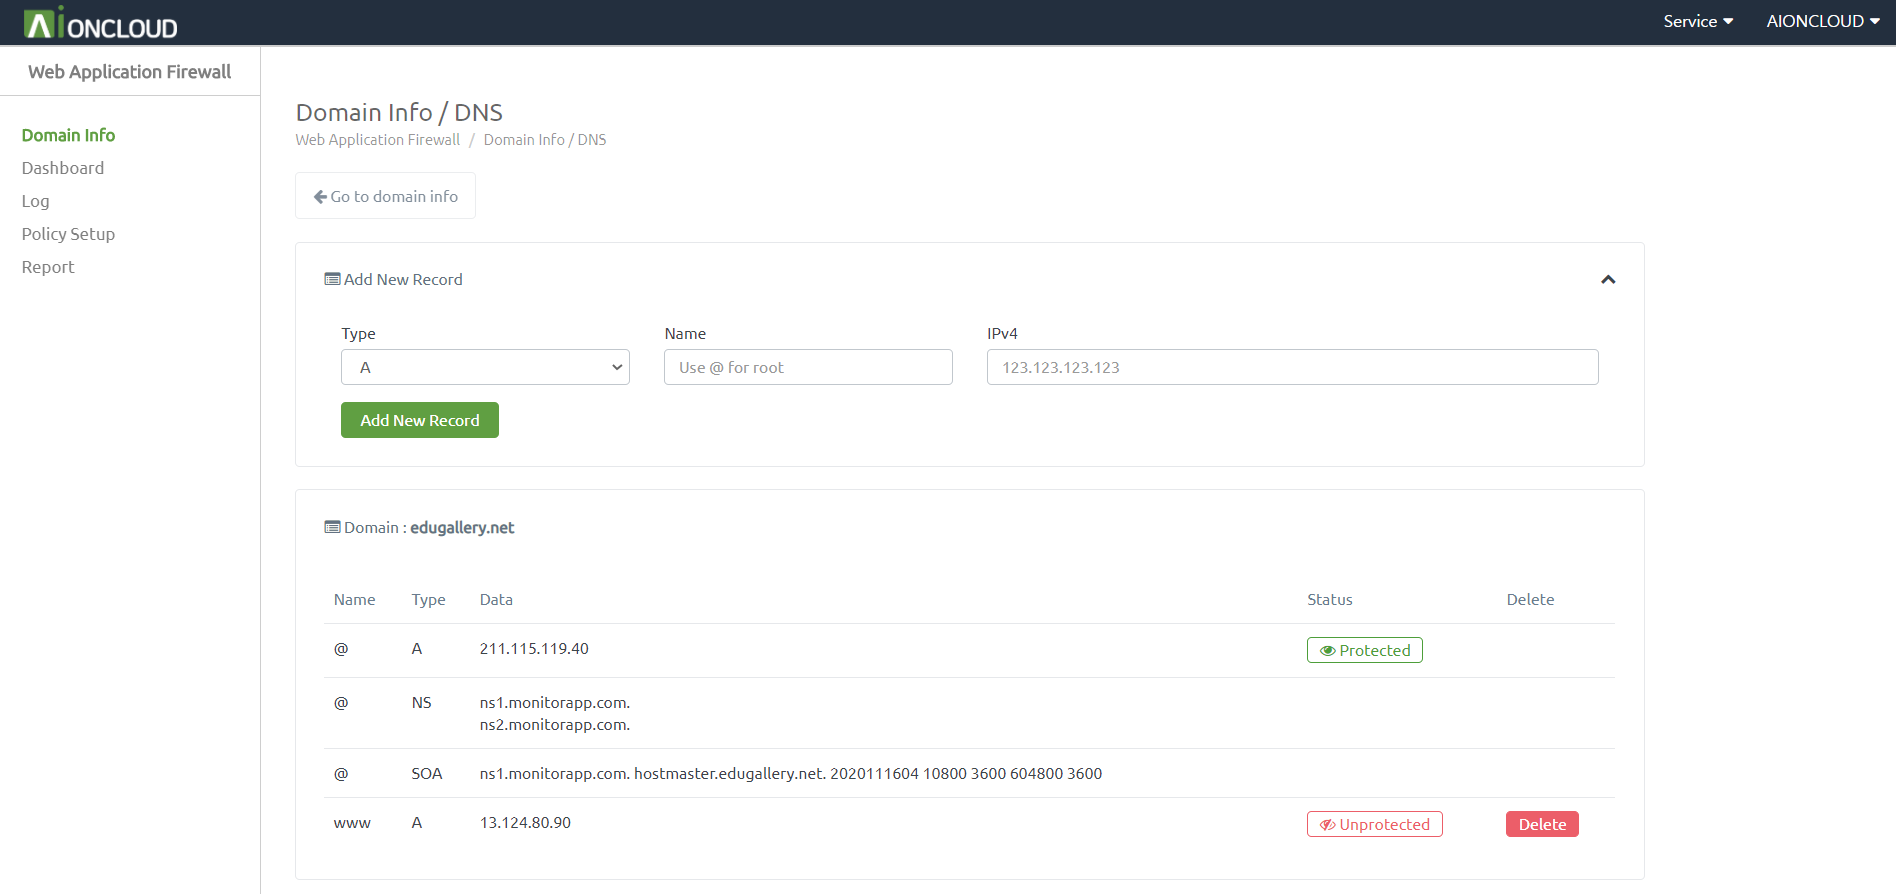
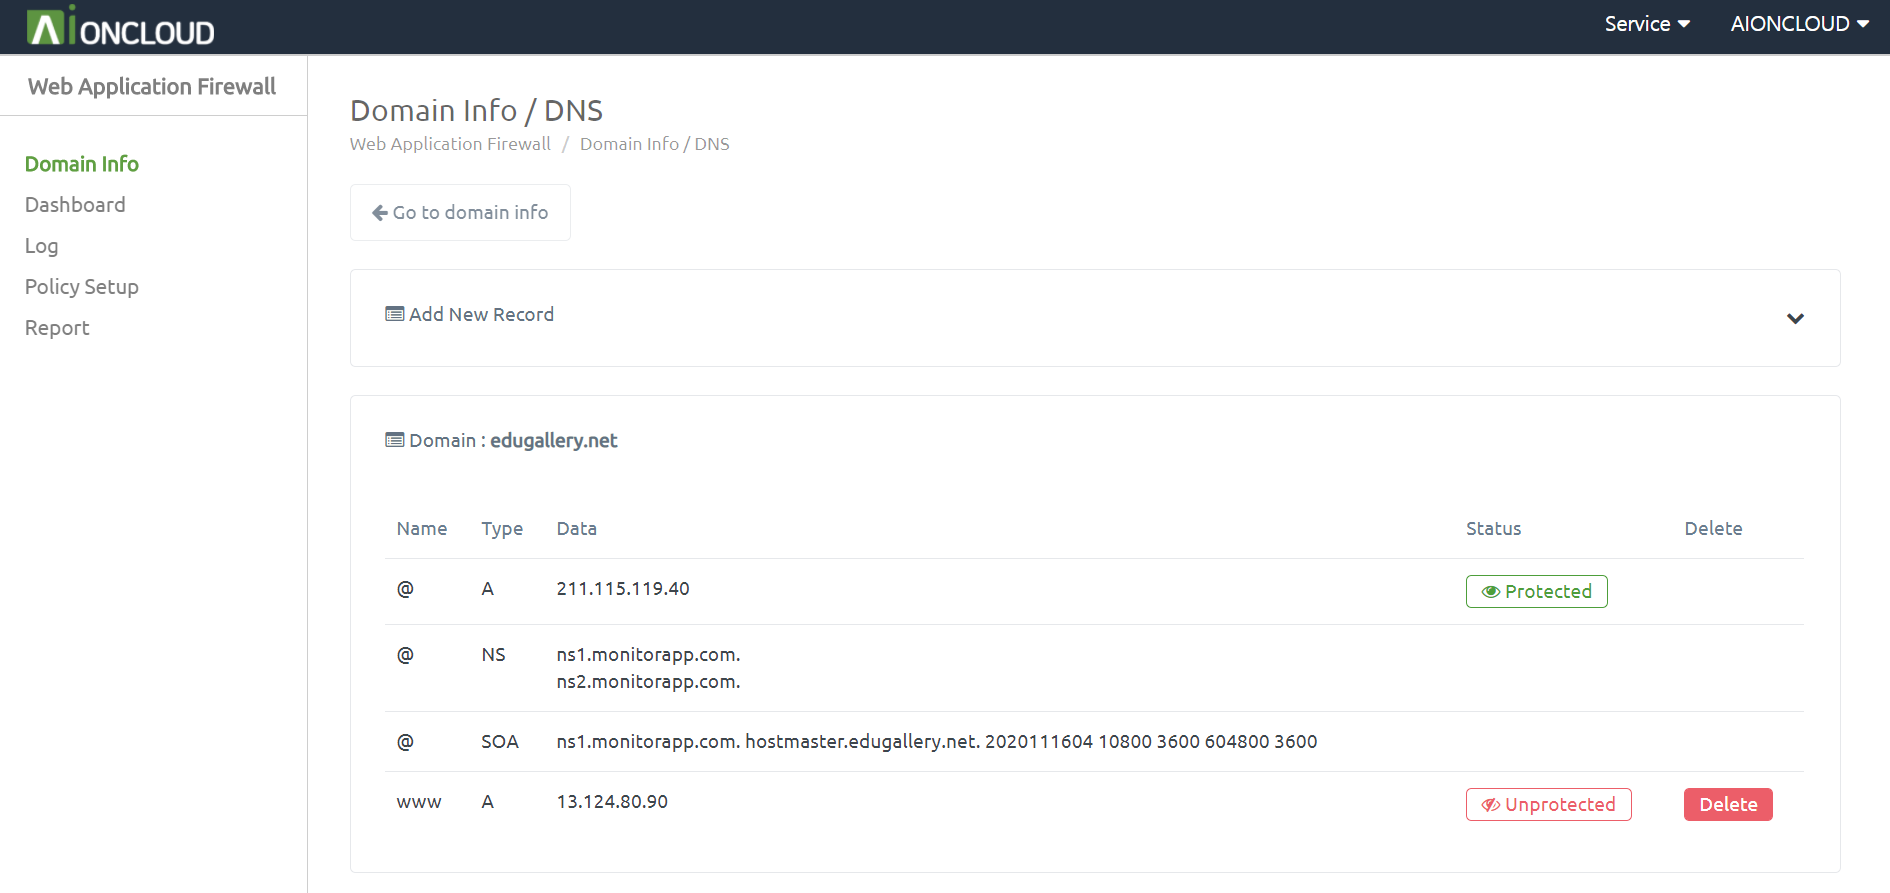
You can check the DNS menu by clicking the "DNS" button in Domain Info.
You can add a record by clicking the "Add New Record" button. - Appendable Record : A, AAAA, CNAME, CAA, LOC, MX, PTR, SPF, SRV, TXT
You can register AIONCLOUD WAF by clicking the "Unprotected" button. After registration, it changes to "Protected".
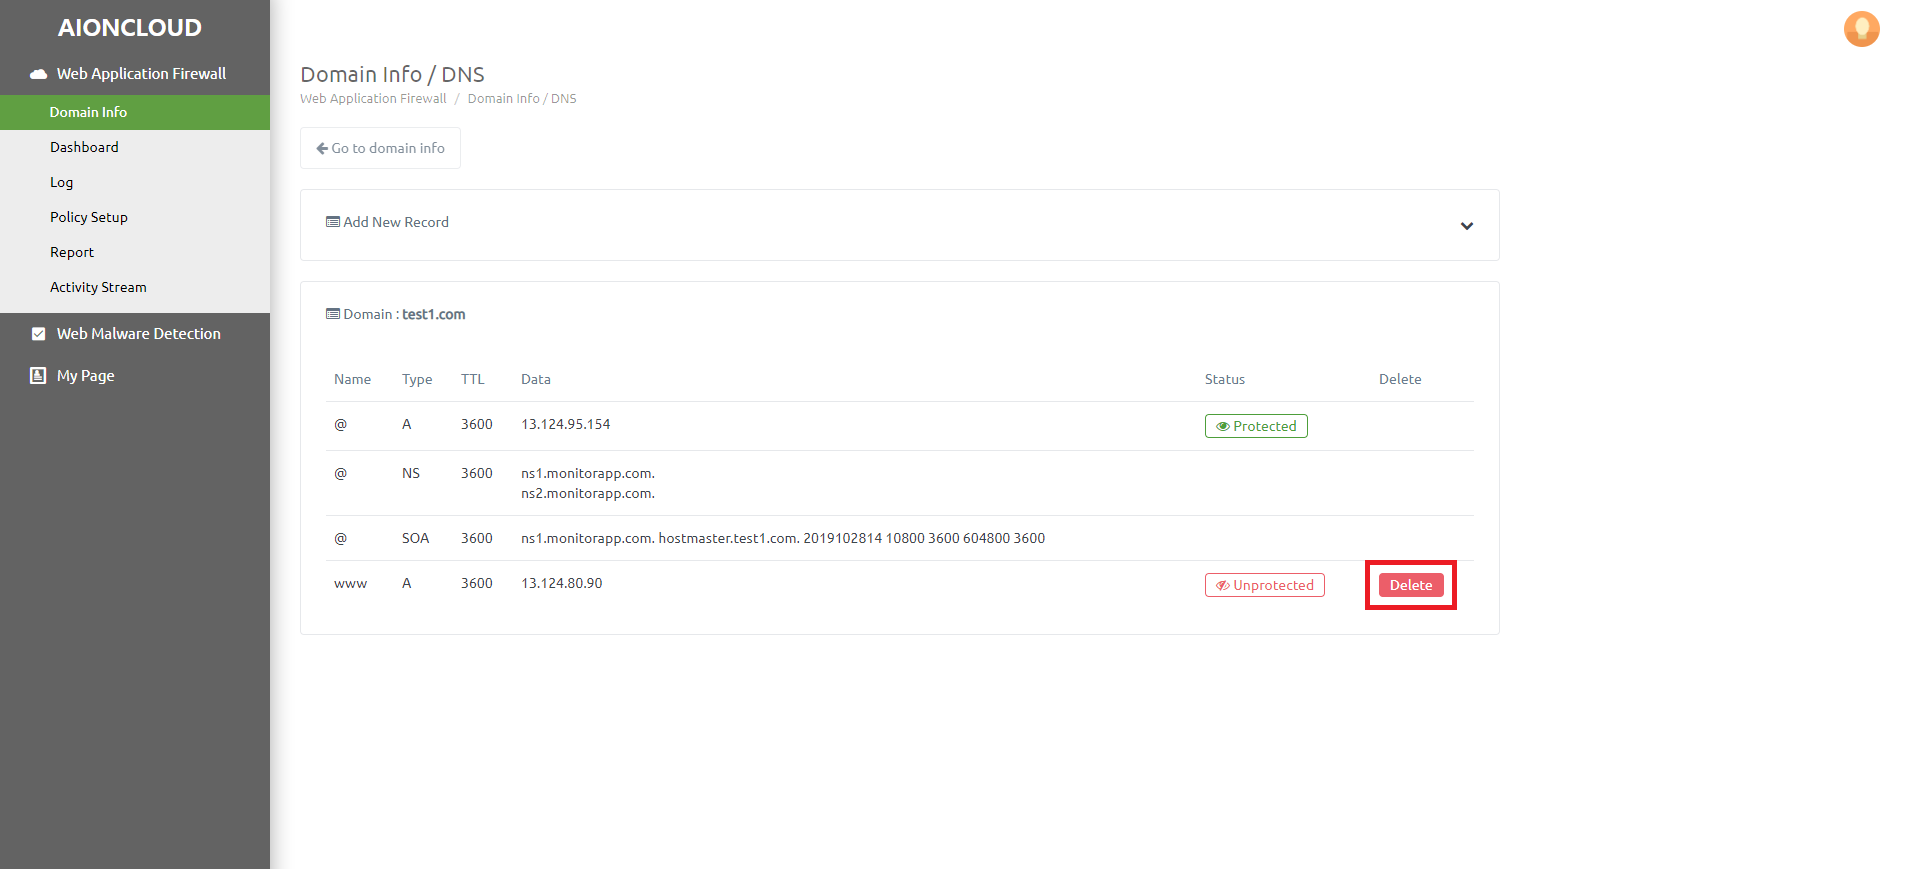
You can delete a record by clicking the "Delete" button.
You can't delete a record if it's a "Protected" state.
You can delete the record after entering the unprotected state by deleting the domain in "Domain info".
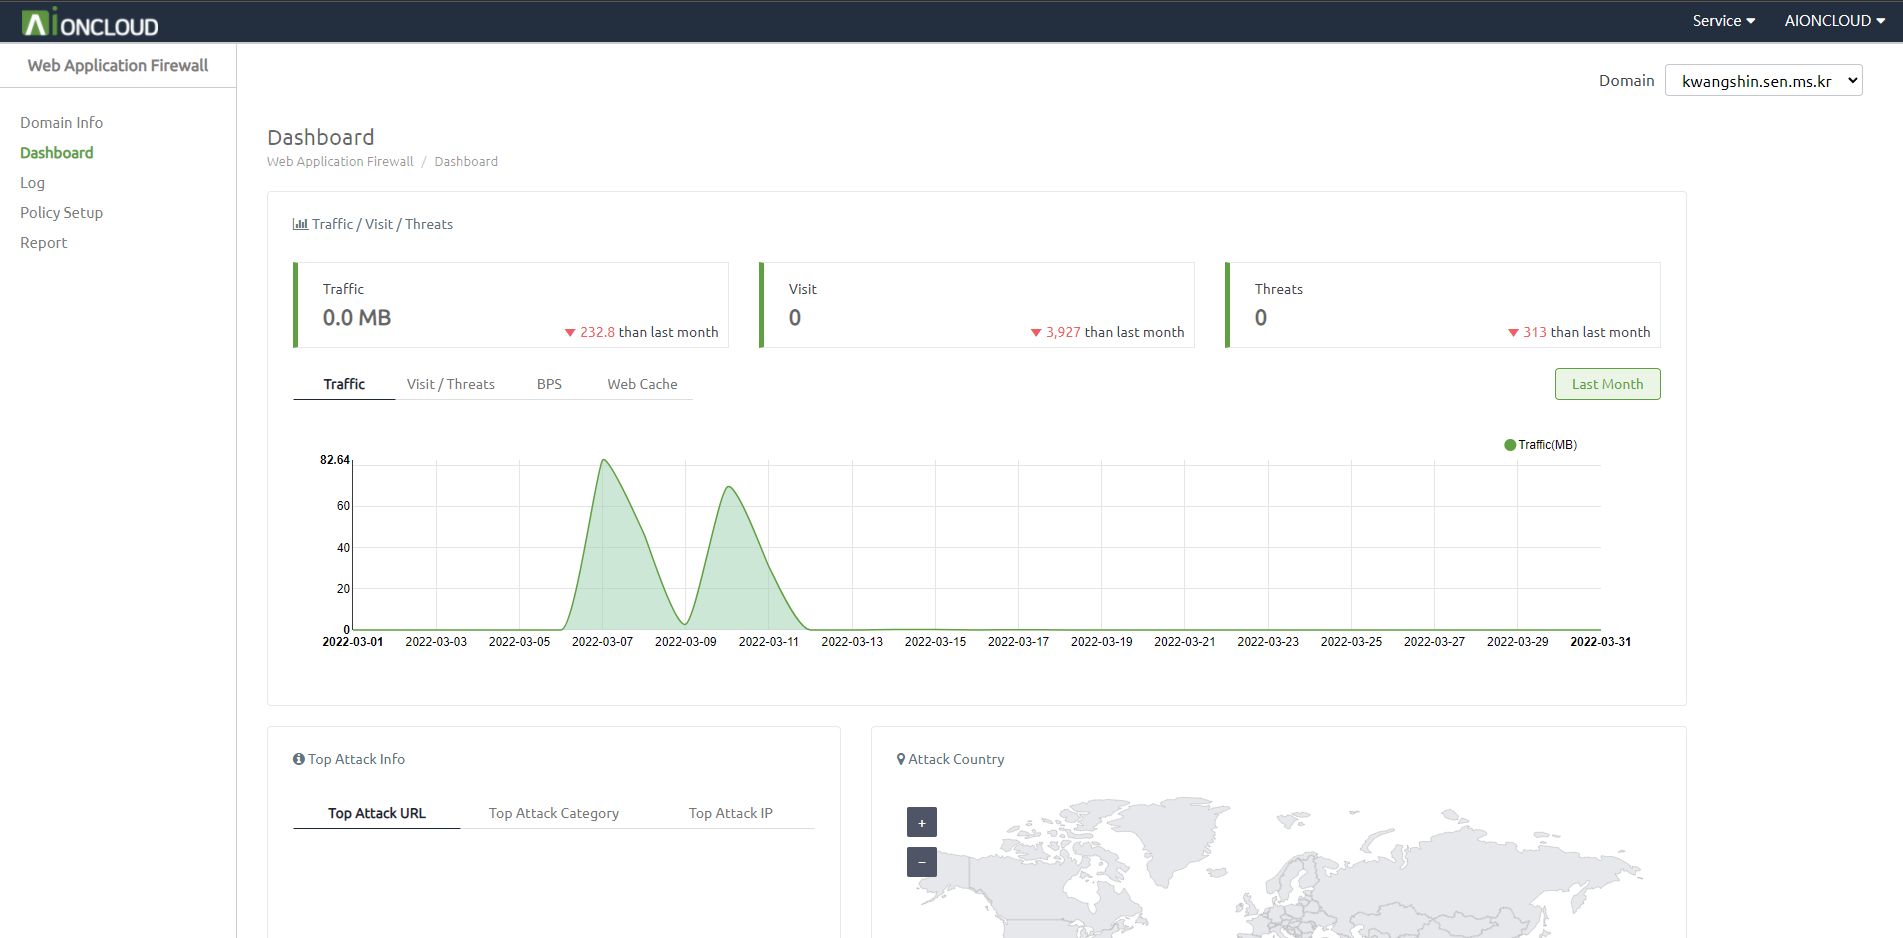
In the dashboard menu, you can see figures such as traffic, number of visitors/threats, BPS, web cache hit rate and more against data from last month.
You can check the graph of the last month by clicking the 'Last Month' button.
You can view information such as URLs, policies, and attacker IPs with the highest number of searches. You can also see the number of attacks by country on a map and click on a country to add it to the blacklist.
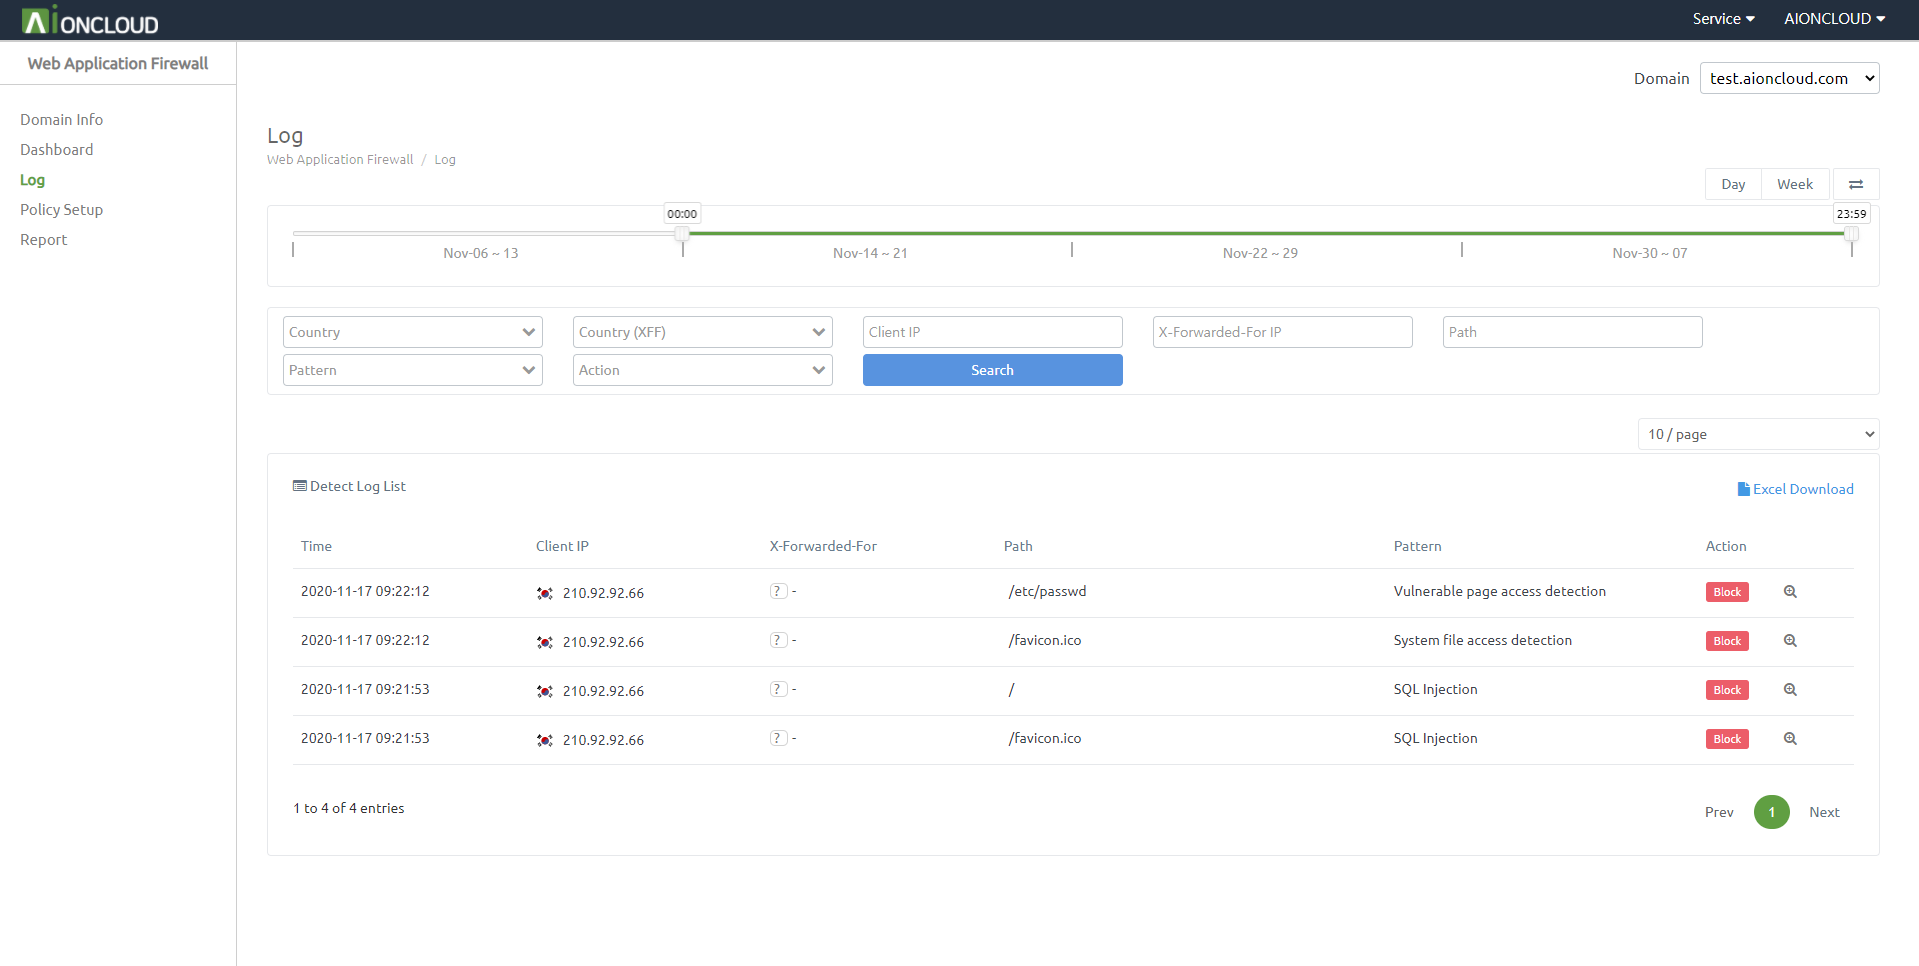
You can check detection logs in the 'Web Application Firewall - Log' menu.
It supports to choose the date period to search your domain's logs in bar and calendar form.
It has filters of 'Country', 'X-Forwarded-For Country', 'Client IP', 'X-Forwarded-For IP', 'Path', 'Pattern' and 'Action' for search except what you want not to see.
If you click 'view more' icon, can check detail of this log.
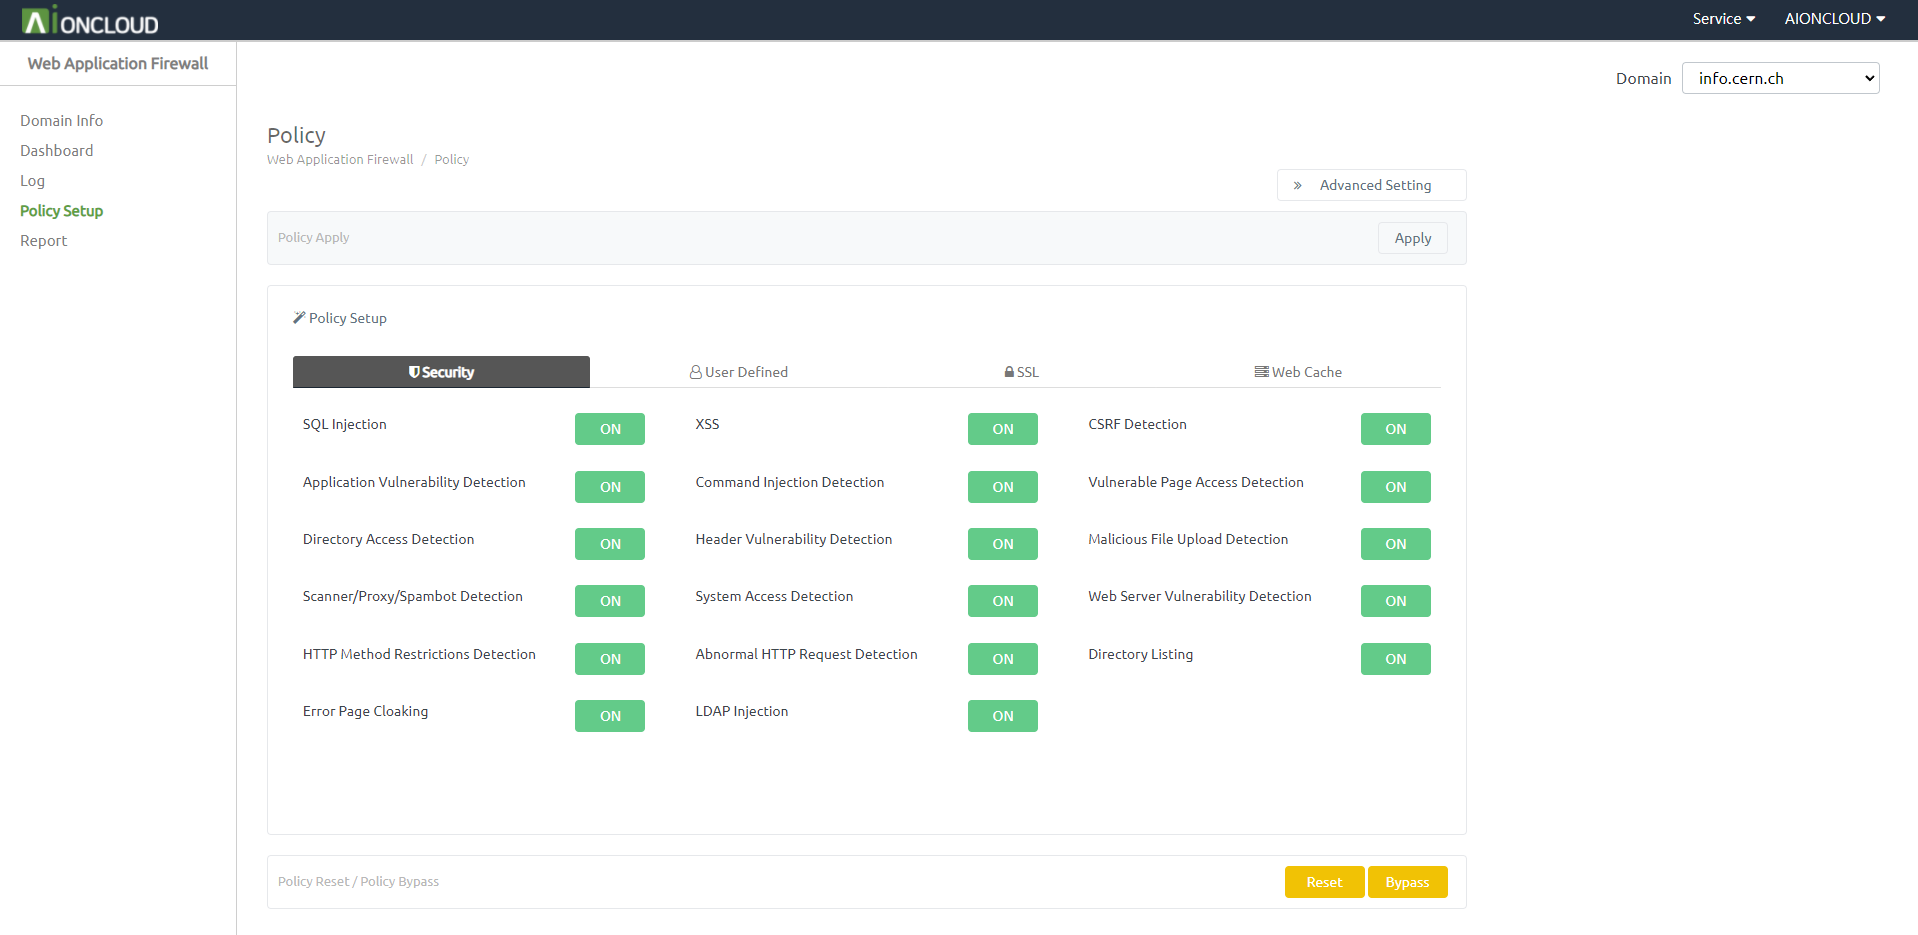
Click on the ON / OFF button to start the attack policy setup. - If the policy setup is ‘ON’, it will perform detection with the selected policy and perform blocking. - If the policy setup is ‘OFF’, it will not detect with the selected policy.
Configurable Attack policy
| Policy | Description |
|---|---|
| SQL Injection | A vulnerability that could allow an attacker to view (or manipulate) information from the DB by inserting SQL statements into the input form and URL fields in a web application that is interfaced with the database(DB). |
| XSS | A vulnerability that could allow an attacker to execute an inappropriate script with the privileges of a visitor who views a Web page by including a malicious script on the page. |
| Scanner/Proxy/Spambot Detection | Crawling, Scraping, Scanner, Web Attack Toolkit, etc., to generate comprehensive attack traffic to detect direct vulnerabilities or collect indirect information to identify vulnerabilities. |
| Web Server Vulnerability Detection | Vulnerability due to inadequate system configuration, such as the presense of installation files and temporary files created during the installation of the application (Apache, etc.), or the windows login window being exposed on the Web. |
| Application Vulnerability Detection | A vulnerability that can be used as an intermediary for homepage tampering and hacking due to various vulnerability information of a public application that is open to the Internet due to financial and time burden in building a web server. |
| CSRF | A vulnerability in which inappropriate scripting is performed with the privileges of the visitor viewing the transmitted dynamic web page when the external input is used to generate the dynamic web page. |
| Malicious File Upload Detection | A vulnerability that the attacker can execute the system internal command or control the system if a script file (asp, jsp, php file, etc.) that can be executed on the server-side can be uploaded and the attacker can execute this file directly through the web. |
| Abnormal HTTP Request Detection | A comprehensive attack mechanism for accessing a web server by manipulating traffic with contradictory standard rules such as multiple spaces, multiple slashes, newline characters, null character insertion, specific header deletion or modulation for security system bypass purposes. |
| Error Page Cloaking | A vulnerability that exposes attack information such as server data information through an error message when a separate error page is not set in the web server. |
| Directory Listing | A vulnerability that could potentially expose sensitive file information by enabling indexing of all directories within the server or directories containing sensitive information. |
| Command Injection Detection | Vulnerability in which unintended system commands are executed when user input values that have not been properly validated are run with some or all of the operating system commands. |
| System Access Detection | A vulnerability that exploits important system information or sensitive information exposed by direct access to important tables or objects of Windows and Unix Web servers in known locations and commercial DBMS servers. |
| Directory Access Detection | A vulnerability that could lead to system information leaks, service failures, etc., because it is possible to construct a path string for an unexpected access restriction area if the characters that can be used for the path manipulation are not filtered for external input values. |
| HTTP Method Restrictions Detection | A vulnerability that allows an attacker to upload malicious files or to delete important files by allowing unnecessary methods (PUT, DELETE, OPTIONS, etc.) when providing Web services. |
| Vulnerable Page Access Detection | A vulnerability that if a file such as an internal document, a backup file, a log file, or a compressed file exists under the web root, the file name can be obtained by inferring, then the service information necessary for hacking can be obtained by directly requesting these file name. Additionally, it is also a vulnerability that could be exploited by various forms of attack, such as an attacker's SQL injection or brute-force attack, when the administrator's page is accessible via the Internet. |
| Header Vulnerability Detection | A vulnerability that causes remote command execution or buffer overflow by accessing known vulnerabilities in a web application server or OS system through manipulation of header information such as User-Agent and Range header. |
| LDAP Injection | A vulnerability that tempers with LDAP (application protocol for querying and modifying directory services) query or injects LDAP, thus leaking passwords, personal information, etc. If an LDAP query is performed as part of the user input on the website, change the LDAP syntax to obtain sensitive information within the system. |
Setup define detail to start user defined policy setup.
Configurable User defined policy
| Policy | Description |
|---|---|
| IP Allow list | Bypassing the client IP regardless of other the Web Application Firewall policy after input client IP and apply it. |
| IP Block list | Blocking the client ip regardless of other the Web Application Firewall policy after input client IP and apply it. |
| DoS Detection | Block clients who make much traffic this domain and regist these ips to blocklist. |
| Brute Force Detection | Blocking clients who try to abnormal login attempt to this domain and register this IP to blocklist. |
| URL Allow list | Bypassing the URL regardless of other the Web Application Firewall policy after input URL path and apply it. |
| National IP Detection | National IP Detection blocks the HTTP request which is registered in the untrusted national list before analyzing the data. |
| JS Challenge | Upon receipt of the HTTP request, the WAF responds with a Javascript challenge script, which can only be interpreted in a web browser. It allows access to the actual website only when interpreting this script, and it defends automated attacks such as bots that cannot be interpreted. |
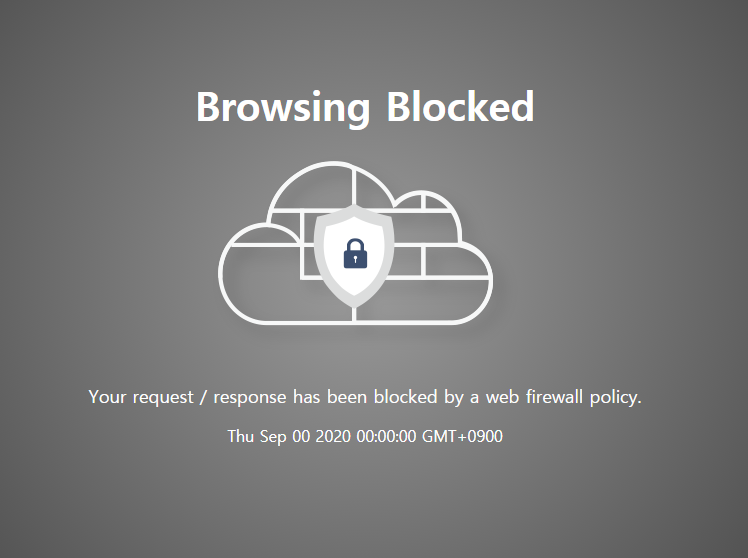
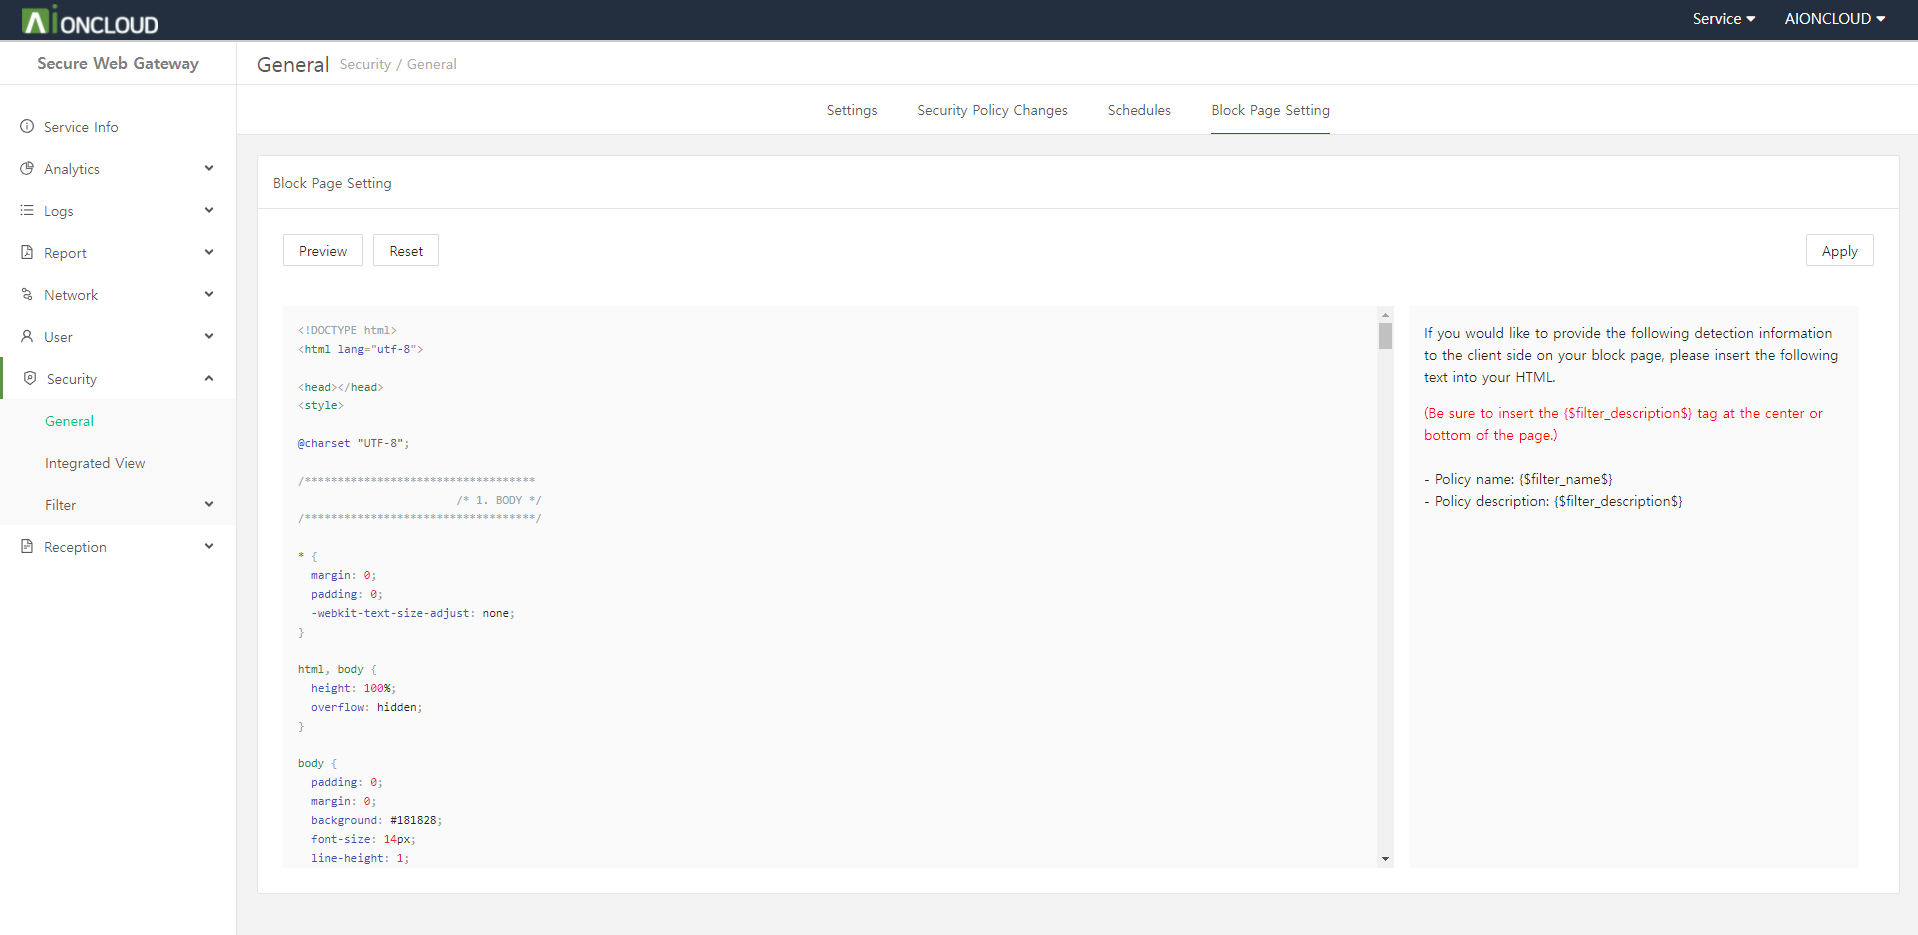
| Block Page | If blocked by policy, you can customize the blocking page shown to clients. |
Setup SSL detail to start SSL policy.
Configurable SSL policy
| Policy | Description |
|---|---|
| SSL Certificate | Upload new SSL certificate of your domain for regist or change SSL certificate. - Support type : CRT, DER, PEM, PFX, ... |
| 80 → 443 Redirect | All traffic of Port 80 (HTTP) redirect to Port 443 (HTTPS). |
This menu allows you to set the web cache for the domain.
Configurable web cache policy
| Policy | Description |
|---|---|
| Use Web Cache | Enables or disables the web cache for the domain. |
| TTL | You can set the time to live of the web cache. If you set TTL to 0 seconds, follow the web server settings. |
| Except URL | Add URLs that do not store web caches. |
| Clear Web Cache | Batch delete or specify to delete files cached in WAF. |
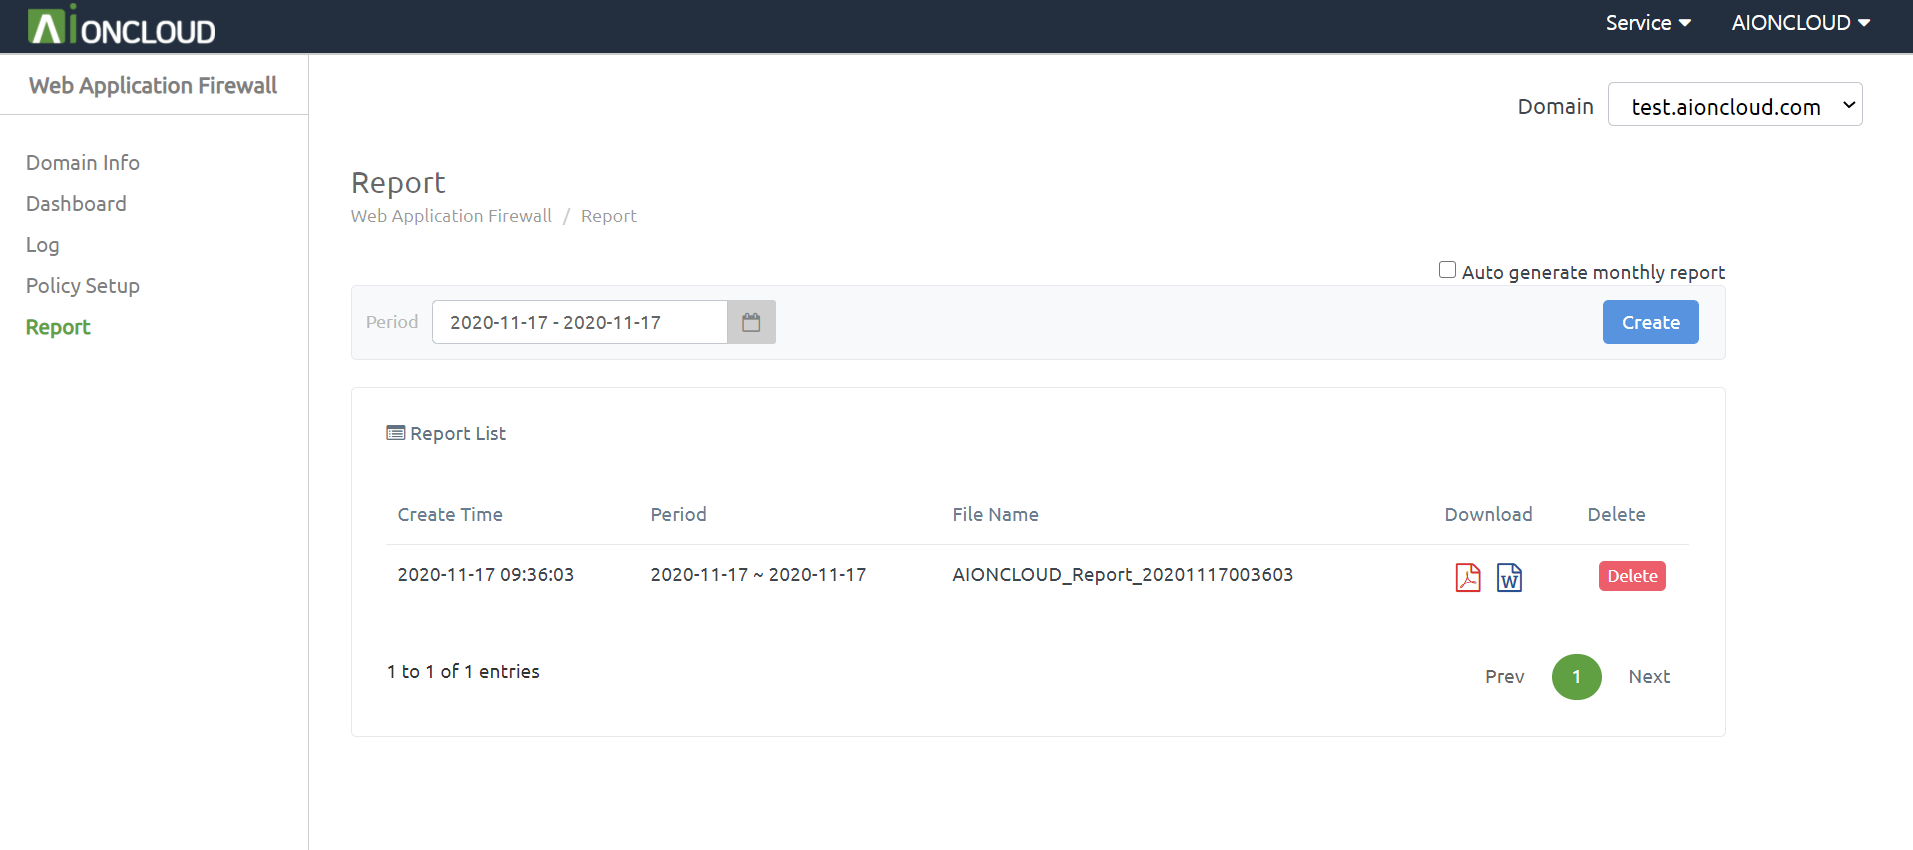
You can make a report of domain information in the 'Web Application Firewall - Report' menu.
Click the 'Create' button to make a report after choose the date period.
After creating the report, the download button of PDF and DOC type is activated and you can download the corresponding type report when you click the button.
When you click the 'Delete' button on the right, the generated report will be deleted.
If you check "Auto-generate monthly report", the report will be generated automatically on the first day of each month.
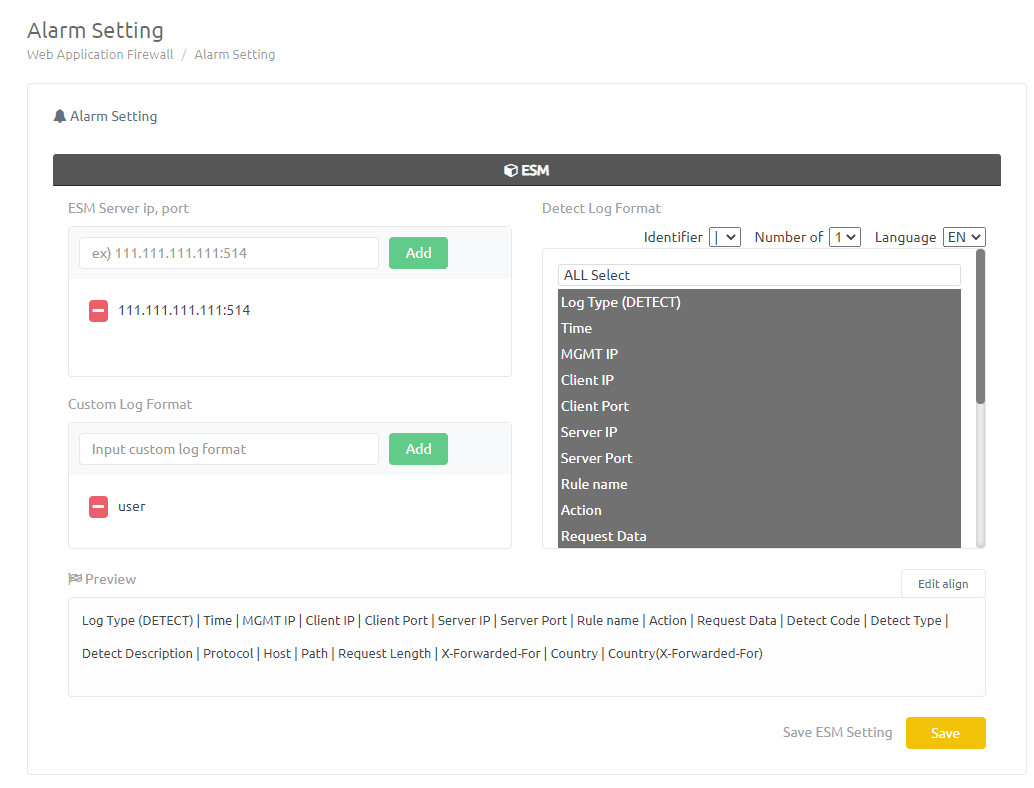
In the 'Web Application Firewall - Alarm Setting' menu, set up alarm for the domain.
Add the IP, Port of the ESM server and Custom Log Format and detect log and press [save].
Custom Log Format : When sending detect log to the ESM server, The first log format set.
When a domain receives an attack related to to alarm settings, Send the detect log to the ESM server.
※ ex) Custom Log Format : “user”
Set detect log format : Time | Detect Description | Detect Type | Detect Code | Protocol | Host | Path | Request Length
In case of applying settings : user | Time | Detect Description | Detect Type | Detect Code | Protocol | Host | Path | Request Length
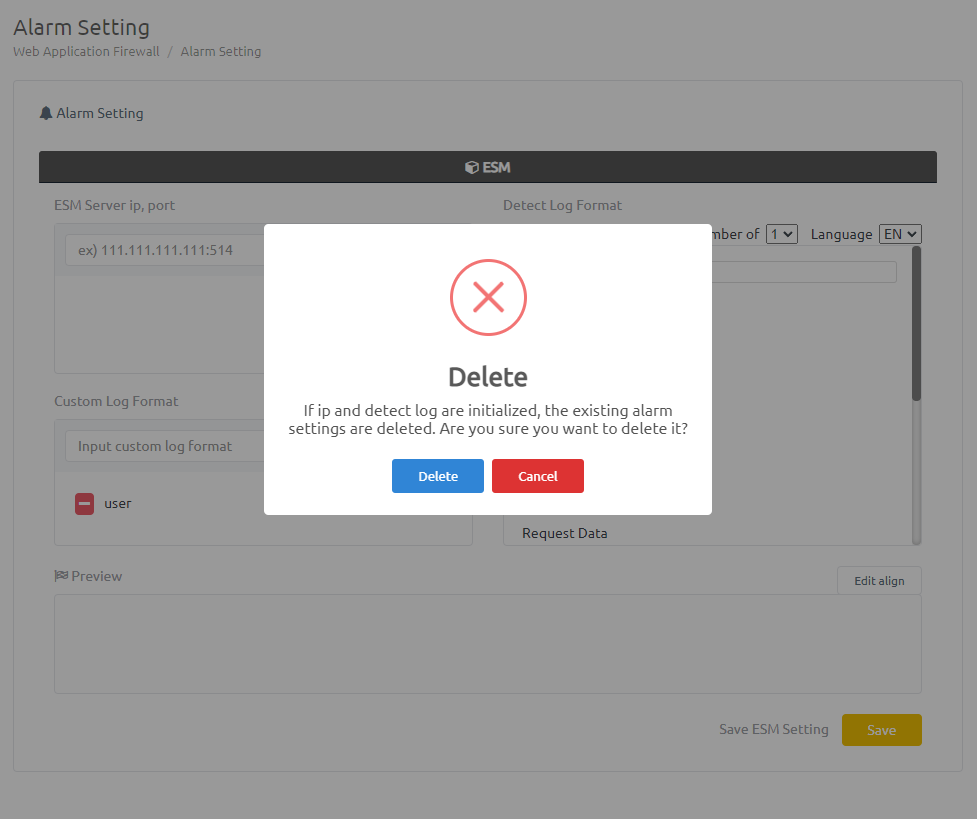
If you want to reset A, Cancel the set ESM server address or the selected detect logs and press [save].
If you press Delete on the warning message, the existing alarm setting is reset.
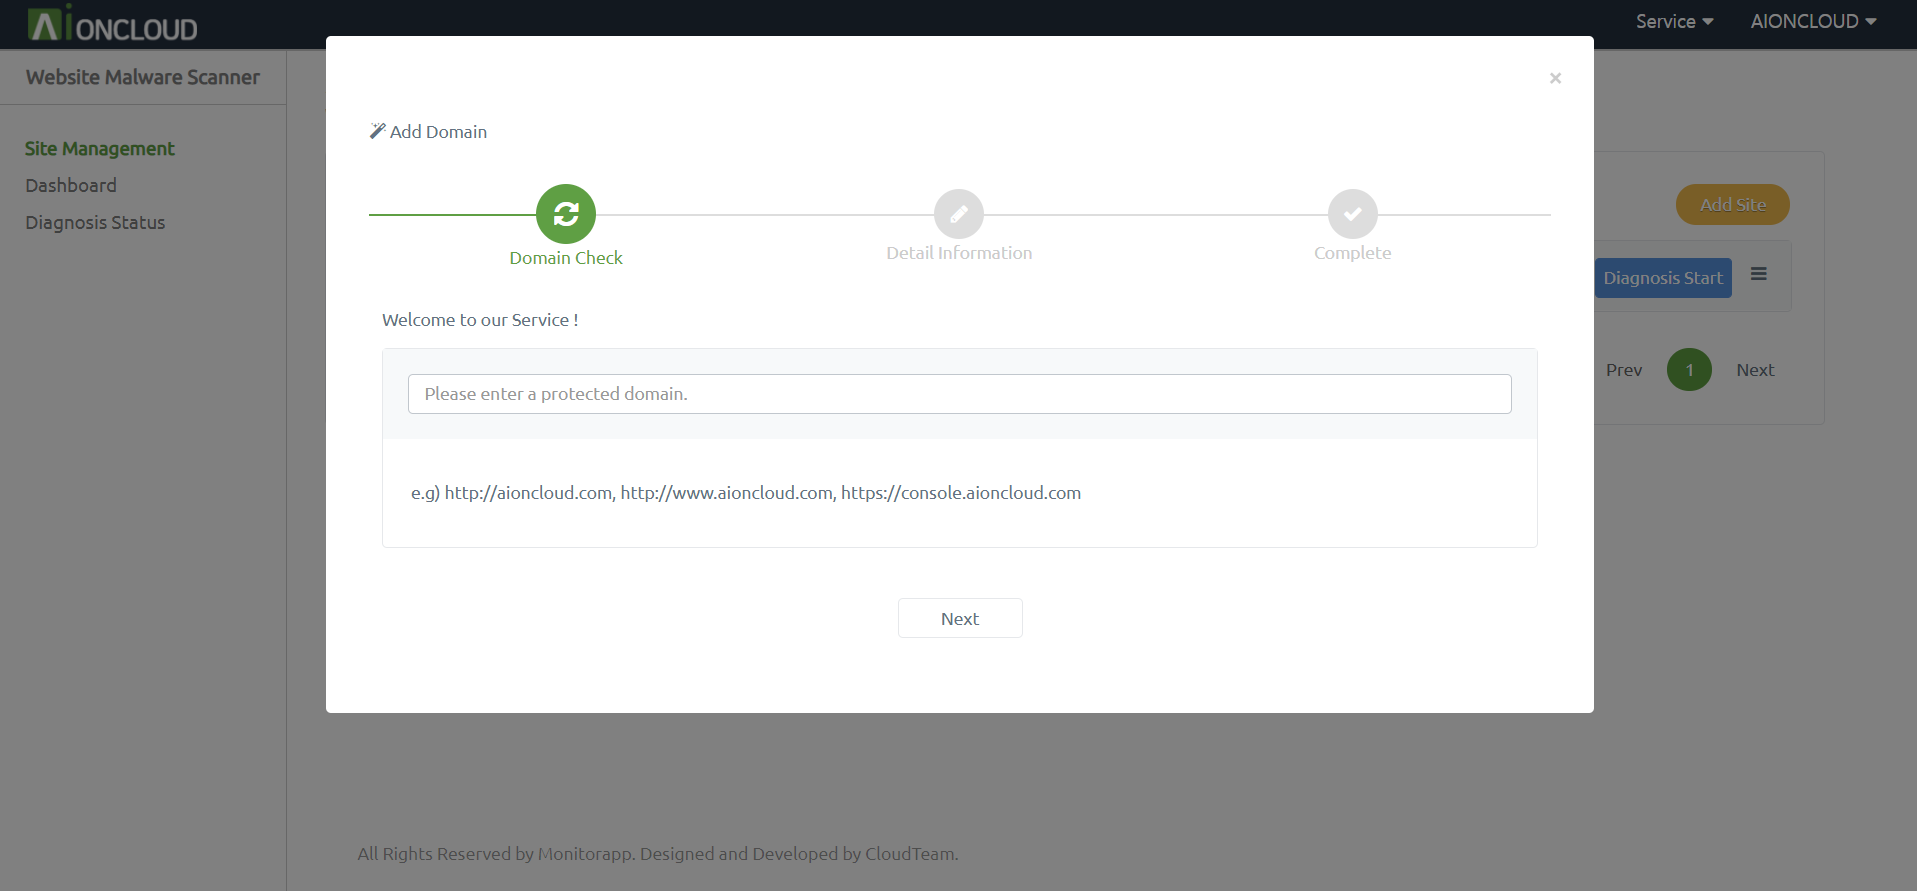
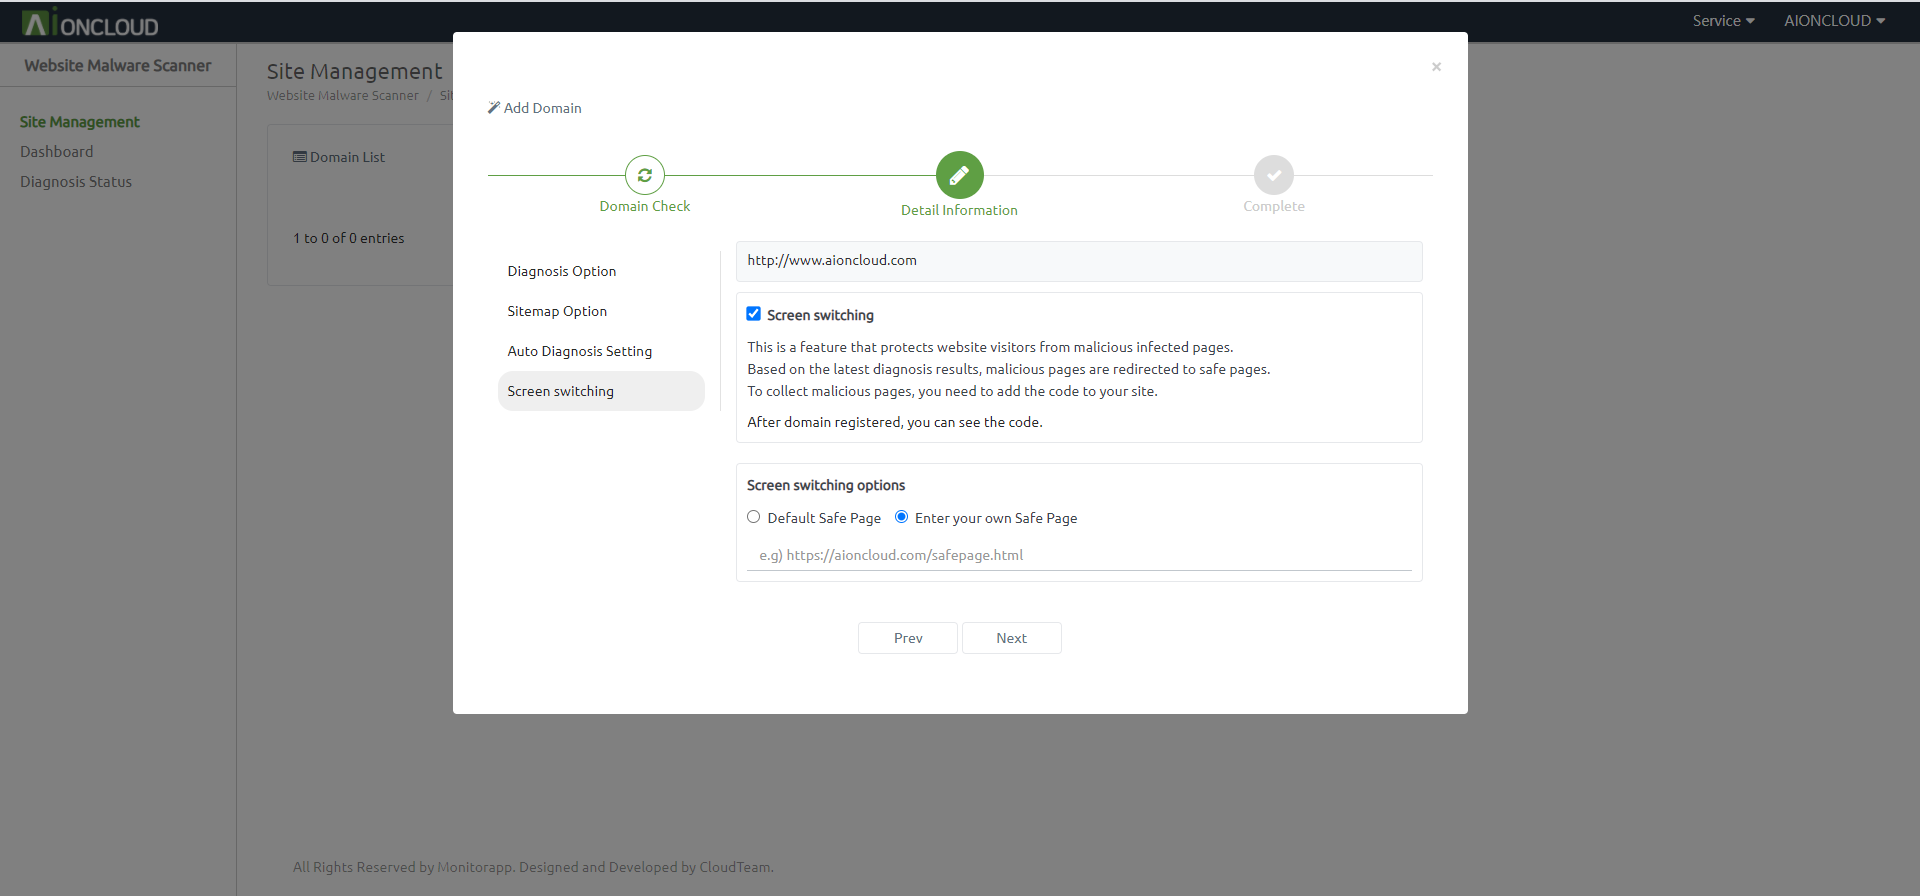
Click the “Add Site” button in the Site Management menu to register the target site.
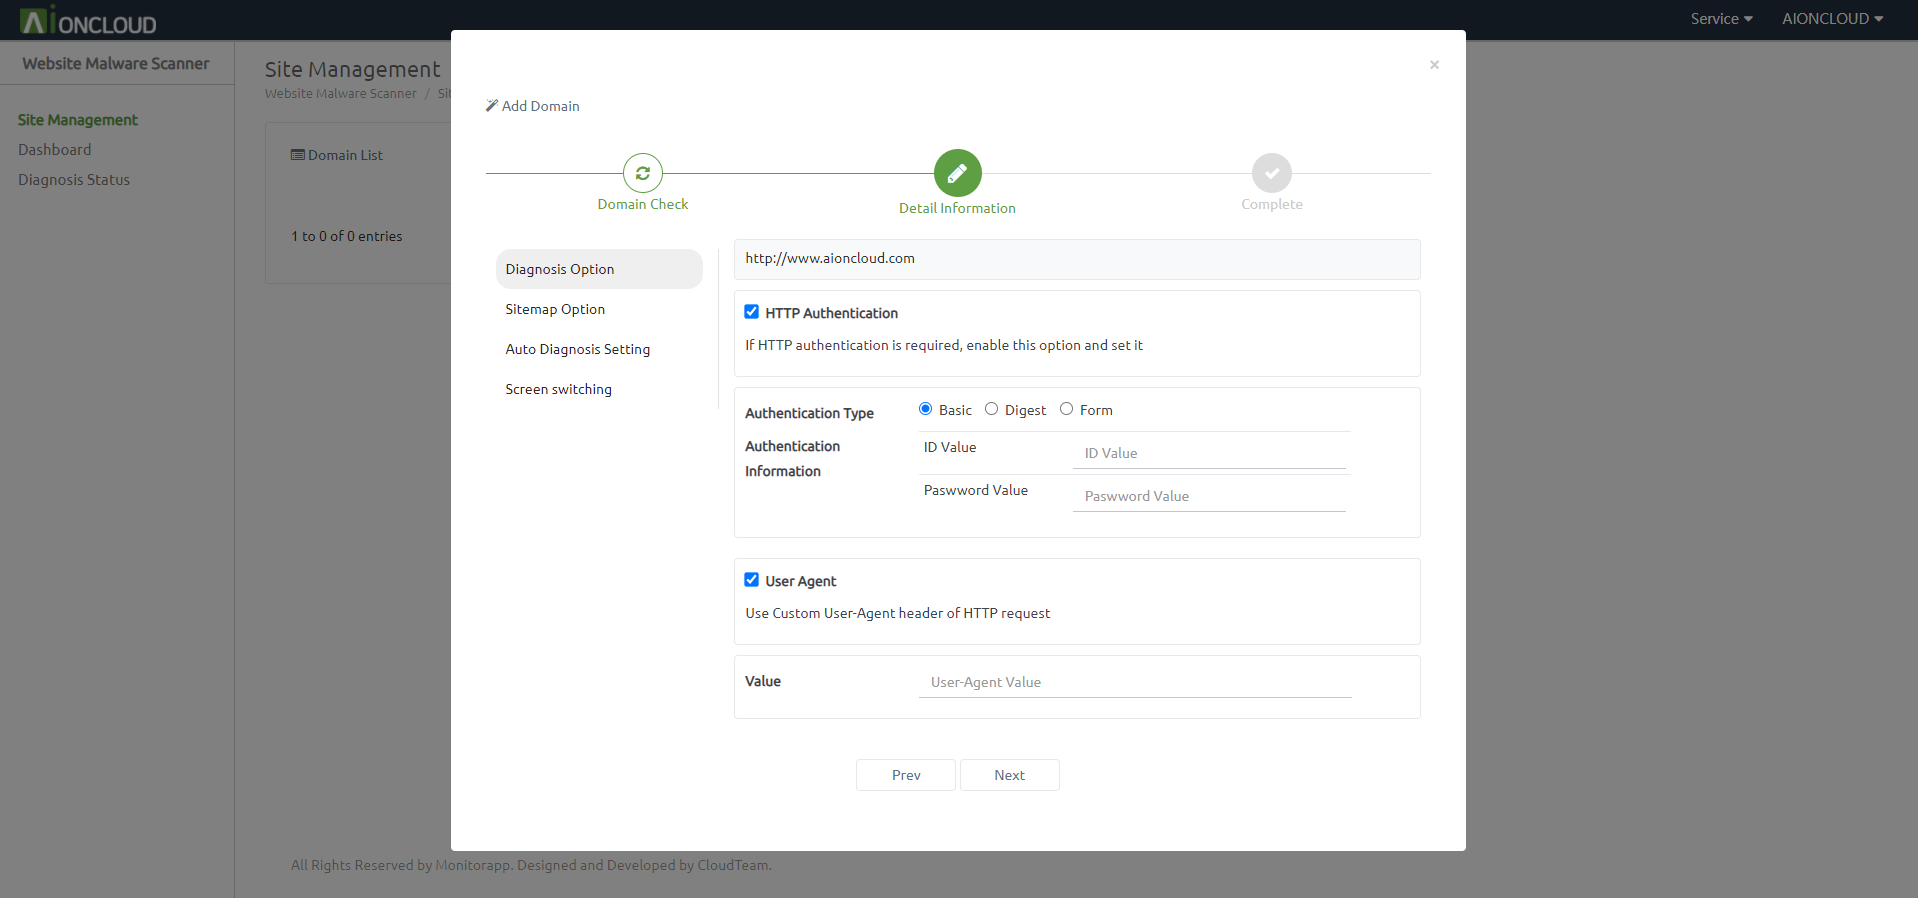
You must enter the URL in the Input box. Also you can set Site authentication and User-Agent.
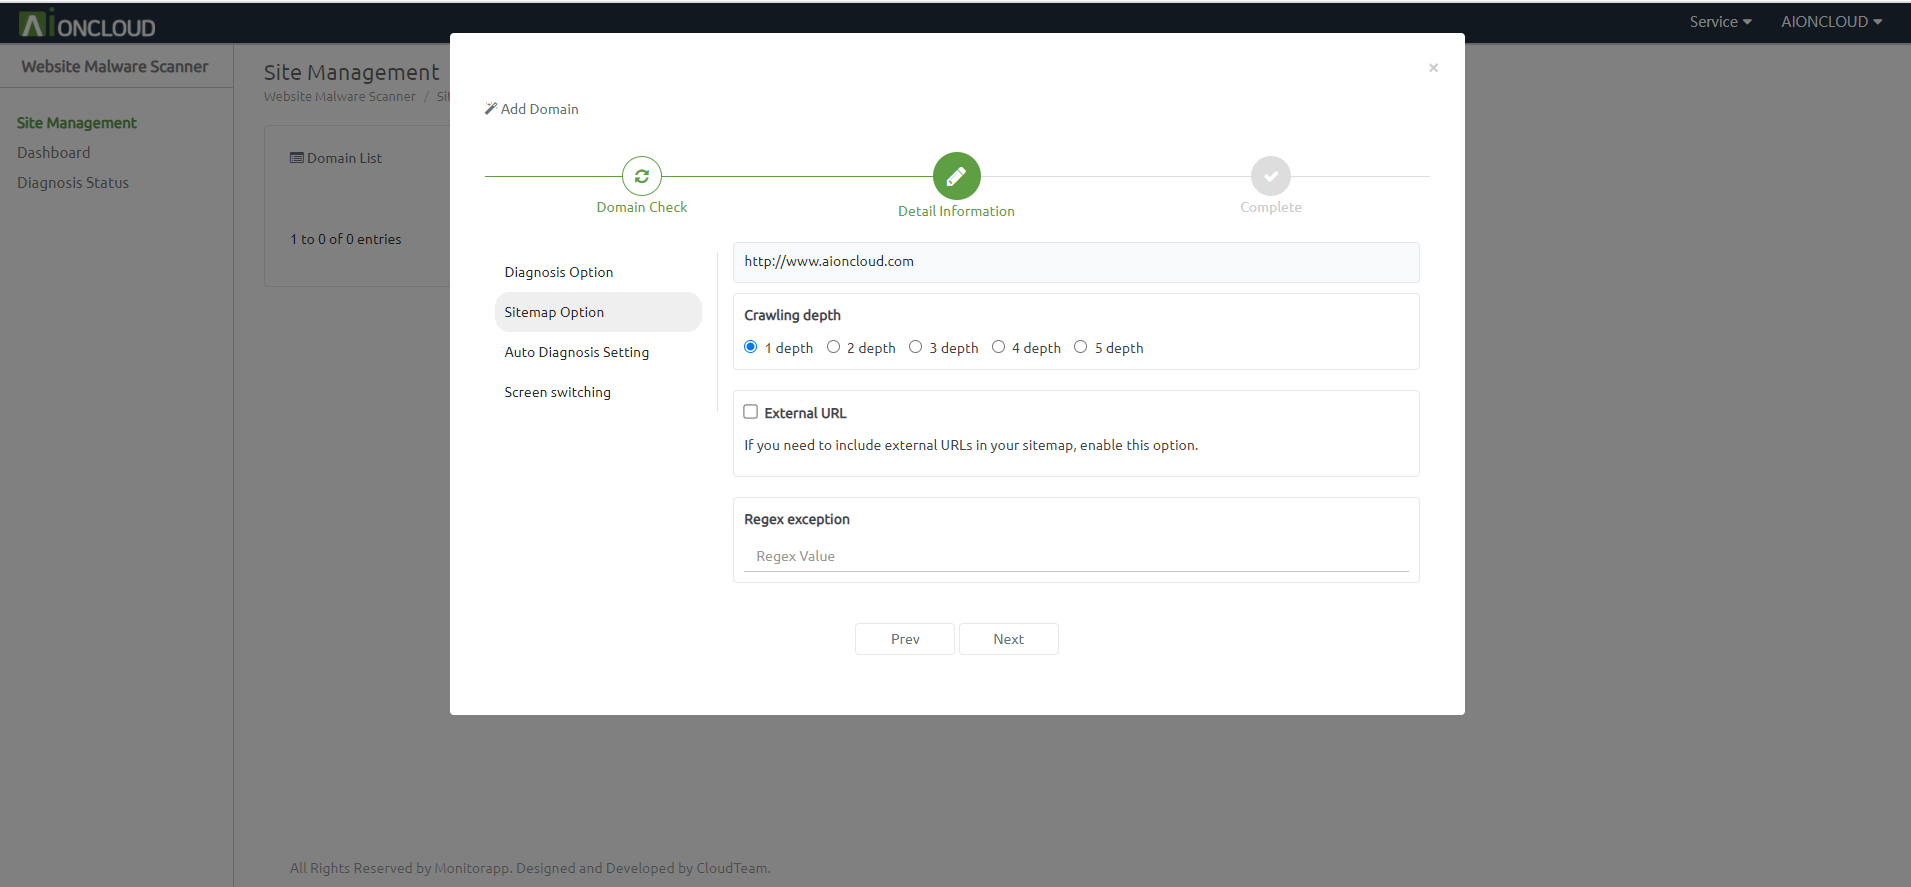
If you set Auto Diagnosis, set sitemap remake, diagnosis level, crawling depth, external link, and regex exception.
The crawl depth refers to the extent to which a WMS indexes the site’s content. The larger the value, the longer the creation time.
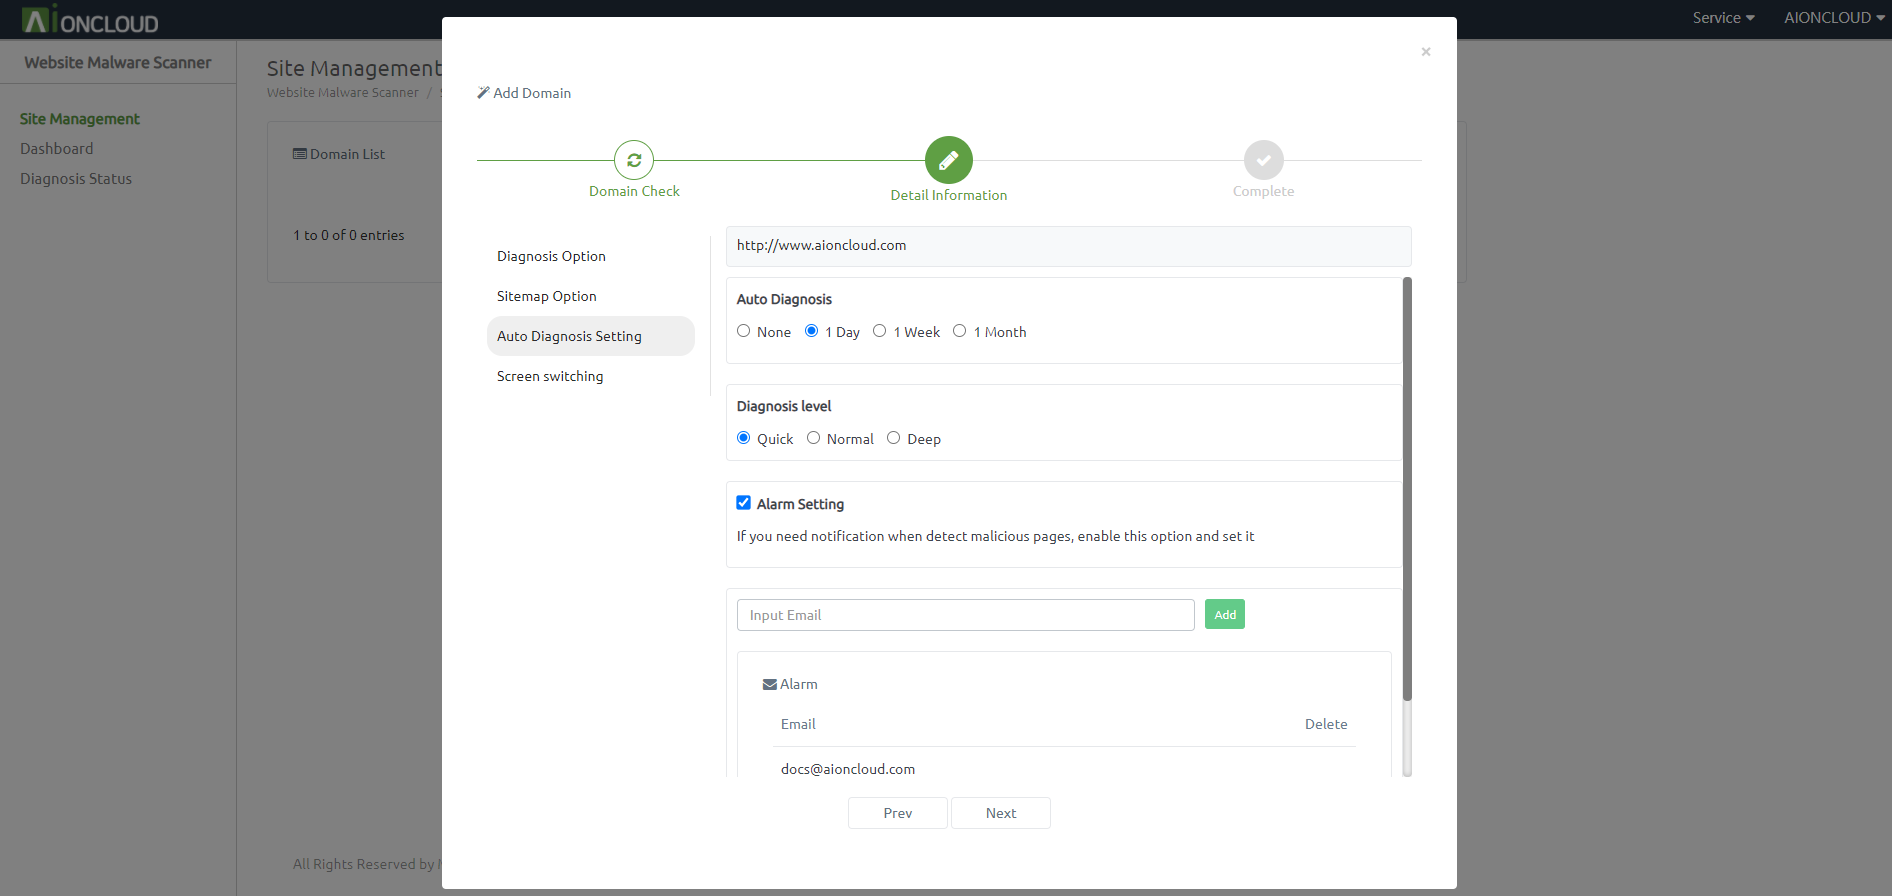
You can set Auto Diagnosis, alarm setting.
If you set Auto Diagnosis, a sitemap is created automatically and started the first diagnosis within one minute.
If you select "Email" in the alarm setting, you can set the email address to which you want to receive notifications.
You can set Screen switching.
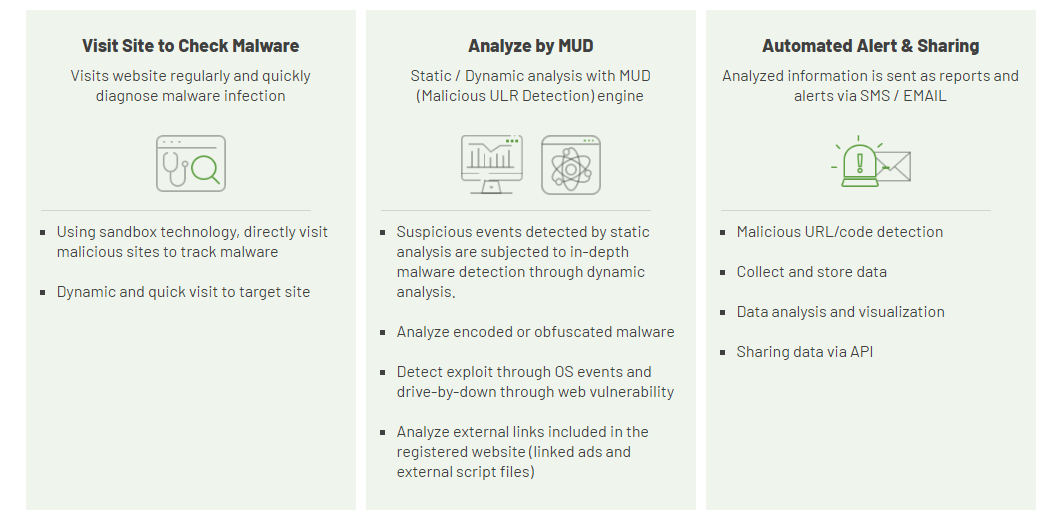
This is a feature that protects website visitors from malicious infected pages.
And click the "Next" button.
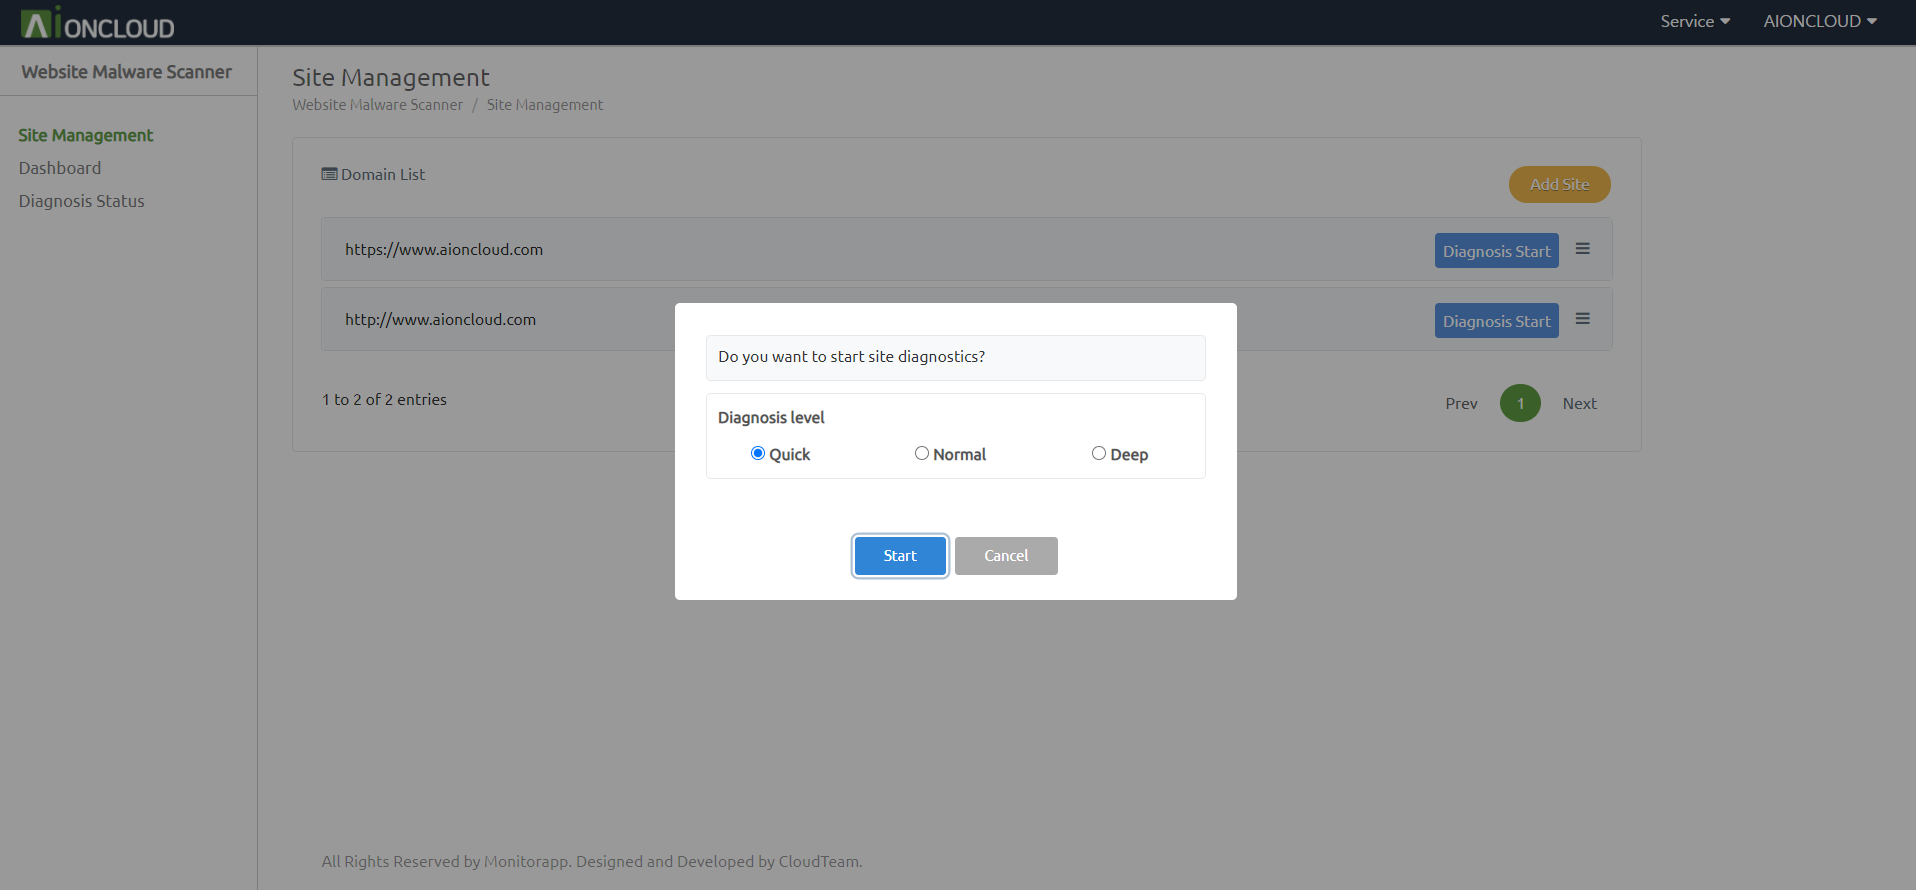
Click the 'Diagnosis Start' button in 'Website Malware Scanner - Site Management' menu to start diagnosis
For quick completion, new or changed URLs only can be diagnosed. (The option does not appear for the first diagnosis.)
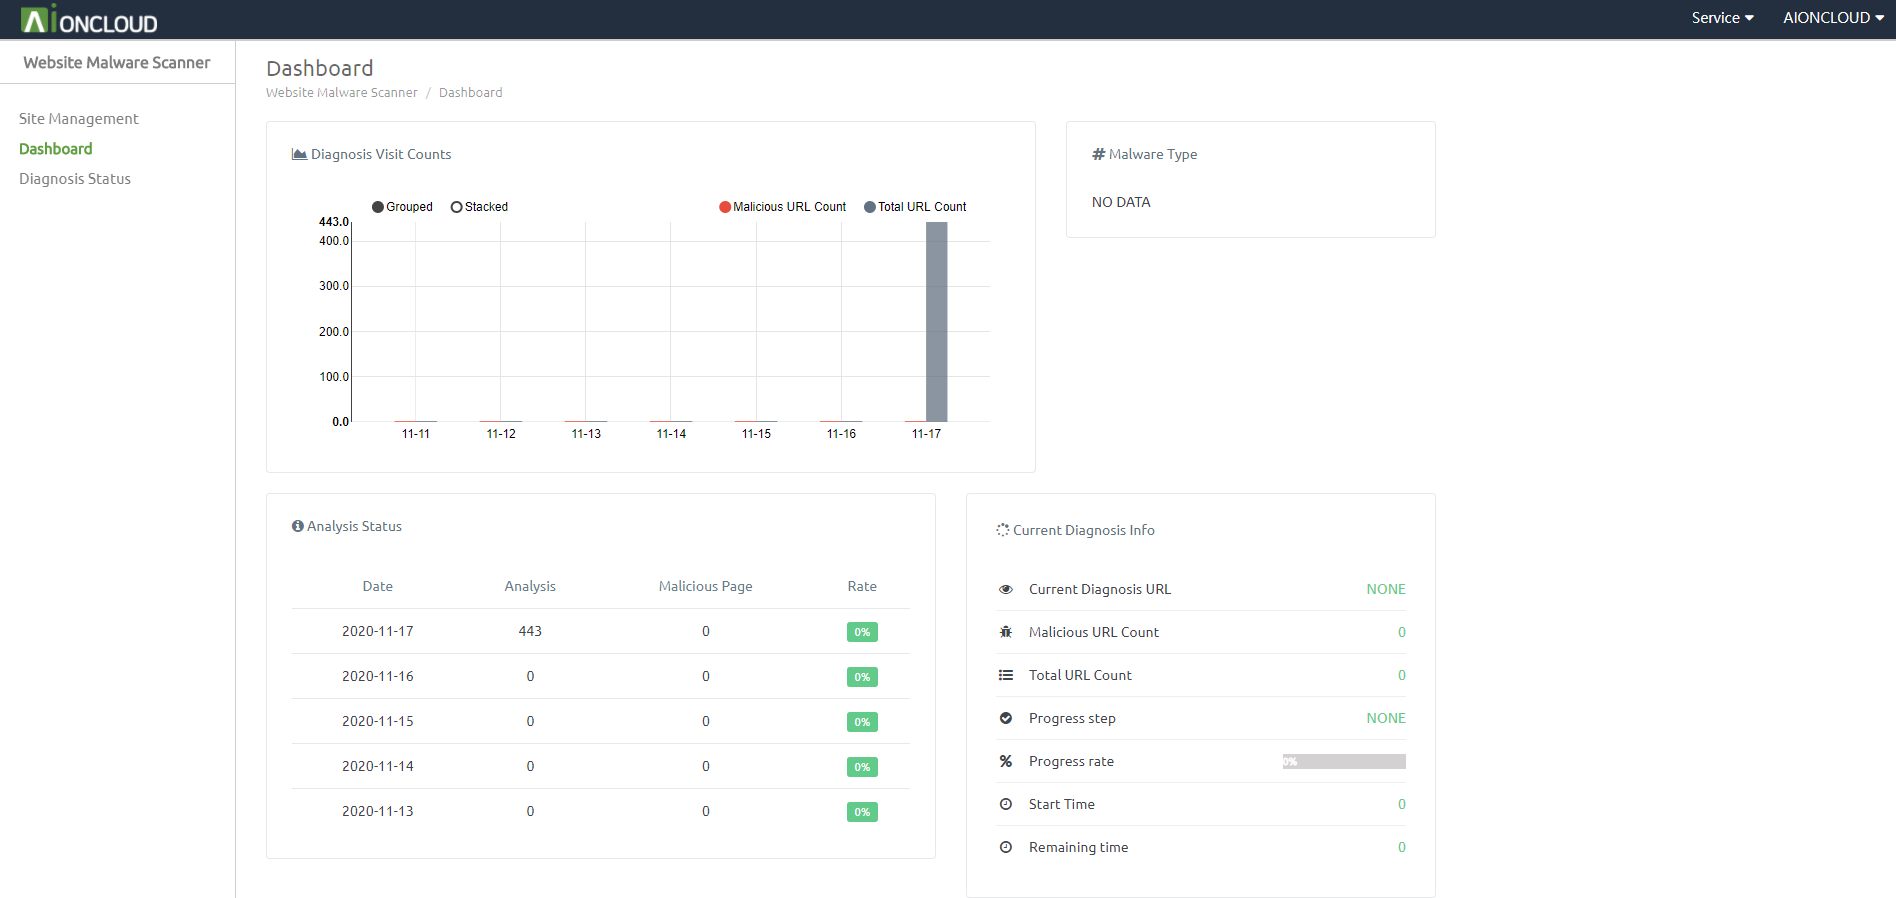
You can check the diagnosis progress in 'Dashboard - Current Diagnosis Info'.
After the diagnosis is completed, you can check the diagnosis result in the 'Website Malware Scanner - Diagnosis Status' menu.
You can view summary information by clicking the number of threats, the infected URL, and the total URL.
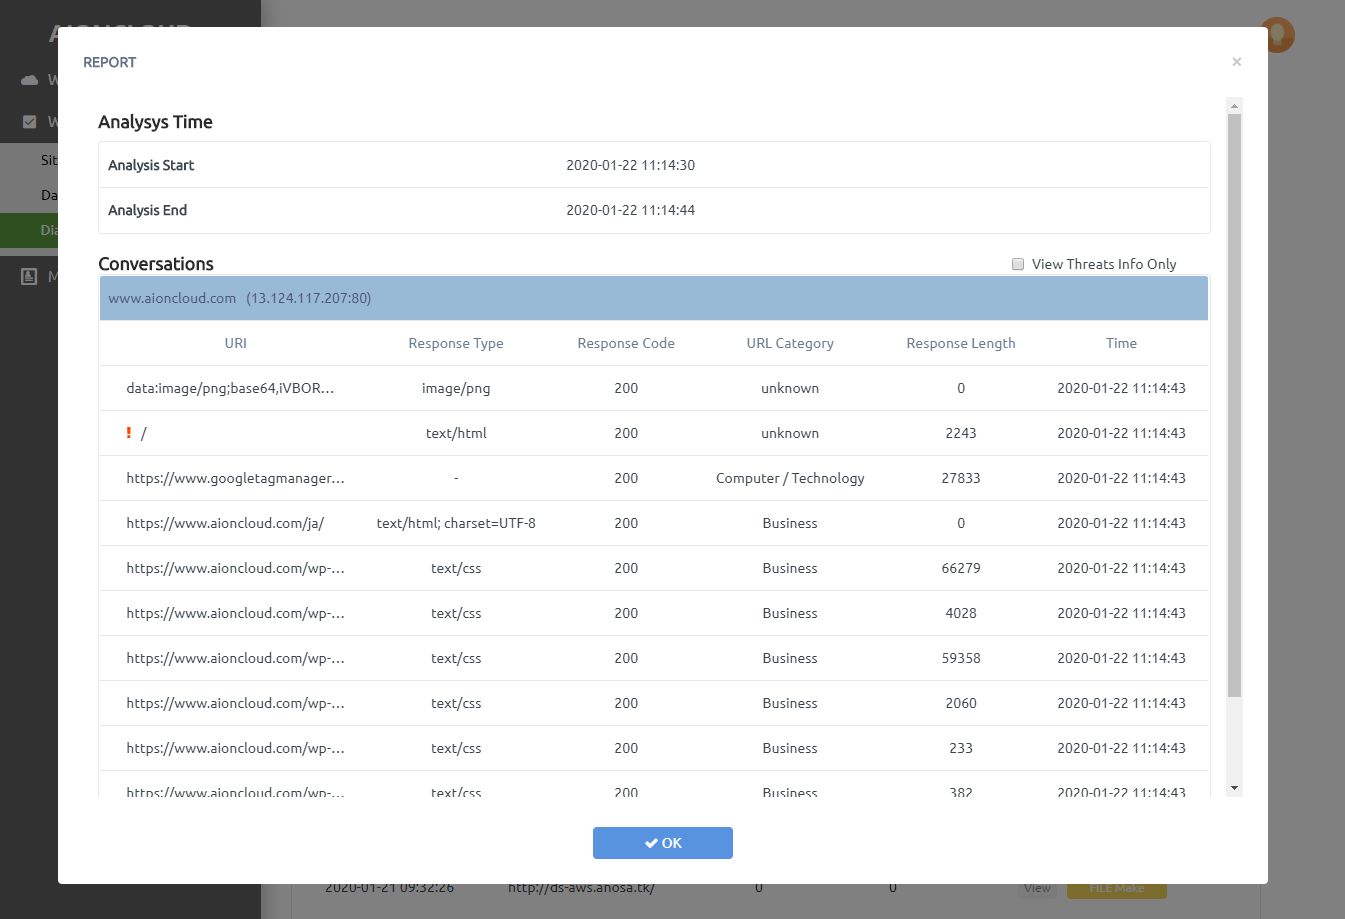
Click the 'View' button to see a detailed report of the diagnosis. After creating the report, You can download the appropriate type of report
If the URL is malicious, '!' is added and you can click to see more information.
Cloud-based SWG service with affordable, with easy to use to protect your clients from harmful web access.
SWG services run on a Multi-Tenancy Based SECaaS platform. The platform configures a service infrastructure through the interconnection of Service Gateway, Security Manager,Security Edge, and Log Collector.
SWG service can be delivered anywhere in the world with one gateway, reducing the cost of the company’s backhaul and helping to ensure compliance with the company’s security compliance.
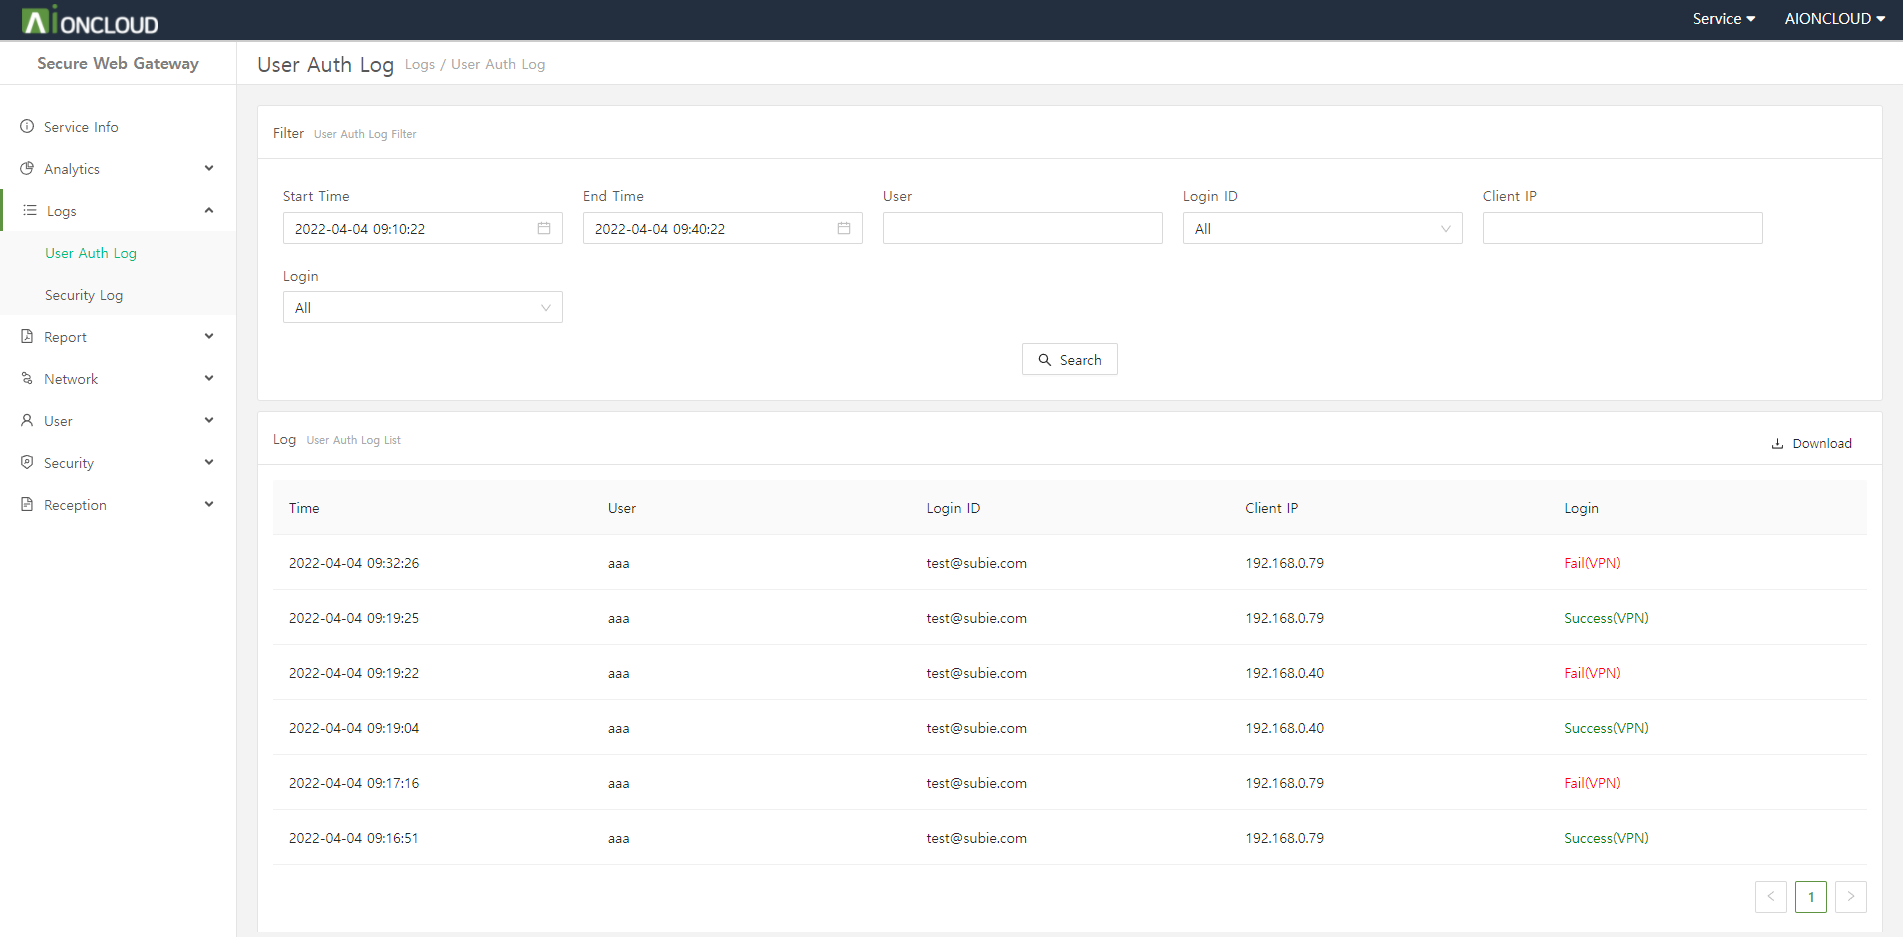
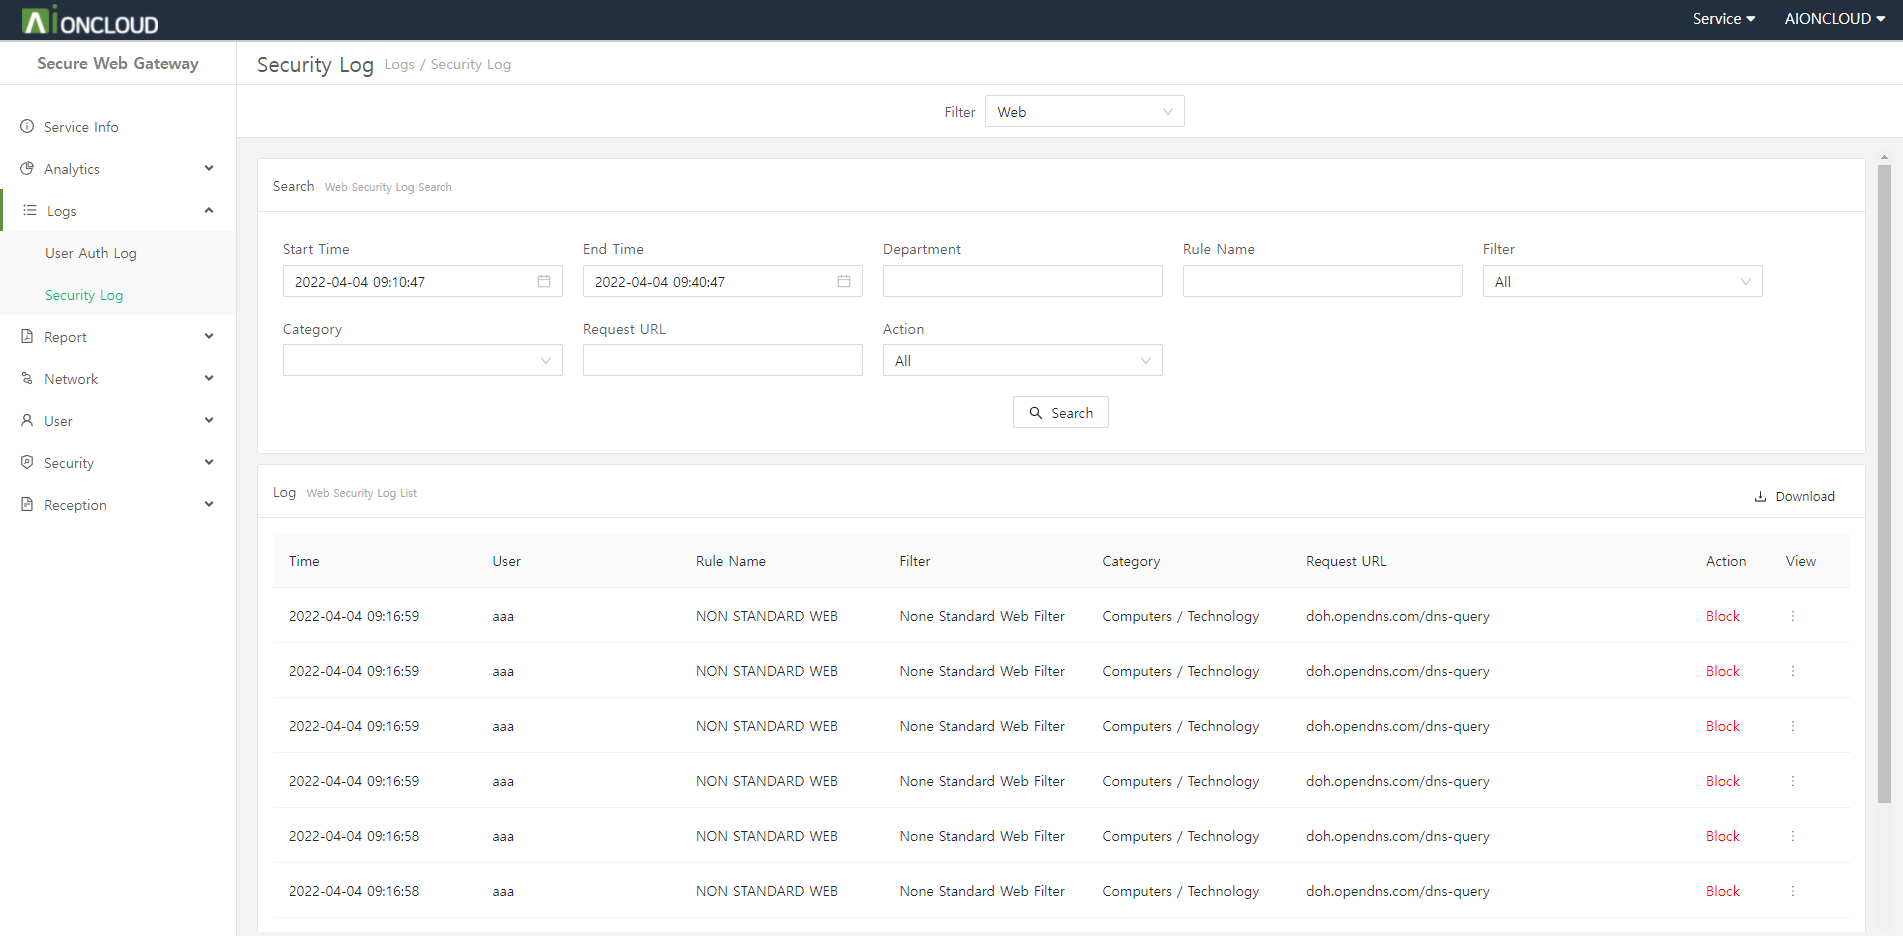
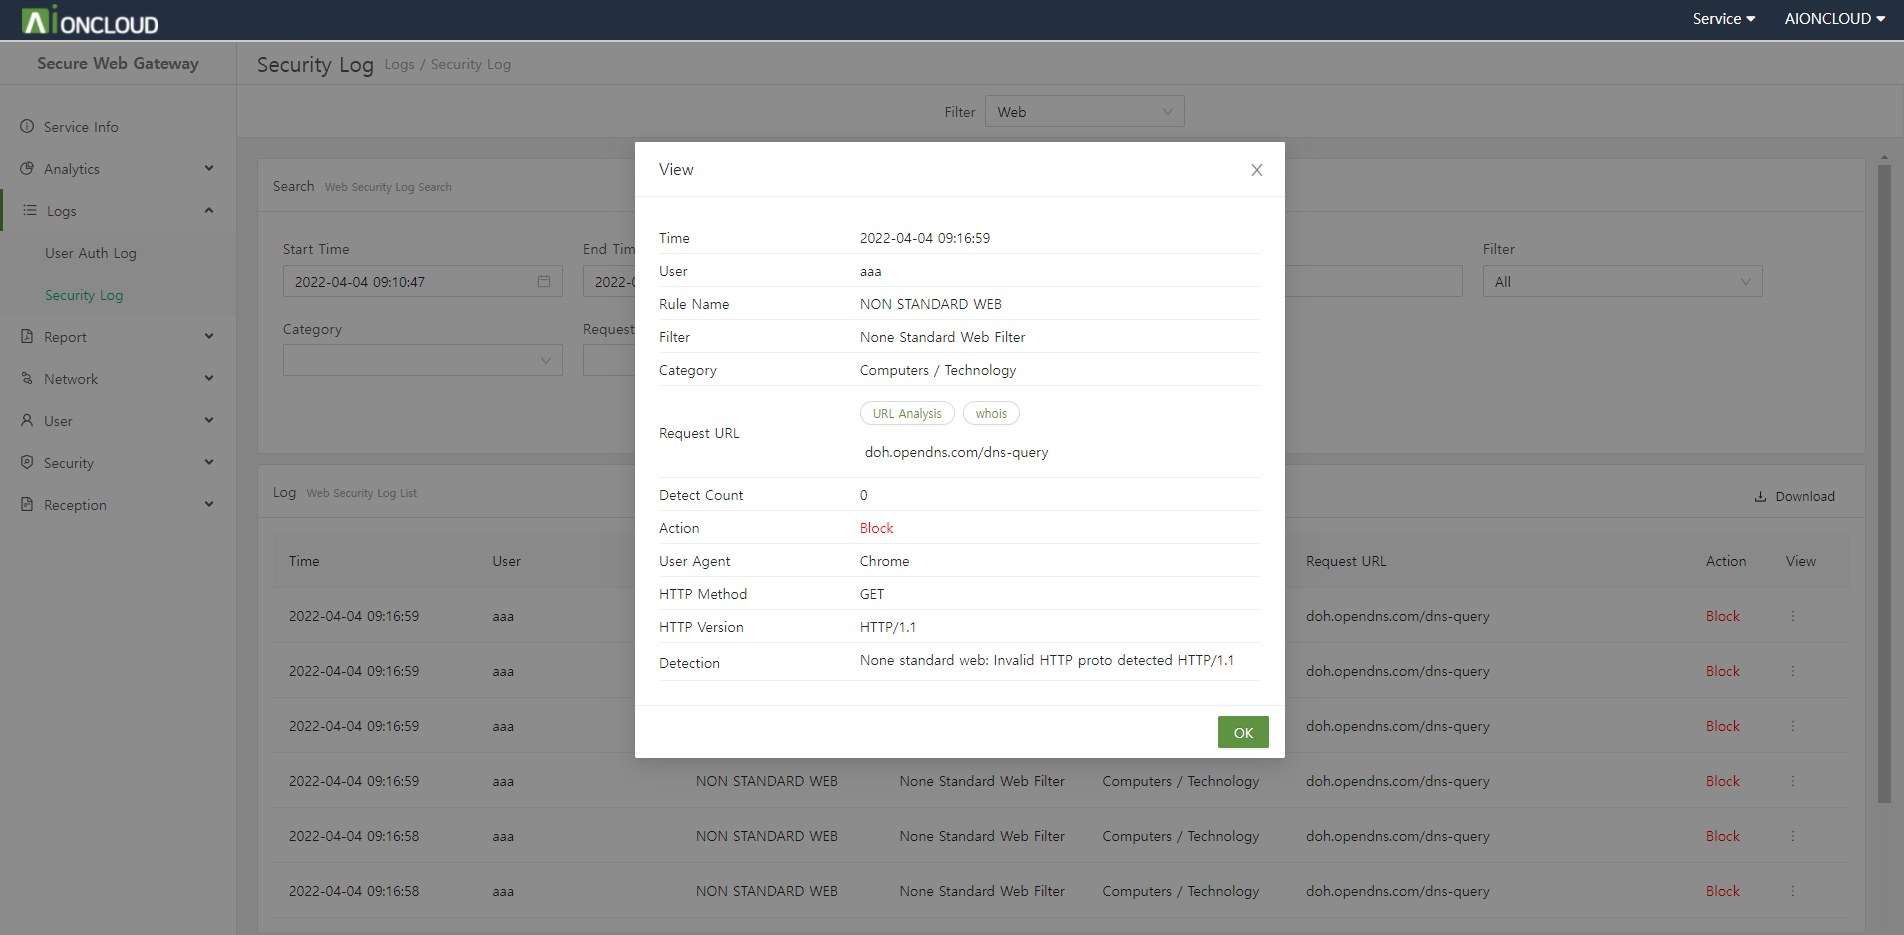
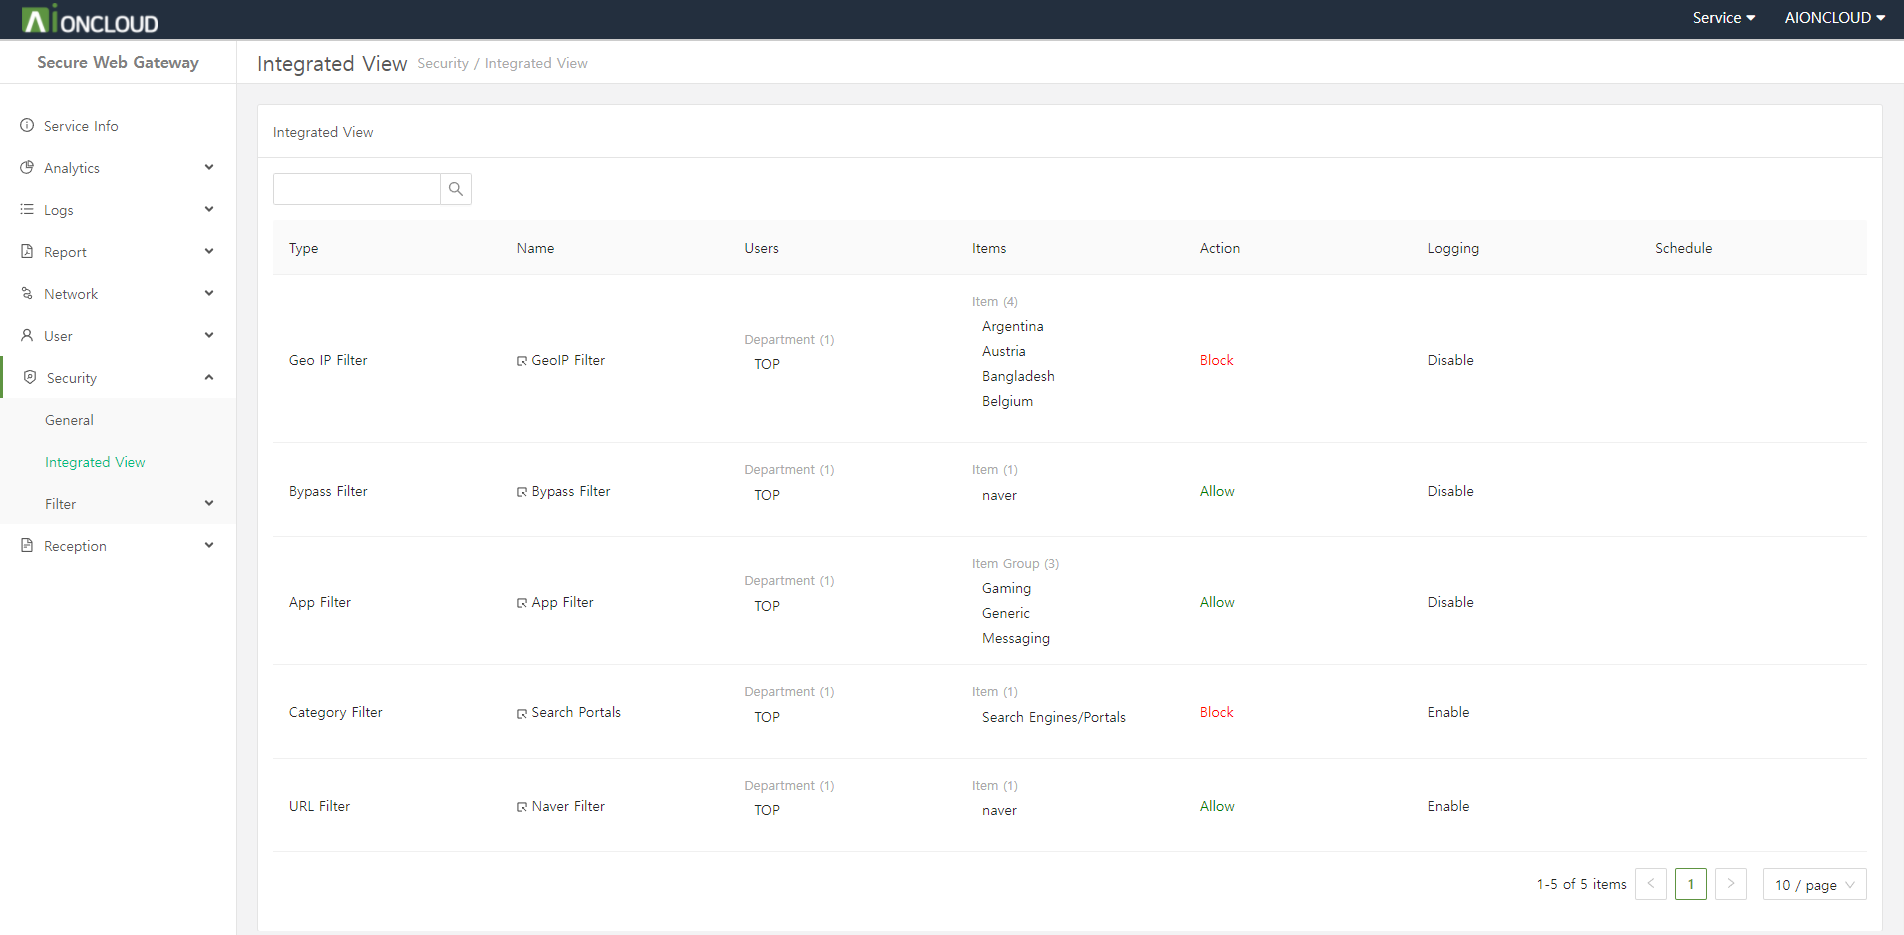
You can see web, app, bypass, and geoip logs.
| Menu | Description |
|---|---|
| Web Security Log |
You can view the web security log that is ‘detected/blocked’ because it violates the policy among the web requests of internal users. You can check the request time, user, policy, filter, category, request URL, and action. |
| App Security Log |
You can view the app security log that has been ‘detected/blocked’ due to policy violations among internal users’ APP requests. You can check request times, users, policies, app groups, apps, and actions. |
| Bypass Security Log |
You can view the bypassed logs during WEB requests of internal users. You can check the request time, user, policy, type of bypass, host and IP. |
| GeoIP Security Log |
It is possible to inquire the WEB security log requested by country. You can check the request time, user, policy, country, action, and number of detections. |
You can download the filtered log as a CSV file by clicking the download button at the top of the log.
You can check detailed log information by clicking the View button to the right of each log.
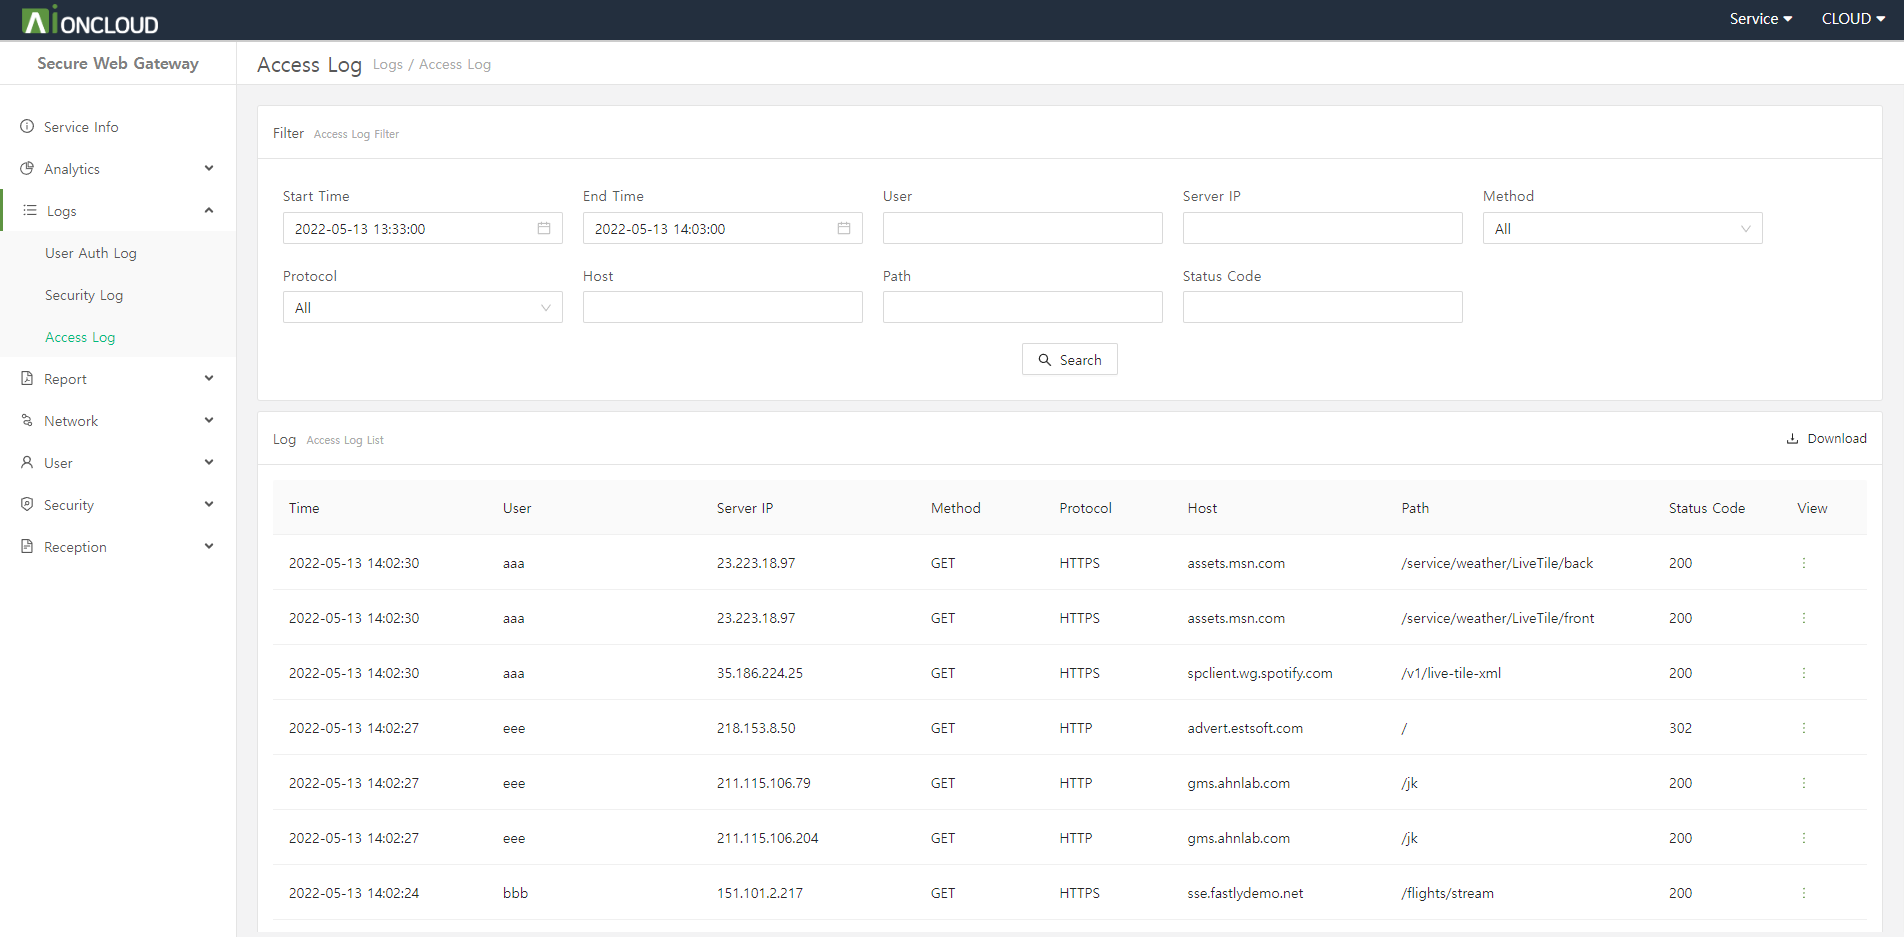
You can check the time, name, server IP, method, protocol, host, route, and status code when the user accessed the web.
You can download the filtered log as a CSV file by clicking the download button at the top of the log.
You can check detailed log information by clicking the View button to the right of each log.
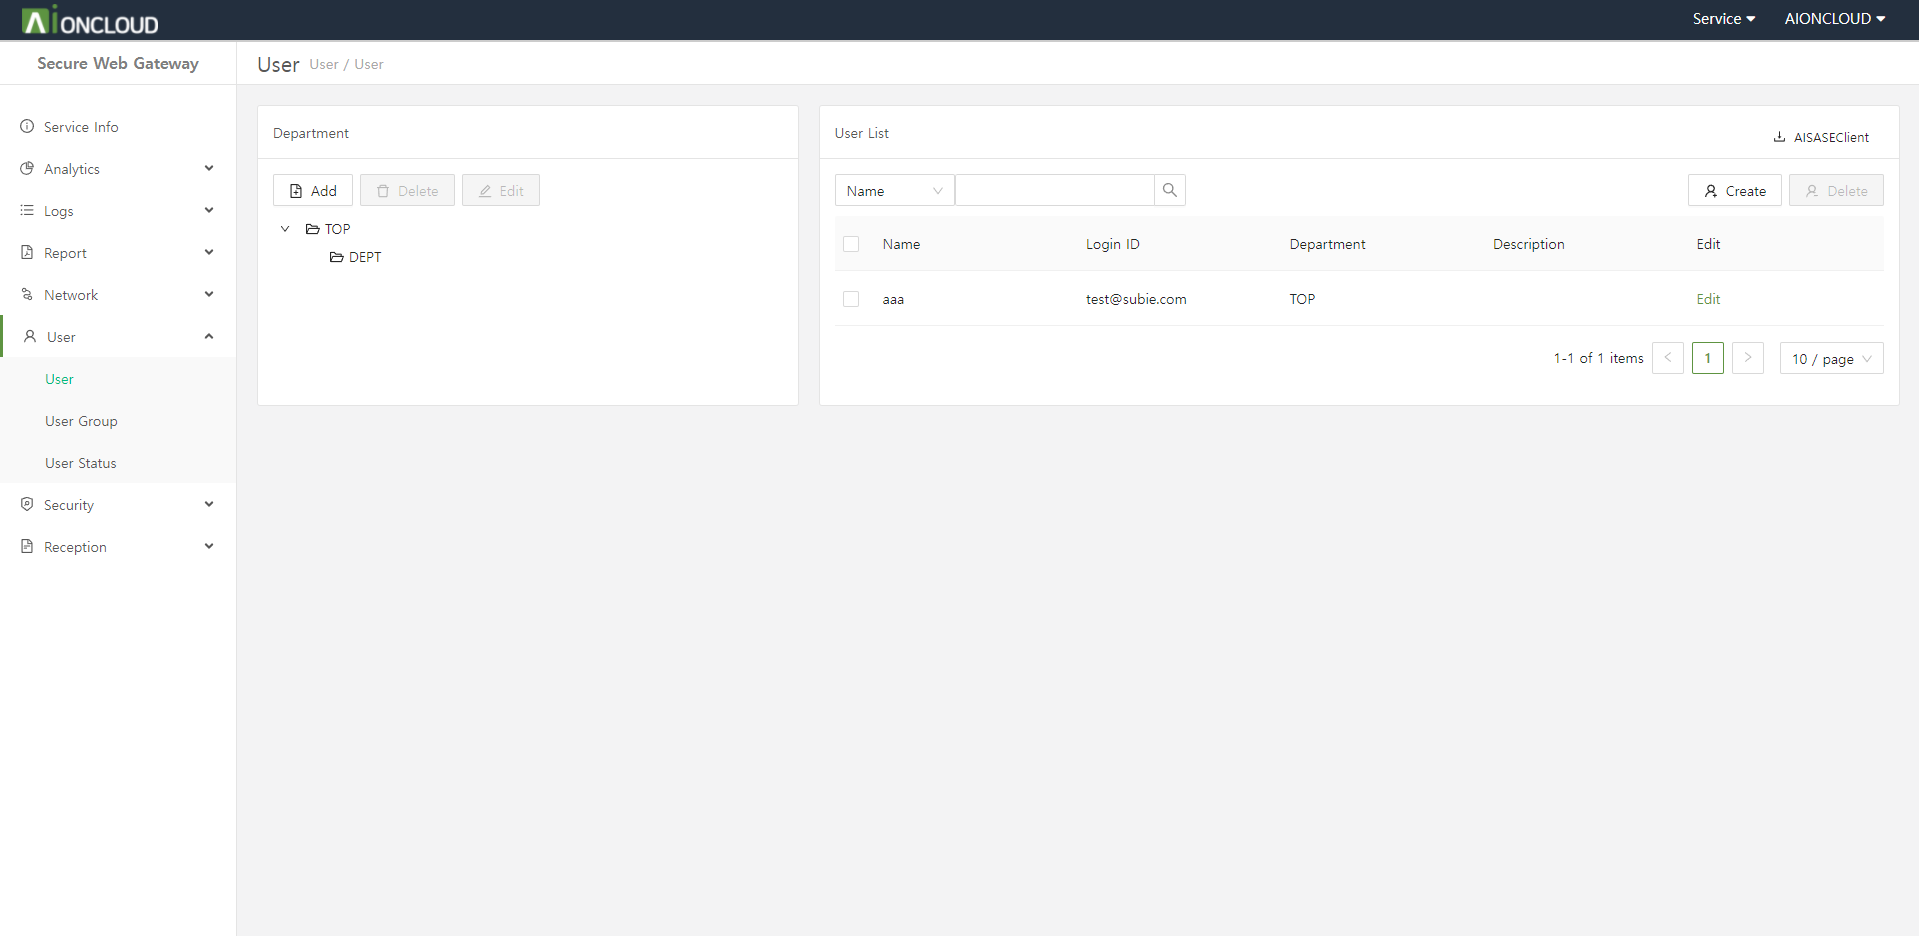
Click the "Create" button in the User > User menu to add user.
Step 1. Enter user information.
- User ID : Login ID used to sign in
- Name : User's name
- Password : User's password. It must contain at least one number, one special character, and one English character.
- Subnet : Specifies the subnet to assign the IP of the SDP client to.
- Department : Department to which the user belongs.
- Description : (Optional) Notes and additional information.
Step 2. Click on the "OK" button.
Click the "Add" button in the User > User menu to add department.
Step 1. Enter department information.
- Name : Department's name
- Department : Upper department
Step 2. Click on the "OK" button.
Click the "Create" button in the User > User Group menu to add group.
Step 1. Enter group information.
- Name : Group's name
- Description: (Optional) Notes and additional information.
- Users : User to add to user group
Step 2. Click on the "OK" button.
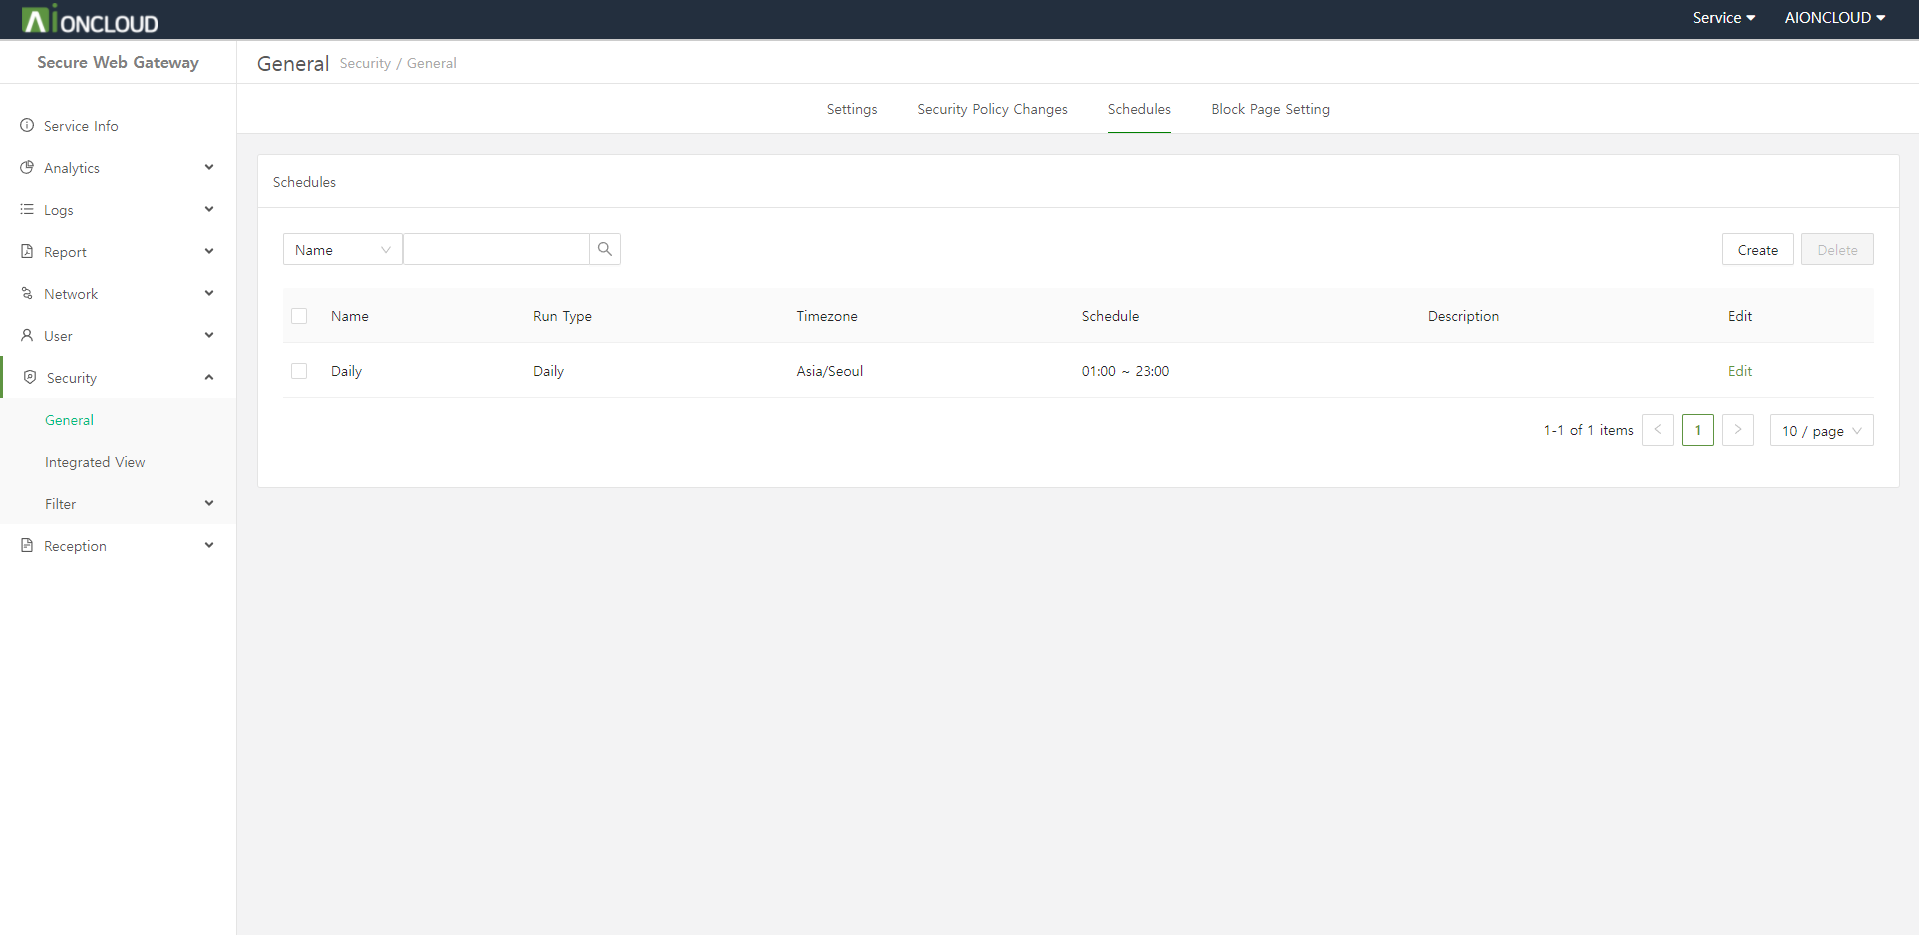
Using a schedule will block or bypass only during that schedule.
Click the "Create" button in Security > General menu to add schedule.
Step 1. Enter the schedule information.
- Name : Schedule's Name
- Run Type : Schedule repeat interval
- Timezone : Schedule time basis
- Schedule : Schedule period
- Description: (Optional) Notes and additional information.
Step 2. Click on the "OK" button.
The URL you set is available in the URL filter.
Click the "Create" button in the URL Filter > URLs tab of the Security > Filter > Web menu to add URL.
Step 1. Enter URL information.
- Name : URL's name
- URL : URL address
Step 2. Click on the "OK" button.
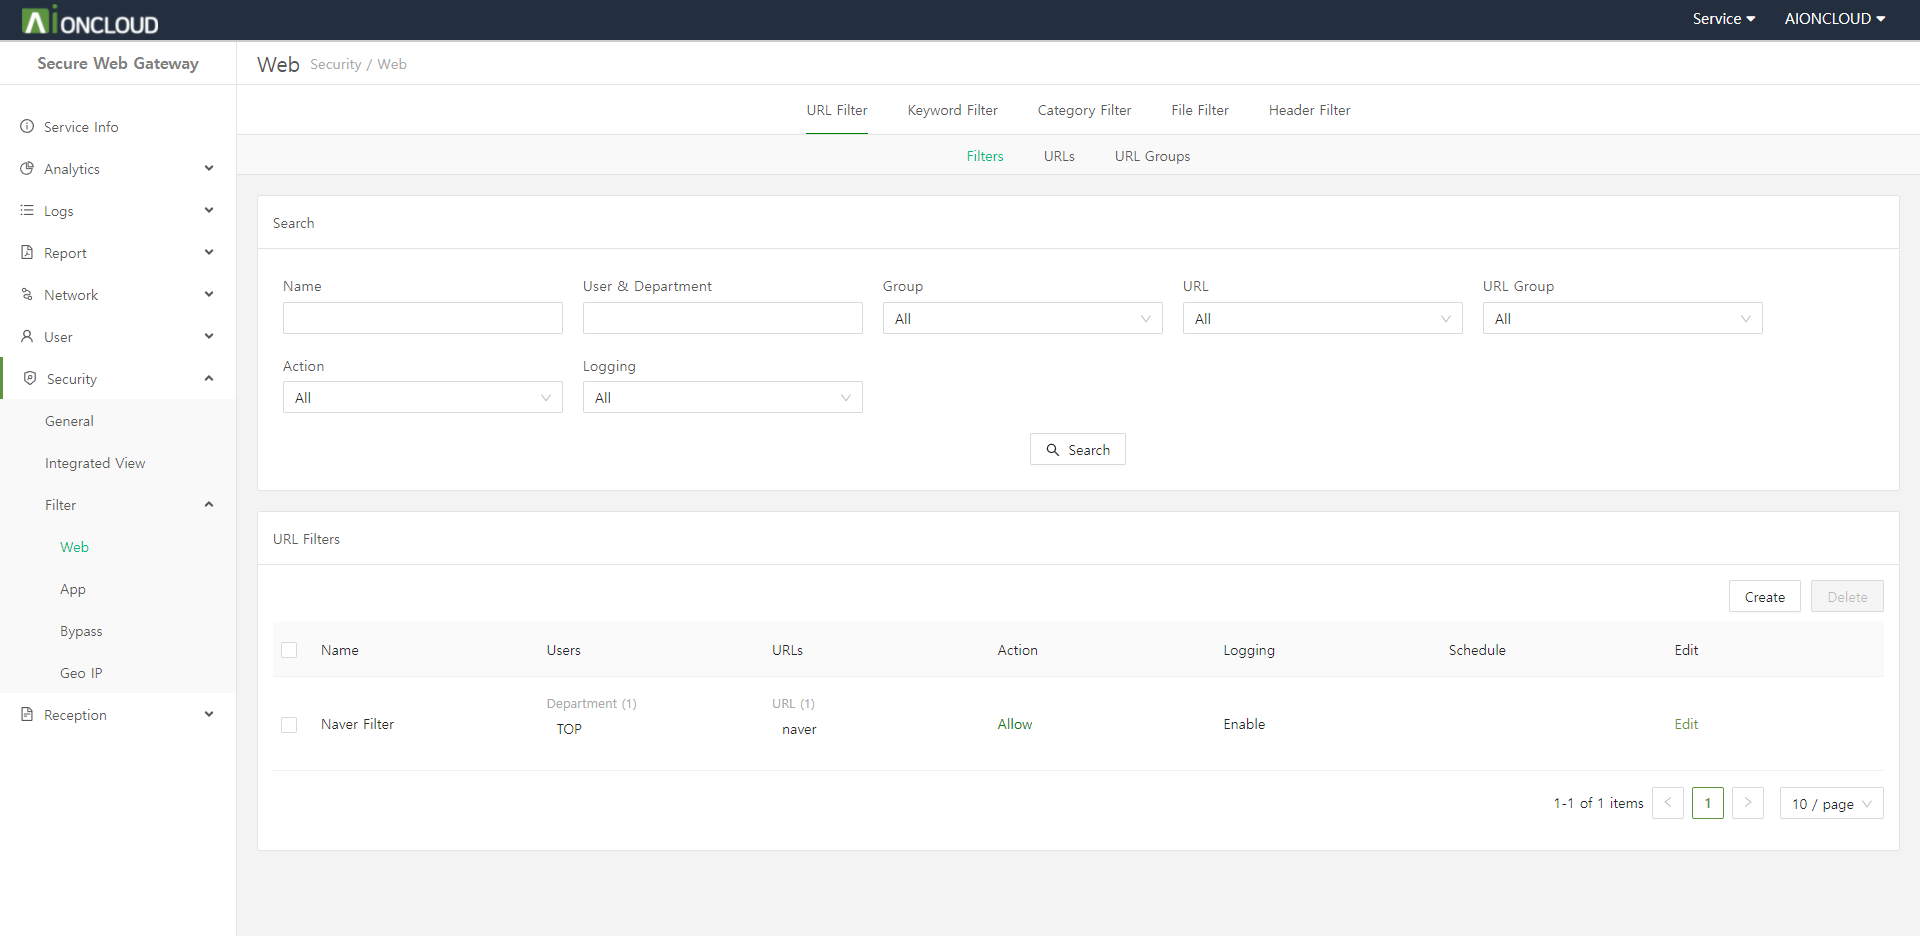
Click the "Create" button in the URL Filter > Filters tab of the Security > Filter > Web menu to add URL filter.
Step 1. Enter URL Filter information.
- Name : URL Filter's name
- User : Who to apply the URL filter to
- User Group : User group to apply URL filter to
- URLs : URLs to apply as a URL filter
- URL Group : A group of URLs to apply as a URL filter
- Schedule : How long to apply the URL filter
- Action : Whether to block/allow URLs
- Logging : Whether to log
Step 2. Click on the "OK" button.
The keyword you set is available in the keyword filter.
Click the "Create" button in the Keyword Filter > Keywords tab of the Security > Filter > Web menu to add keyword.
Step 1. Enter keyword information.
- Name : Keyword's name
- Keyword : keywords to detect
Step 2. Click on the "OK" button.
Click the "Create" button in the Keyword Filter > Filters tab of the Security > Filter > Web menu to add keyword filter.
Step 1. Enter keyword filter information.
- Name : Keyword filter's name
- User : Who to apply the keyword filter to
- User Group : User group to apply the keyword filter to
- Keyword : Keywords to apply as a keyword filter
- Keyword Group : A group of keywords to apply as a keyword filter
- Schedule : How long to apply the keyword filter
- Action : Whether to block/allow keywords
- Logging : Whether to log
Step 2. Click on the "OK" button.
Click the "Create" button in the Category Filter > Categories tab of the Security > Filter > Web menu to add user define category item.
Step 1. Enter user define category item information.
- Category : Category to add URL to
- URL : URL to add to category
Step 2. Click on the "OK" button.
Category filter is a menu that allows you to select whether to block or allow by selecting a specific category from 65 URL category areas, each classified according to URL characteristics.
Click the "Create" button in the Category Filter > Filters tab of the Security > Filter > Web menu to add category filter.
Step 1. Enter category filter information.
- Name : Category filter's name
- User : Who to apply the category filter to
- User Group : User groups to apply the category filter to
- Category : Category to apply as a category filter
- Category Group : Category group to apply as a category filter
- Schedule : How long to apply the category filter
- Action : Whether to block/allow categories
- Logging : Whether to log
Step 2. Click on the "OK" button.
Click the "Create" button in the File Filter > Files tab of the Security > Filter > Web menu to add file.
Step 1. Enter file information.
- Name : File's name
- Extension : The extension you set will be detected.
- Size : File's size
- Forgery : It will be detected if you change the extension.
Step 2. Click on the "OK" button.
Click the "Create" button in the File Filter > Filters tab of the Security > Filter > Web menu to add file filter.
Step 1. Enter file filter information.
- Name : File filter's name
- User : Who to apply the file filter to
- User Group : User group to apply the file filter to
- File : File to be applied as a file filter
- File Group : File group to apply as a file filter
- Schedule : How long to apply the file filter
- Action : Whether to block/allow files
- Logging : Whether to log
Step 2. Click on the "OK" button.
Click the "Create" button in the Header Filter > Headers tab of the Security > Filter > Web menu to add header.
Step 1. Enter header information.
- Name : Header's name
- Method : Method to detect
- Header : Header to detect
Step 2. Click on the "OK" button.
Click the "Create" button in the Header Filter > Filters tab of the Security > Filter > Web menu to add header filter.
Step 1. Enter header filter information.
- Name : Header filter's name
- User : Who to apply the header filter to
- User Group : User group to apply the header filter to
- Headers : Header to be applied as a header filter
- Header Group : Header group to apply as a header filter
- Schedule : How long to apply the header filter
- Action : Whether to block/allow headers
- Logging : Whether to log
Step 2. Click on the "OK" button.
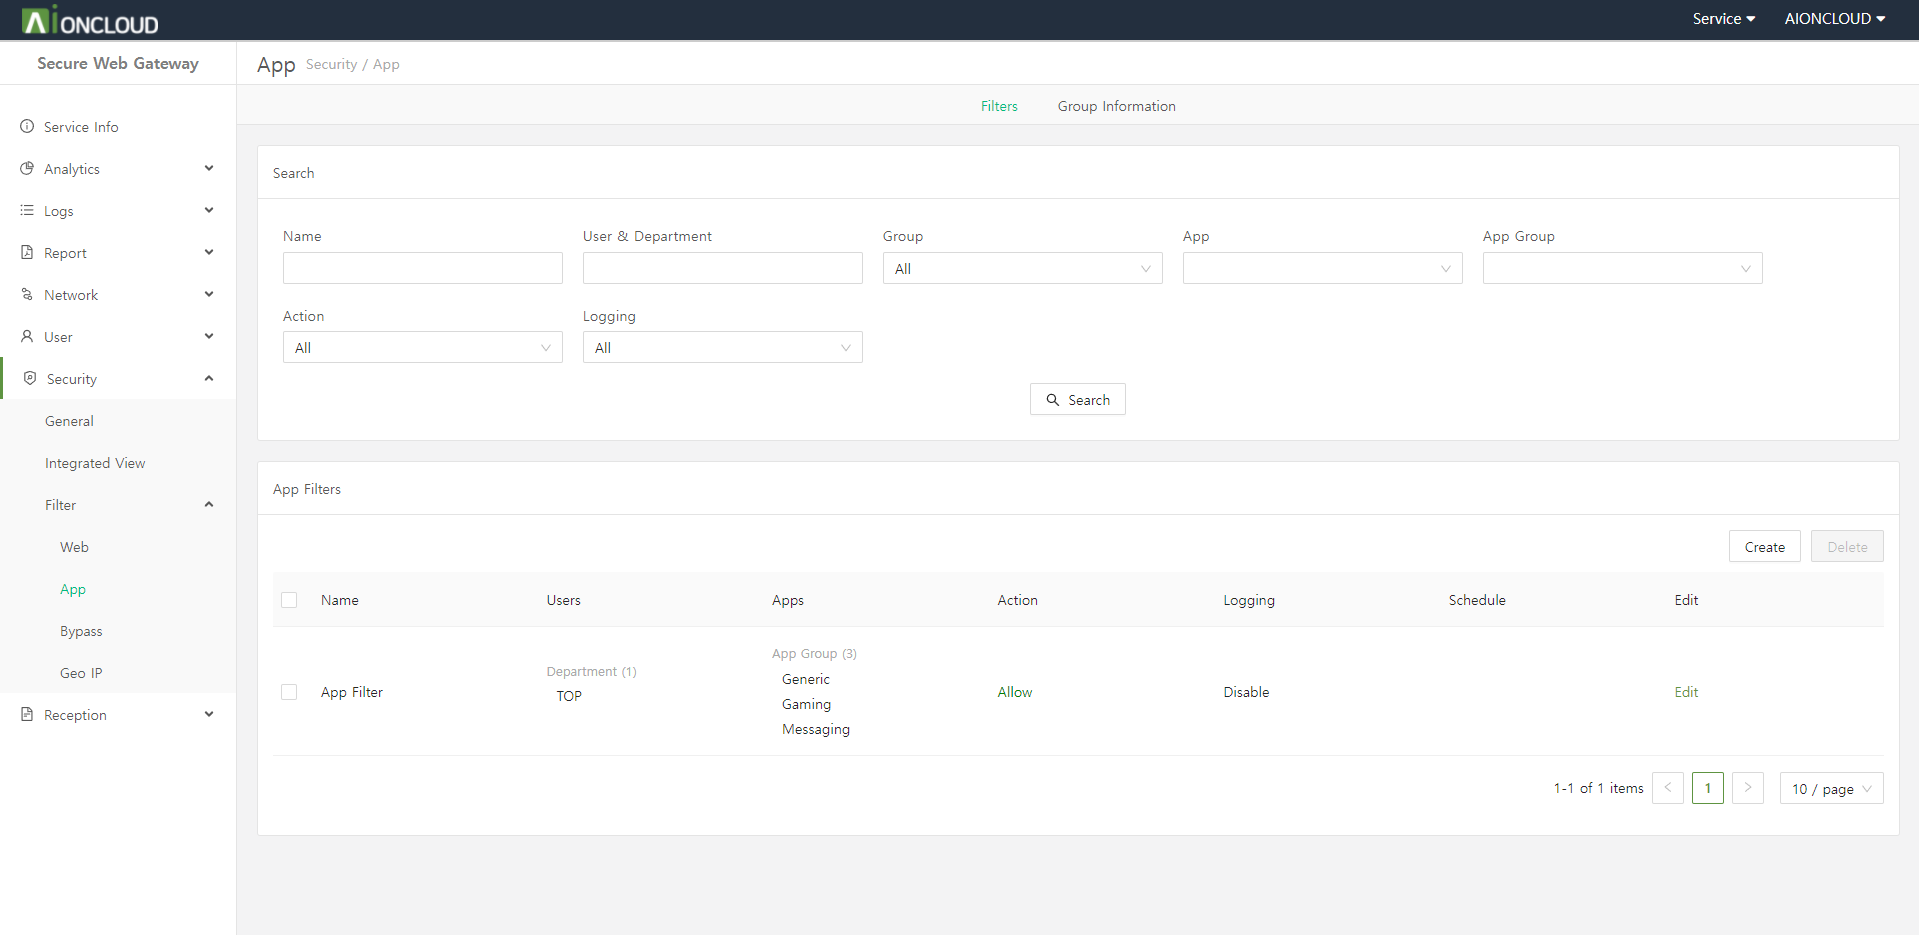
Click the "Create" button in the Filters tab of the Security > Filter > App menu to add app filter.
Step 1. Enter app filter information.
- Name : App Filter's name
- User : Who to apply the app filter to
- User Group : User group to apply the app filter to
- App : App to apply as an app filter
- App Group : App group to apply as an app filter
- Schedule: How long to apply the app filter
- Action : Whether to block/allow the app
- Logging : Whether to log
Step 2. Click on the "OK" button.
Click the "Create" button in the Filter tab of the Security > Filter > Bypass menu to add bypass filter.
Step 1. Enter bypass filter information.
- Name : Bypass filter's name
- User : Who to apply the bypass filter to
- User Group : User groups to apply the bypass filter to
- Host : Host to apply as a bypass filter
- IP : IP to apply as a bypass filter
- Logging : Whether to log
Step 2. Click on the "OK" button.
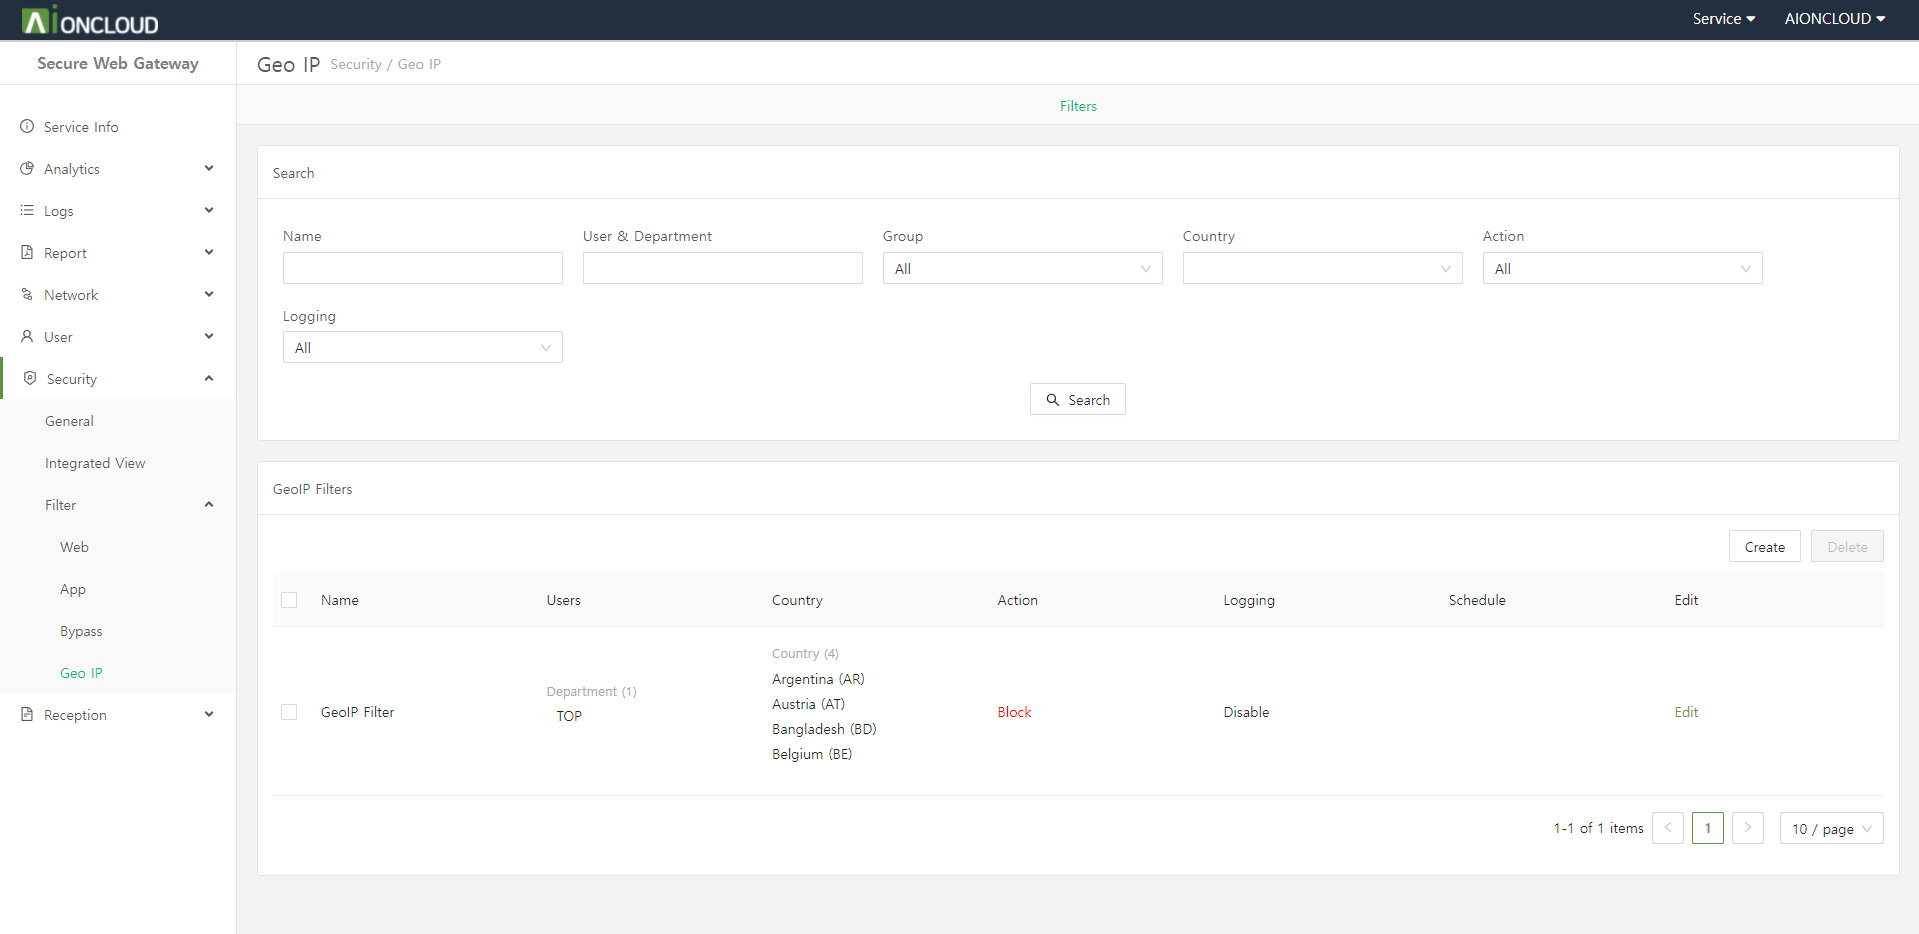
Click the "Create" button in the Filters tab of the Security > Filter > Geo IP menu to add geoip filter.
Step 1. Enter geoip filter information.
- Name : GeoIP Filter's name
- User : Who to apply the geoip filter to
- User Group : User group to apply the geoip filter to
- Country : Country to apply as an geoip filter
- Schedule: How long to apply the geoip filter
- Action : Whether to block/allow the IP
- Logging : Whether to log
Step 2. Click on the "OK" button.
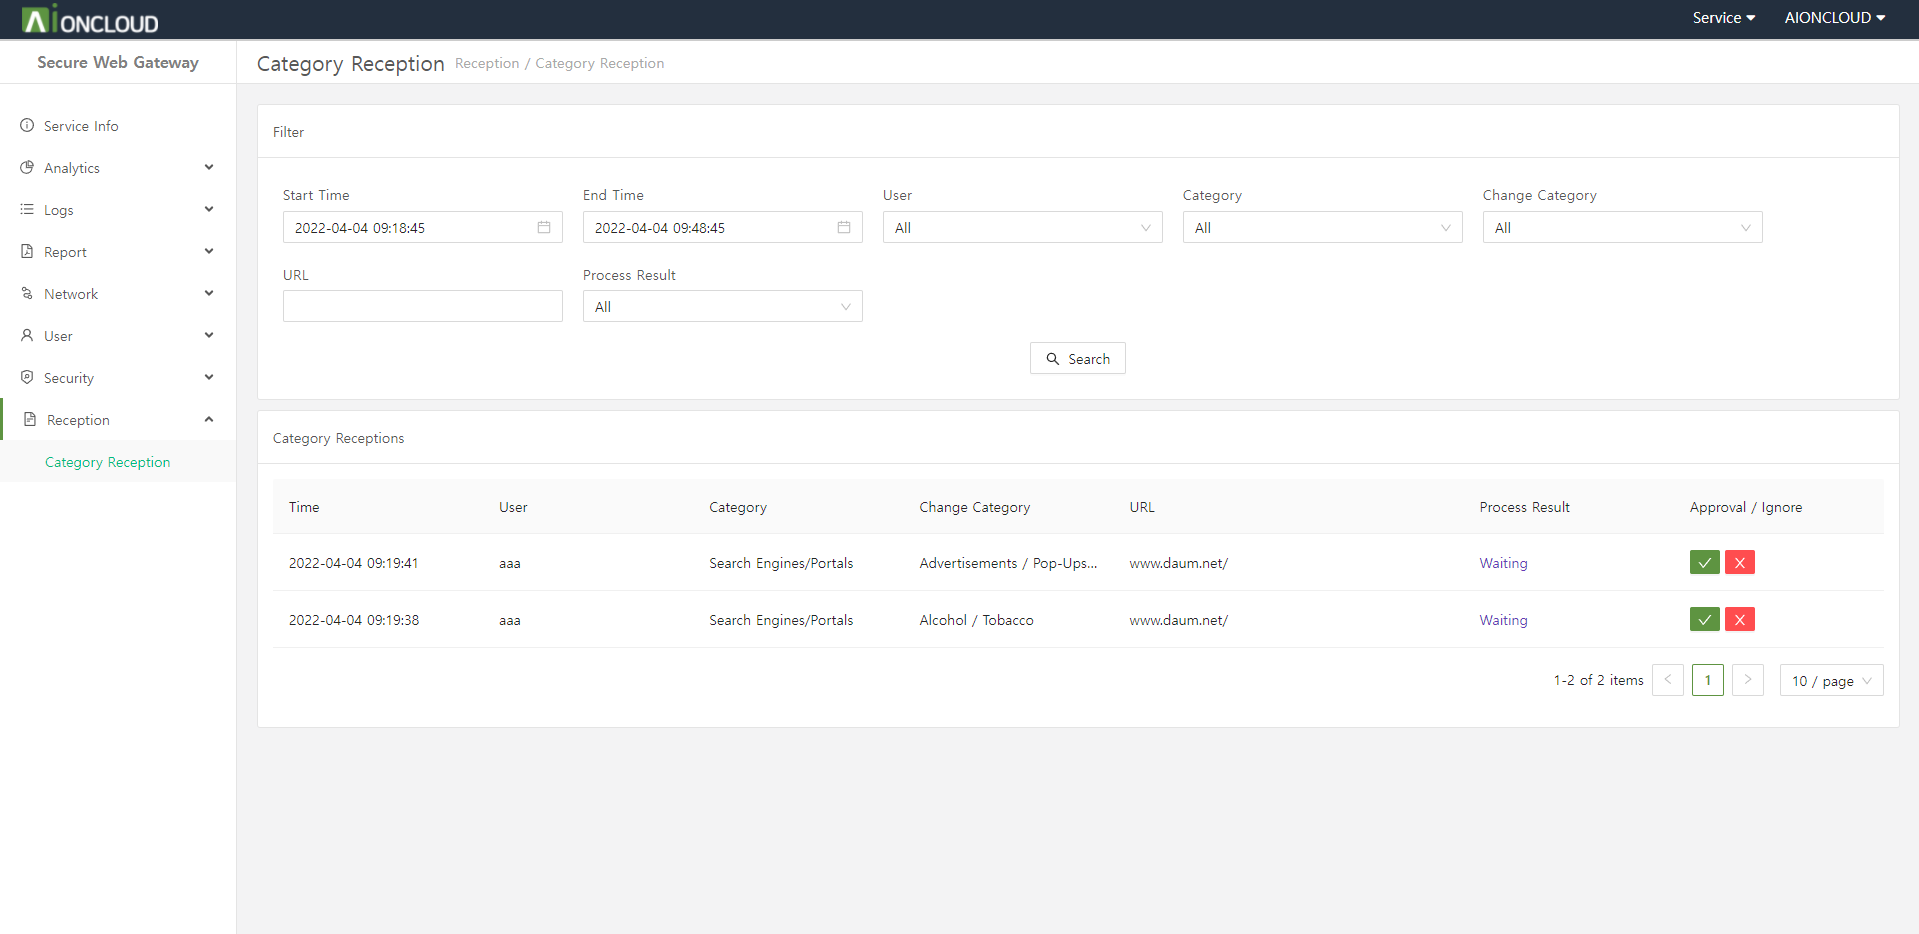
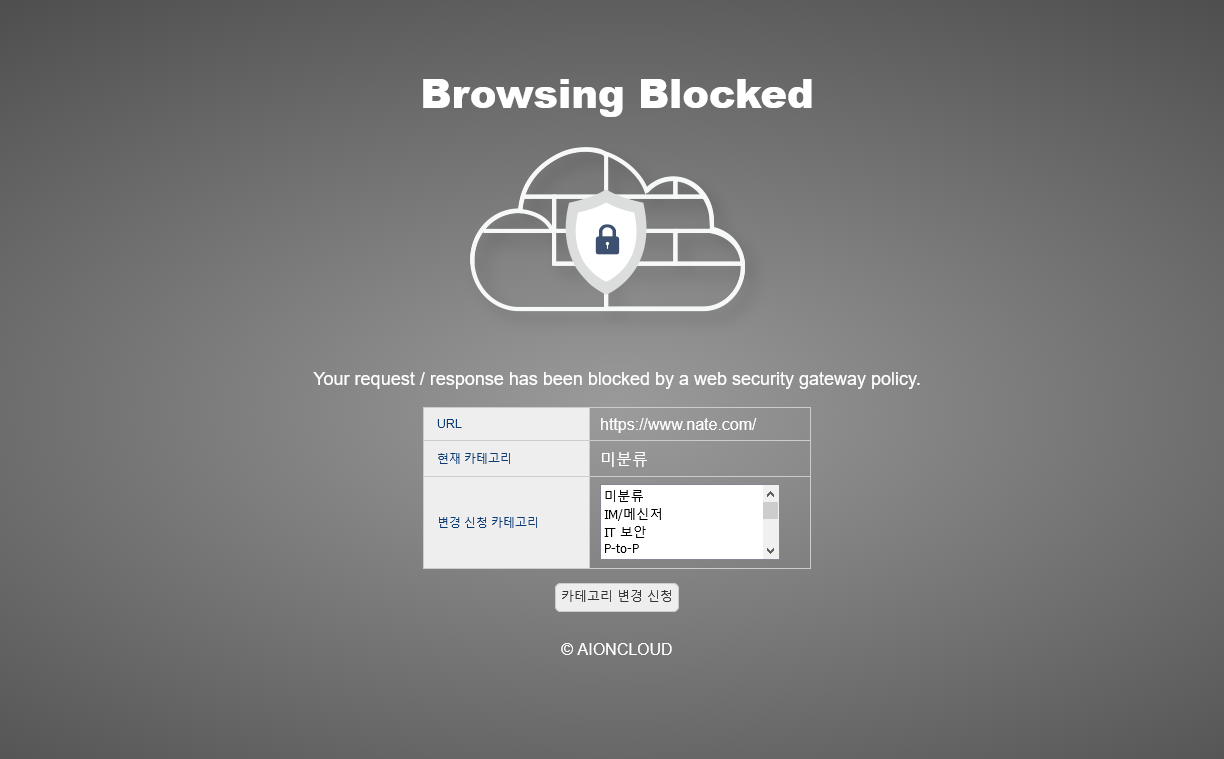
You can approve or ignore the category requested by the client to change. In the case of approval, it is exposed in the Category Filter > Category tab of the Security > Filter > Web menu, and is reclassified as a request category after policy application and detected/blocked.
You can see the category change reception request list.
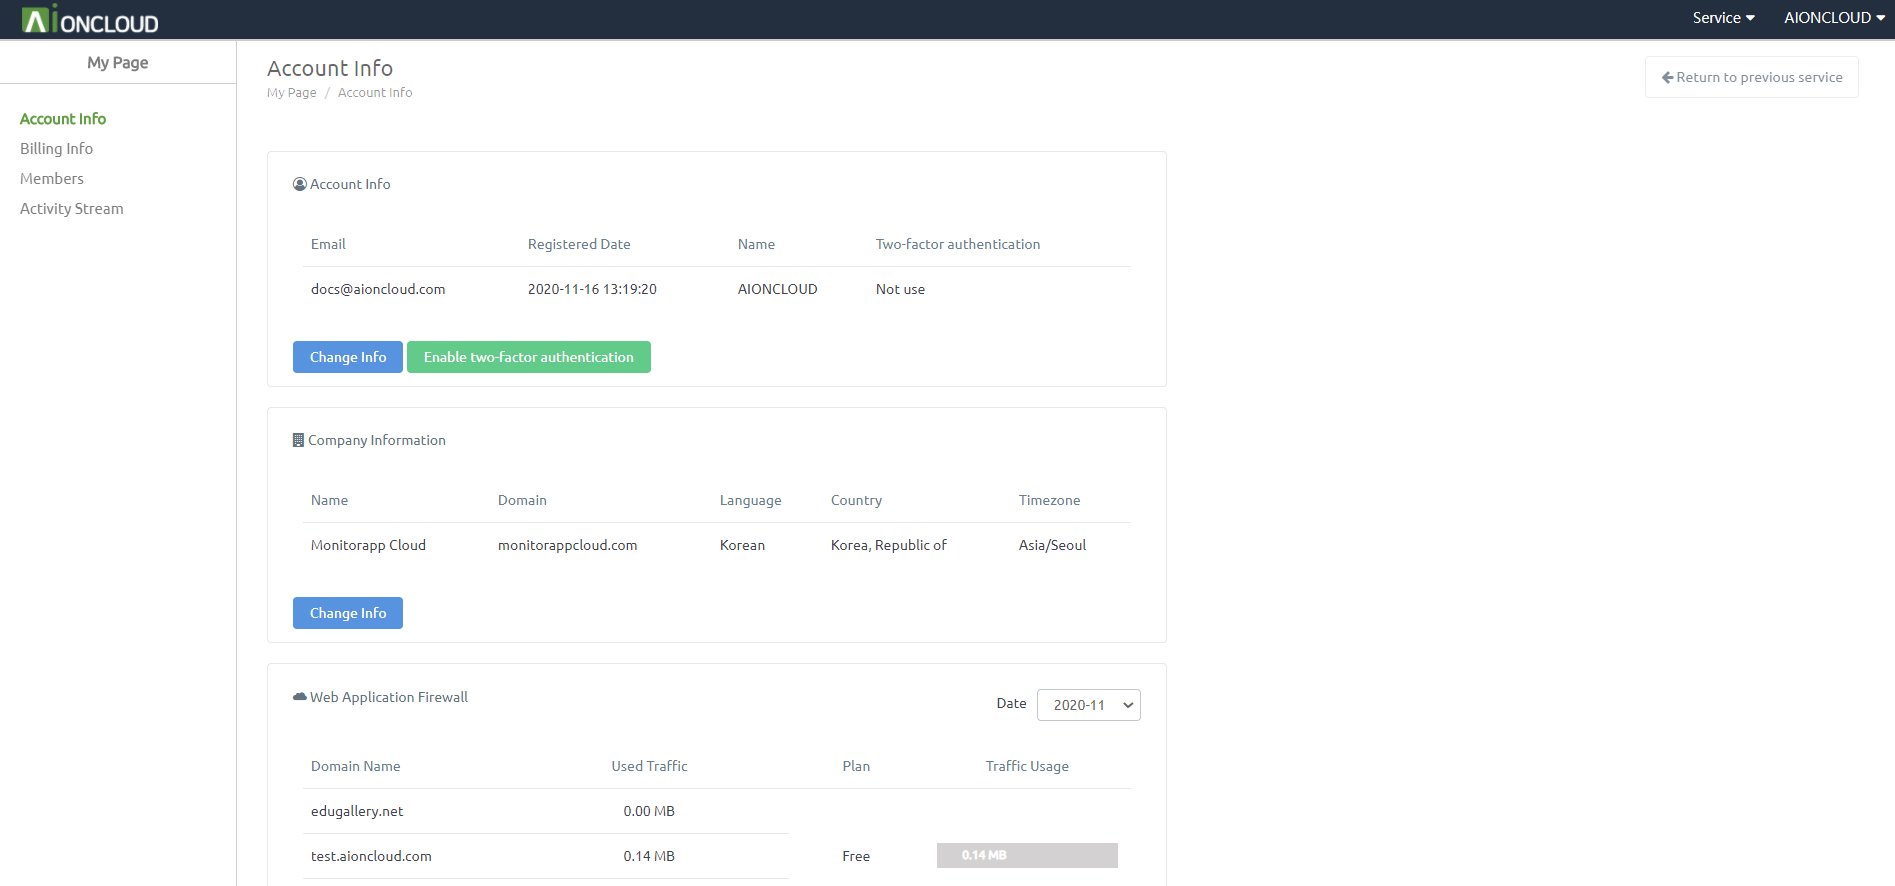
Account information can be checked in the 'My Page - Account Information' menu.
Account information is classified into 'account information', 'Web Application Firewall' and 'Website Malware Scanner'.
Account information can be checked in the 'My Page - Account Information' menu.
In 'Web Application Firewall', you can inquire about the status of domains registered in Web Application Firewall service and traffic usage by month.
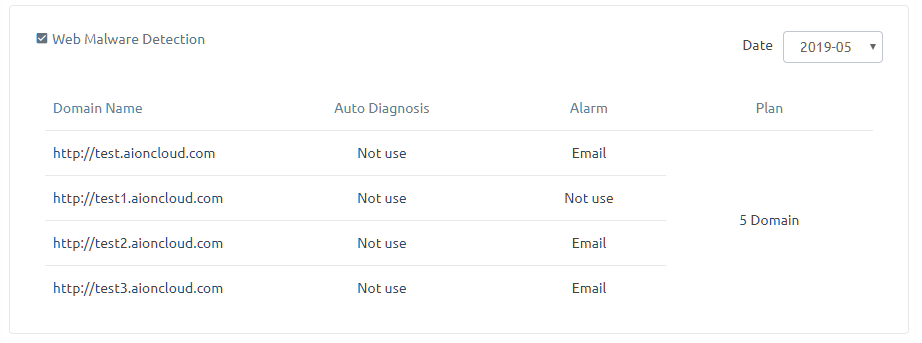
In 'Website Malware Scanner', you can view the setting information of sites registered in Website Malware Scanner service by month.
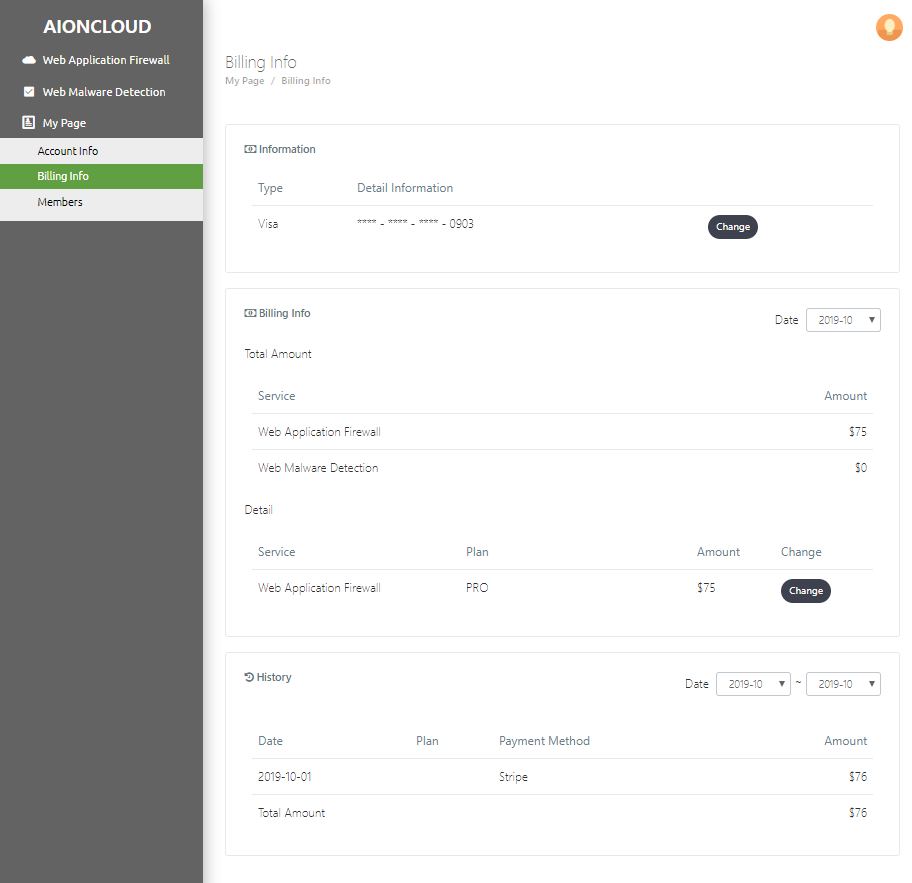
You can see your payment information in the "My Page - Billing information" menu.
You can check the current card information in the 'Information menu' and click 'Change' to modify the card information.
In 'Payment Information', you can check payment information based on service use and payment history by period. You can change the item by clicking 'Change'.
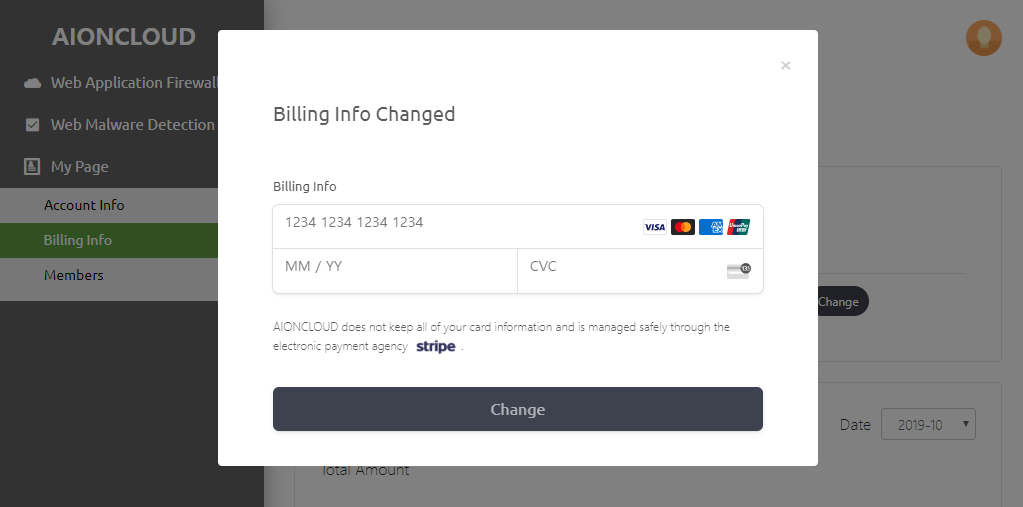
The card number can be modified in 'Change Payment Information'.
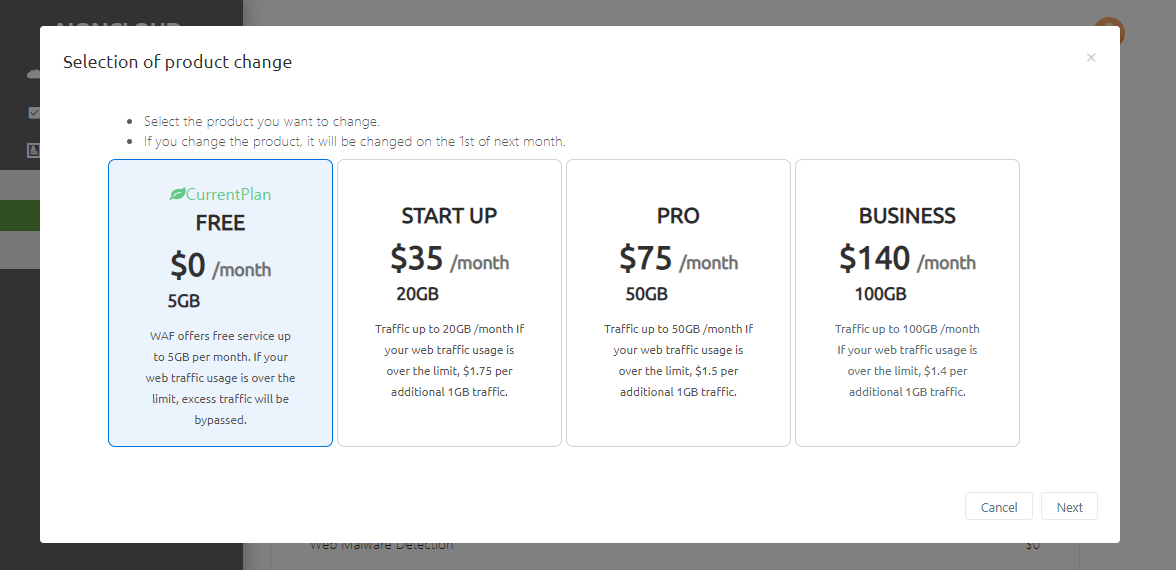
Items changed from 'Change Item Selection' will be applied on the 1st of next month.
If the current product is 'Free', you can change the item by entering the card information.
In 'Confirm product change', you can check the current and changed products. Pressing the 'Complete' button will complete the change reservation.
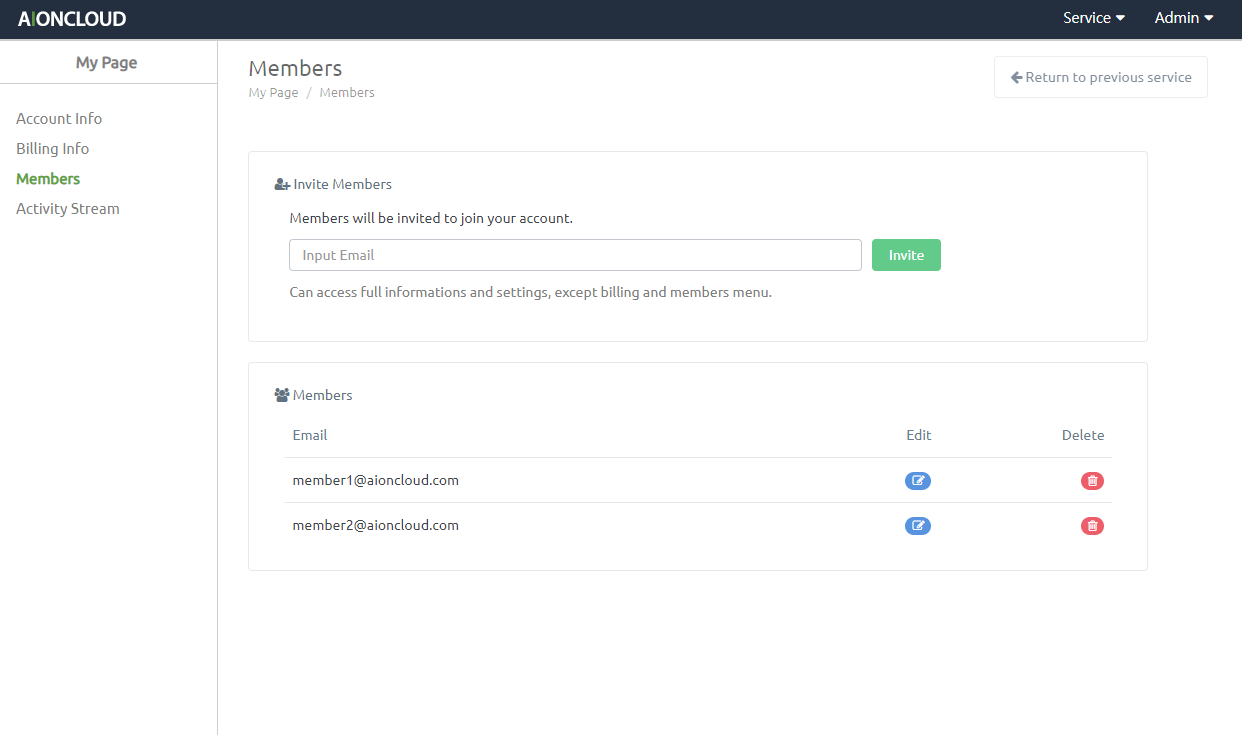
You can see your members information in the "My Page - Members" menu.
You can invite and manage members from the "Members" menu.
Enter the email you want to invite and click the "Invite" button. Password will be sent to the email of the invited member. The member shares your service data.
You can view a list of invited members. Clicking the 'Delete' button will delete the account.
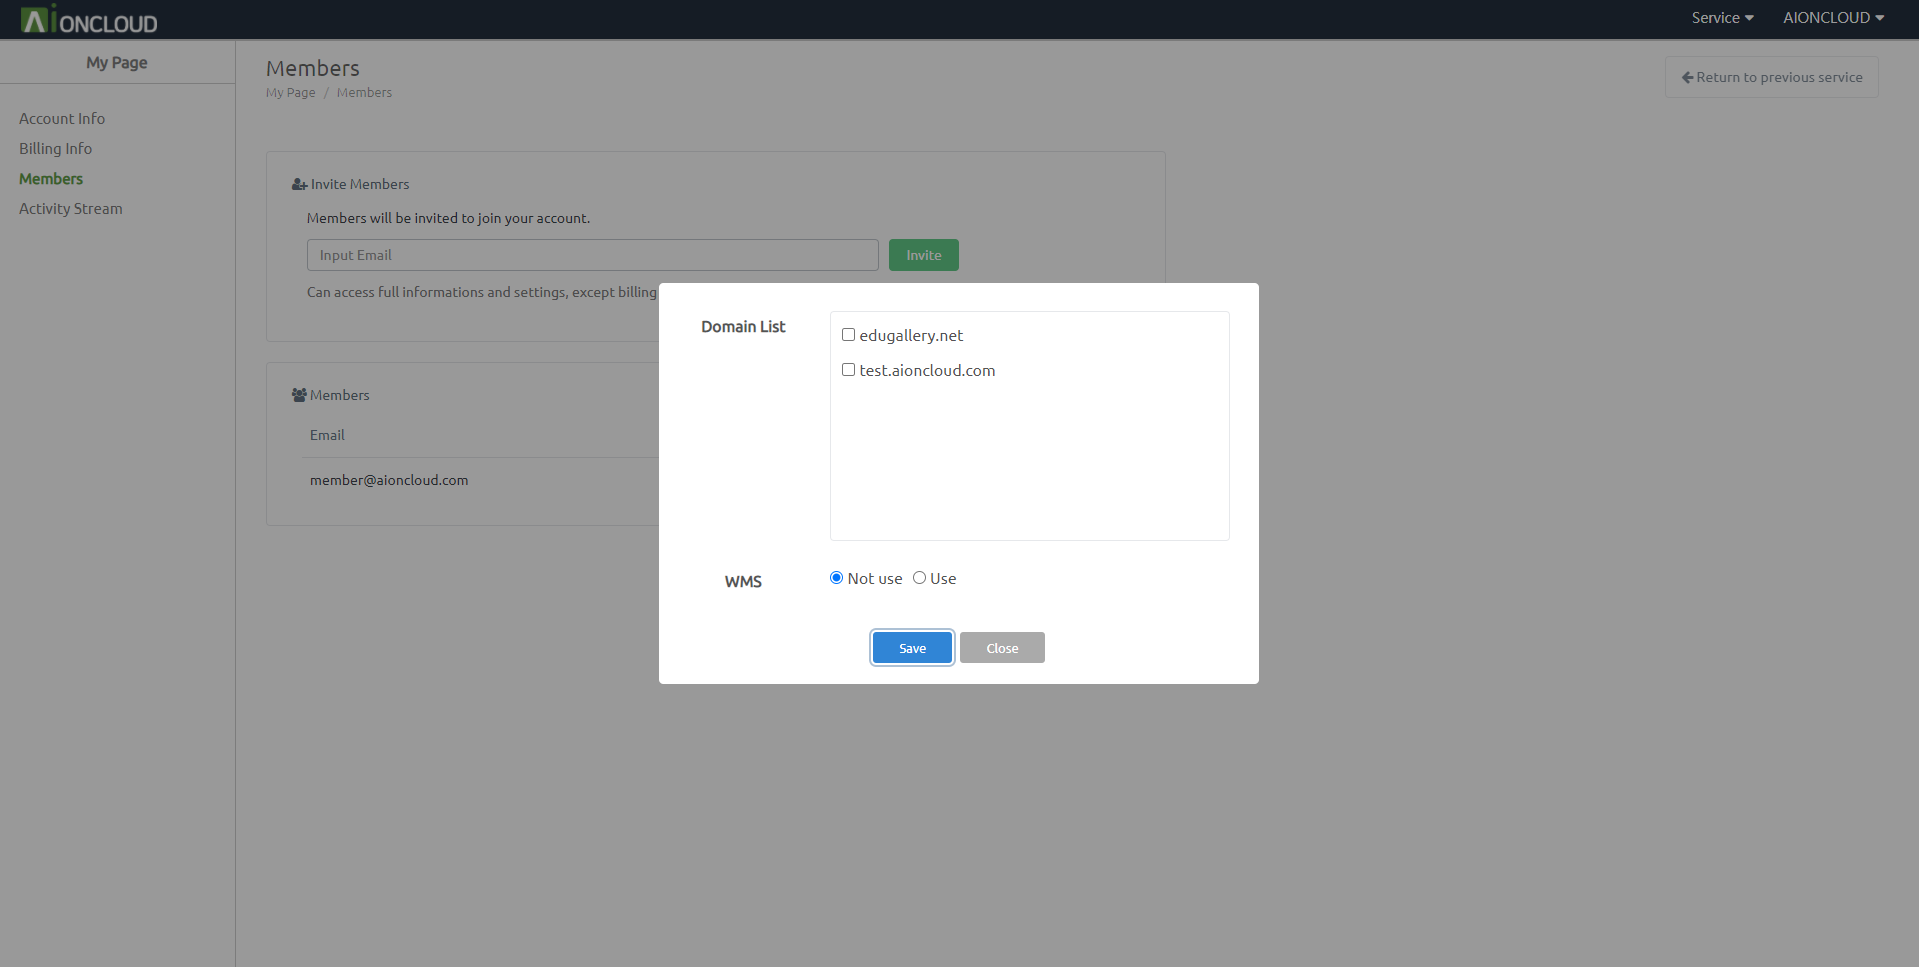
Clicking the 'Edit'' button will set permissions.
Can set domain management permissions
Can set whether to use the WMS service.
